Tuesday, April 30, 2013

For the Sake of Clarity

I've been turning my thoughts towards the class that I'll be teaching at Kelly Mehlers School in a few weeks. I thought it might be worth highlighting some recent thoughts and plans for the class.

Let's face it, there are enough chairs in the out there. I don't rush to the shop concerned that someone is lacking a place to sit. I go for the joy and challenge of making. For the most part, the chairs that I make leave my shop  and I am left pondering the next chair, my tools and my process. As I assume it is with most folks, it's about exploring the limits of my tools and my ability.
And as do most folks, I've looked for help. The magazines and books guided and inspired me, but in the end, I was left guessing whether my results were hitting the mark. The funny thing is, even after all these years, the desire to get more from my tools and process has only deepened.

A case in point just pulled up as I was writing this. My friend Scott came over last week and I helped him reshape his turning tools. This time he came over for a couple of chunks of maple to try them out on. He was remarking how excited he was to get back to the lathe now that his tools were better shaped. I know well the frustration he must have felt turning before.

In a broad sense, this is what the class at Kelly's is about. We will investigate the geometry and function of tools we have and ones that we are making to get the most out of our woodworking experience.Whether it's the holding power of our shave horse or the angle of the handles of our drawknives, we'll be  addressing our expectations head on.

One project that I am excited about is making adzes.
Tim Manney and I have turned our attention to designing a new adze.
Tim had great experience in Peru watching the folks use adzes and I've always made my own adzes, first for financial reasons and lately because I haven't been impressed by the ones available. And, oh yeah, did I mention financial reasons?

Grinding the Blade
We've been asking the basic question "What is a proper chairmakers adze and how does it work?" I've come up with a good prototype and Tim and I made up some variations hoping to advance the design and better understand its use. As expected, our initial efforts raised more questions than answers, but we have gotten some great results and are looking forward to the next versions. Greg is bringing along his forge and anvil to Kelly's so we can make some tools, including adzes and start at the beginning of our craft, the steel.
A Rough Prototype

On the process of chairmaking, we'll start with my basic goal as a chairmaker.
I don't want to make a chair, I want to make any chair. That means that I am not satisfied to have a single design, instead, I want a process that functions to bring to life whatever I can imagine. The Windsor technology is a perfect framework for this, as the limitations that it offers have led me to come up with some simple landmarks and techniques for connecting the dots.
Chairs can be mysterious, even to experienced makers, but I think that with a little focus on design and process, you can understand the variables and their meaning.
A Chair Near Completion
I won't ramble on any more, suffice it to say, this is going to be an exciting week and I hope to see you there.


Friday, April 26, 2013

Dialing it In


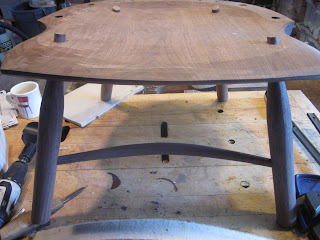
I successfully used the new rocker routing fixture to cut the slots in the walnut chair that I am finishing up.

I suppose that a quick word is in order about my reasons for going to the trouble of building this tool. While I enjoy doing many things with hands tools, because they give me lots of control, freedom and results that machines can't match, when it comes to rockers, I have a different priority.
Designing and building rockers is a process full of variables. To rock successfully, rockers must be oriented to each other and the chair correctly. Any variation in the process of cutting the slots and fitting the rockers can make it difficult to refine the design. Also, the references used to locate the slots can greatly affect the consistency from chair to chair.
What this fixture does, is create repeatable and consistent rocker slots based on references that allow me to focus on the other variables that go into making a rocker.  For me, nailing down the relationship between the seat and the rockers is the next step towards a deeper understanding and freedom in rocking chair design.

I am going to show some photos here, and hopefully you can see that while it has some adjustable parts, the fixture is simple and does a simple job. The photo below shows one the primary advantages of the fixture, which is that the two platforms are automatically parallel to each other which insures that the slots are as well.
Here are the slots already routed. The straight edge lies dead flat against the inside of the slot on both legs.

 Another variable that the fixture addresses is the different splay of the legs. You can see this in the photo below if you look closely.
The slot on the leg in the foreground is slightly tilted off the axis of the leg. You can especially notice this if you compare the half circle shaped material remaining at the bottom of the leg. The slot in the leg in the background does the same thing, but in the opposite direction. The reason for this is that the slots must be oriented to split the difference between the splay of the front and rear legs.
Most importantly, the slot is in the center of each leg at the deepest point, for strength. The jig does this automatically. I'll explain how it does this later, but for now, I just want to point out the variables.
The process follows these steps.
First, I measure the splay of the front and rear legs, in this case 13 degrees for the front and 19 for the rear, which gives me an average of 16 degrees. I pivot the central panel to 16 degrees, push the chair up against the jig and position the two platforms. Then I route the slots.
Next, I swing the pivoting panel the opposite direction (16 degrees again), with the platforms still fixed, reposition the chair, and route the other legs.
Using the fixture was a breeze and so many of the troublesome layout and fitting issues that I've always encountered were either eliminated or greatly simplified.

Above, you can see how I measure the slot angles to transfer to my rocker pattern. If all is right, there is no fiddling around or fitting and I can repeat the results on the next chair. I will be shooting video of the process, but I think that introducing the variable over a few posts might make it all more understandable.

Tuesday, April 23, 2013

Rocker Jig Progress

I found a place to buy 3/4" baltic birch plywood and started working out the design of the rocker fixture. Here are the results so far.
I've eliminated the base that I used in Australia, opting to use the bench and a couple of clamps. It makes the jig much smaller and easier to store. I'll go into more of the details as it comes to fruit.
As you can see, the central panel swings both directions so that the platforms on the top can be set once in the process. If you aren't familiar with original, you might understand it once I shoot the videos.
Here are the platforms that the router runs on. If you click on the images, you can see them larger.

Just a few slots and hardware to make the platforms adjustable and I'll be ready to route. It's almost worth all the splinters... almost.

Monday, April 22, 2013

A View Inside

I would love to pretend that ideas and plans come out of my head like a finished Sketchup drawing, but alas, it's more like the tray on a highchair after a spaghetti dinner.
I show this to announce that I am finally building the next version of the rocker fixture that was so successful on my trip to Australia last year and to show off my new camera. That's right, I've moved out of the point and click and back into my art school photo phase. I'll be using my new camera to shoot high def video of the jig building and use. I'm very excited to have this fixture in the shop, not only will it make mounting rockers easier, but more importantly, they will be exactly consistent from chair to chair, which means that I'll be able to focus on refining them even more.
Here is the view that my wife has seen ever since I got the camera (an Olympus E-m5). Besides grunting for food, all I've talked about for 3 days is the features of this camera, charming, I'm sure.

Thursday, April 18, 2013

Unambiguous

Making shapes in wood is what got me into furniture making. I recall seeing the sculptural curves in Sam Maloofs work and coveting his job. Don't worry, I won't be drawing any comparisons between what we do except to say that there is a lesson that I drew from looking at his results, and the results present in so many Windsors.
The basic idea is simple, each shape should have a geometric logic within itself and a sense of tension with the other pieces that it joins to. Without this, parts and entire pieces of furniture look "ooey gooey", like they are melting or have worn slack.
I have a few techniques that I use to help create the logic within a piece. Mostly, they involve following a series of geometric shapes as inbetween steps so that the final shape has a hidden framework that helps define it.

I was thinking about this today while shaping the curved stretchers for a rocker that I am finishing. I had some issues when bending the stretchers turned to their final shape, the tapers had too much runout and cracked. So I turned the piece at a cylinder and bent it. The bend went fine, but then it was up to me to carve the tapers.
As you can see, I shaved the round part into an octagon. Round is a time consuming and difficult shape to adjust and fair. When I have to remove a bunch of wood, I usually revert to the octagon, which makes it very simple. I just keep working on each facet until the taper of the facet is pleasing and matches the other 7. Then round is an easy step away. Note the felt on the bending form. It took a negative impression of the stretcher and left the surface of the walnut round and uncompressed.
Here is another shot of the stretcher, and yes, I can finally work outside.
Here is is inside the chair. I like the way that the stretcher "pushes" against the legs and echoes the curves of the rockers. The only issue is my every worsening reaction to the walnut, which might make this my last project with this great wood. But of course, never say never.


Tuesday, April 16, 2013

Port Townsend


I've been privileged to teach in a lot of places, but I would seriously be hard pressed to recall one as naturally beautiful and fun as Port Townsend. Obviously it isn't in my neighborhood, actually, it's almost as far as you can get in the lower 48, but I will definitely be returning.


Here are a few shots that I took while wandering around the town.
There a lots of lovely old Victorians and gardens pop up everywhere.


On clear days, you could see snow capped mountains across the Sound. But alas, my ailing camera couldn't capture them.
The school itself is located in Fort Worden State Park which has a huge array of cool old buildings that all sorts of businesses and schools.
The building that houses the school is small, but highly functional.
As a matter of fact, I found something there that I've never seen. Tim Lawson, Jim Tolpin and John Marckworth have equipped the shop with the full sets of sharpened, yes sharpened hand tools for each student. It was a pleasure to reach for a chisel or plane to find it in top working order.

And the photos above only show the shelves. Each bench has a full set of layout tools and just about everything you need. They even had an array of drawknives and spokeshaves. I wish we had talked more before I went or I wouldn't have shipped my froe out there, they had plenty.

Here is Tim warming up while we built the kiln on Sunday before the class.
And here are the students shaving away. They recently built the shavehorses and they performed beautifully. I love it when the students work on good shavehorses because the quickly come to appreciate how efficient they are.
By day 6 we had all of the chairs assembled, and I was very pleased with the quality that the students achieved.

The last item worth mentioning is the food. Everywhere I went there was a new place to get great coffee, food or beer, my kind of town. I've discussed returning with Tim and have already started plotting to get Sue out there for a well deserved vacation.


Friday, April 5, 2013

One Heck of a Link

I was reading Caleb James blog and realized that I had to post about it. Looking at his latest entries, it's easy to see the breadth of his abilities and generosity. Not only has he recently completed the plans for Curtis' comb back, which are available here, but he is offering free plans for moulding planes and sharing some brilliant shop jigs. I love watching his development and am positive that it will go on and on. Keep it up Caleb!

Curtis Buchanan's Signature Comb Back

A quick word about Curtis' videos and plans. Curtis has been a friend for many years and he greatly influenced my decision to offer my experience in an open format and so it was no surprise when he started offering his in his videos. Now that he has created a package of videos and plans, I'd encourage you to support him, knowing that he is working to find a way to balance making his living with openly offering his knowledge. A success with this effort will lead him to do more videos, which will benefit you, me and chairmaking enthusiasts for years to come.

Wednesday, April 3, 2013

Spring Report

From my lack of posting lately, you have probably surmised that it's been a busy couple of months. I have been working to wrap up projects, some new tools, some new techniques and of course some classes. I've been teaching weekends at the North Bennet Street school in Boston. After their initial taste of chairmaking from Dan Faia and Elia Bizzarri, some of the students decided to bring me in to teach some other designs. It's a fun place to teach with lots of talent and energy.

But as with all things in this world, choices must be made and consequences endured, so my maple syrup season has been whittled down to a couple of days of running out to the rig to check the fire, while tending to other business. It's the exact opposite of the way it is meant to be, which is an excuse to hang out outside for 8 hours tending a fire and watching the spring arrive. But, I needed to do it, even if it wasn't the ambling joy of burning wood and time together.

But that said, my efforts last season to improve my rig worked great and I was able to get more than a gallon each day that I boiled. Enough for me and my helpers.
Speaking of helpers, he are pics of Dan and Tim helping me split out parts for a class that I am teaching next week at the Port Townsend School of Woodworking in Washington state.


I am excited to go to the northwest, I haven't been there in 20 years. This is my first time teaching there and I am excited to be expanding to the west. There is one spot open if you are interested.


I forgot how much work it is to prep an entire classes worth of material. I've never missed Greg so much.

I did finally get a chance to paint the "glueless" chair. It hasn't fallen apart yet!
I have been experimenting with some new paint and new techniques and am excited to share the results. I have some more testing to do, but I think that I might be on track to the fool proof finishing that we all want (especially this fool).

I set out to paint the chair blue, and I did, but the layering, and shellac (hint) shifted the color to the green
In case you missed it, check out Jameel's blog over at Benchcrafted.
 
He made his "smarthead" shavehorse and made some updates and additions to the plans. It boggles my mind how pretty he makes everything. I wonder if his sock drawer is a mess.
I am getting very excited for the class at Kelly Mehler's where we will be building this project as well as forging blades, getting down and dirty with our tools and as always, having a ball.
Happy Spring!