Showing posts with label Power Tools. Show all posts

Monday, September 8, 2014

The Drill Bits are Here!

It's taken a while, but I'm happy to announce that we are now taking orders for sets of chairmakers long spur brad point drill bits. Charlie Ryland came here last February straight from North Bennet Street. We talked about his making drill bits, but quickly became mired in all sorts of other projects. But lately Charlie jumped in and started grinding away.

Just as with Claire and the travishers and Tim with the reamers and adzes, he has advanced the bits beyond what I was doing with them. By making some slight alterations to the dressing of the wheel, he's managed to make a bit that lets you know when it is about to poke through the other side of the workpiece. The lead spur is slightly wider at the base and the change in pressure as it comes through is perceptible.

If you aren't familiar with the abilities of these bits, I will be making a video when we get back from North Carolina. The geometry of these bits is helpful in getting clean entry and exits holes as well as drilling at angles,  making them great for making chairs. Plus, seeing a ribbon like shaving pour out of the hole proves that drill bits really are woodworking tools, deserving of attention and respect just like a plane or chisel.


The bits are available in sets of 5 as shown for $110 plus $10 for shipping. They are made from American made High Speed Steel and include 5/8", 1/2", 7/16", 3/8" and 11/32".
The larger bits require a drill with a 1/2" chuck.

Charlie will have some sets available for purchase at WIA and is accepting orders at rylandwoodworking@gmail.com. And of course, feel free to contact me directly if you have any questions, peter@petergalbertchairmaker.com

Sunday, February 17, 2013

The Connection


Moving from our New York homestead was a trying and painful process, but in the end, I can honestly say that I am content in the knowledge that it was the right move, and a move up. The one lingering pang has been the loss of my longtime connection to my sawyer. He was always helpful and reasonable when it came to getting me my logs. Since the move, I've floundered a bit on this count and scraped by with what I could find locally... until now.
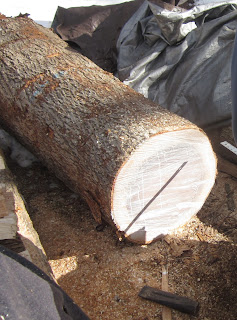
Thanks to my friend Bill Doe, I've found a local logger who has the good sense to set aside the best logs for furniture making and while he generally ships them to Canada, he's graciously agreed to sell some to me. The hickory log in the picture above is a lovely example of his work.
Here is Tim Manney splitting up billets for reamers. He got 165 blanks out of 1/2 of the log!
I know that many folks out there are suffering the same problems finding green wood and my sympathy is with you. There are folks who sell splits of different species, such as Elia Bizzarri and Nick Cicchinelli and perhaps this new connection will help a local friend to start up another venue for getting the right material to the right folks. I'll keep you posted.

Thursday, May 17, 2012

Sharp!

I've been working on a continuous arm settee and as I've been reaching for tools, I've been using my "sanding flap" wheel on the backs to help hollow them out for sharpening.  Today, I was finishing the cutout on the side of the seat, shown above, and figured it was a good time to take one of my favorite knives off the wall and give it a once over.

This cut is tricky on a regular seat, and even more so on a settee because the cove is all endgrain. Nothing but the sharpest knife will do.

So I got out my angle grinder (you have bought one, right!?) and went to work on the back of the drawknife. The knife that I use for this is very special. It doesn't have much steel left on it and I don't grind a bevel on it. Instead, I round the front (which rides in the cut) and flatten the back. Of course, a rounded front is very hard to sharpen because of the difficulty honing it. So the back is where the action is.

By flattening the back and honing it until a burr turns to the front, I get a great edge. I run through all of the stones on the back and only touch the front to the final stone and strop it lightly. I don't strop the back because I want it perfectly flat. With the hollowing help of the grinder, I got the thing sharper than I've ever had it and the cove on the seat was a breeze!
Click on the image for a closer look

Since I've been reforming my tools, I've picked up a new habit that I'm ashamed to say I didn't years ago. I've started oiling all of my edge tools with camelia oil before stowing them. It may seem like a little thing, but rust never sleeps and a sharp edge is a tiny place, easily affected.


Now I take the tool off the rack and give it a quick rub with a paper towel and let it sing.


Here is the settee, all legged up.

Since spring has sprung, I have been enjoying all the work that the previous owners of our house put into their gardens. Here is a rhododendron outside my shop window.


Great stuff, but poison to goats, so watch out.


Thursday, May 10, 2012

New Wood and Travisher Update


Recently, my friend Dan Monsees and I went to his parents land and cut down a bunch of trees. Roz and Pete were incredibly generous and lined up all of the hauling and sawing apparatus. Having moved to a new area and losing my decade long sawyer connection, this was a great gift.


We used a Timber King bandsaw (which my friends in Australia import as well) to mill the walnut, maple and oak.

The walnut is one type of wood that I always have sawn, but coming across a supply that hasn't been run through the kiln is tough. Some of the boards are wide enough for one piece seats!!
The oak, I had sawn for rockers and the parts of my "Crested Rocker" that are more easily handled dry, such as the arms.

The real surprise was when we took down the maples. They were curly through and through. Which is not my choice for chairs (I know, it's a personal preference but I find curly chairs a bit too intense) but for tool making and flat work, it's great stuff.


But the maple trees had one more surprise, they were further colored by Ambrosia beetles. You can see the telltale color on the endgrain.

And what a sight when they were sawn!


I wouldn't use this wood in chairs, so I was a bit confused about how to saw it. I had a variety of boards made, mainly for table tops and legs. Some will definitely end up in travishers when it's dry.

On the travisher note. I have received many more orders than I anticipated and it pushed me to engage a machinist to mill the metal parts for better speed and consistency. I also bought a gas forge for more control over the heat treating process. But this has pushed my output back a bit. I hope to be fillng orders in the next couple of weeks and to have all the orders filled as soon as possible. Thanks for your patience.

Thursday, April 12, 2012

A Smooth Back

For year, I resisted the urge to buy an angle grinder. It just seemed like such a crude tool. But then I looked at the mushrooming of my wedges, basically shrapnel in waiting, and decided to take the plunge. Just like with my buffer, I feel foolish for having waited so long. I keep finding great uses for this tool.


A while back, I saw these "Flap" wheels for the angle grinder at the store and thought that they might come in handy. When I was teaching at Kelly's last week, Roger Clark told me that he'd had great luck using these to sharpen his mower blades. Roger brought one in, but the mower had taken it's toll and it didn't work on the hardened steel we were working with. Always willing to take a $5 bet, I picked up a new one yesterday, and the results are fantastic.


I've been using regular grinding and cutting wheels on the angle grinder to knock down high spots on the back of drawknives while flattening, and it's proven to be faster and more controllable than I had expected. But the smooth action of the flap wheels and ease of control is far superior.

I haven't met the craftsman yet who lives for flattening the back of tools, but honestly, I'm having to control myself from wanting to grab all my knives of the rack and make them this lovely. Well done Roger!

Wednesday, April 11, 2012

Survivor Tool Chest

No, this isn't about a bookmatched, dovetailed toolchest with 50 compartments and inlay in the shape of a drawknife, although I dream of having one!
I have often been asked about the tools required to make a chair, and since I travel so much these days, it's become evident, and imperative that I figure out the necessities in my shop. One of the joys of chairmaking is the limited tool list, and in the cauldron of the classroom, I've refined this list and thought you might like to see it. There are a few things that are specific to my personal techniques, but in general, this list could get you sitting pretty after a shipwreck (on an island with ring porous hardwoods!)
EDIT: Obviously, this isn't a real survivor list, which would be just a few tools, but a list of the tools that come into use in my everyday shop experience, although, all of these tools do basically fit in a toolbag. Now if I could just get Hoadley to publish a version of his book that doubles as a floatation device!

Turning


Roughing Gouge


1 in gouge


Skew


Parting tool


Tenoners ½, 7/16, 3/8,5/8


Tenon jig that sits on lathe bed for sighting tenon angle

Galbert Caliper


Sizing Tool


Spindle gouge


2MT jacobs chuck and key


steady rest


cclamps


Shaving


Drawknives


Spokeshaves


marking guage


Bead Scraper


Books


Hoadley


Alexander


Sloane


Langsner


Underhill


Santori


Carving


Adze


Travisher


Inshave


Gutter carver


Tenon trimming gouges


Flush cut saws


Depth drill


Painting


Filters


Paint


Extra Bond


Brush


Anti Foaming


Scotchbrite


Steel wool


Oil


Gloves


Splitting


Maul


Froe


Wedges


Brake


Hatchet


Sledges


Chainsaw


Gas


Oil


Wrench


Spark plugs


Sharpening


Stones


Grinders


Buffer


Holders


bear tex


auger file


Nagura


Drywall screen


Plate glass


Wood Stone Holder with wedge


Strop


Small grinding bits


Green rouge


diamond hones


wheel dresser


pin jig for drawknife grinding


magnet jig for drawknife grinding


diamond paste


Planes


Scrub


#4


#5


#7


Drilling


Drill and charger


Bits


bit and brace


irwin extension bit


Measuring and Marking


Clear Rulers


Protractors


Black rules


Extension rule


Bevel boss


Spindle blocks


Aluminum straight edges


Carpenter pencils


Accuscribe


Assembly


String


Irwin quick grip clamp


Tenon chamferer (carpenter pencil sharpener)


Rubberbands


Reamers


Holding Jigs with v notches for drilling undercarraige


Mirrors


Dead Blow


Hammer


Bevel Squares


Steel plate with holes for sizing tenons


square


target for sighting mortise drilling


tenon taperer


plumber reamer


extra bends


Misc


Wax


Pencils


Cyanoacrylate


Foil


Gluepot


Measuring spoons


Chip brushes


Spring clamps


Shavehorses


Heat gun


iron


Steamer, pot, reservoir


5/8 dowels


Tape


Scraping


scraper jig


Scrapers


Burnisher


Oil


Files


I'm sure you will have a couple of questions which I can answer in the comments page, plus you can tell me which tools you can't live with out. Cheers!

Thursday, February 16, 2012

Murray Kidman

I was fortunate to have my friends Carl and Glen in Australia introduce me to Murray Kidman. He is a rare breed of Aussie who goes out into the bush with a chainsaw and a boatload of skill and comes back with some beautiful woods. He specializes in tone woods for guitar makers. Watching him work is pure pleasure. I've never seen a chainsaw handled so expertly.
 Here is a snake having a particularly tough day. He was in the log and managed to get cut into thirds. We never did find the head!


Check out this video of Murray at work.


I watched him rip a board less than 3/8" off the side of the log like it was cut on a resaw bandsaw.
Here is the final product at the Maton Guitar showroom in Victoria.


For another video of brilliant Aussie bushmen, check out this one that Robin Wood posted.

Thursday, January 14, 2010

A Walk on the Dark Side

The response was so kind regarding my walnut chair, that I thought it would be a good time to spring some of the darker side of my latest work on you! Below is a photo of the little machine shop that I set up in the shed next to the shop. I know, well lit and organized with efficiency and safety written all over it, right?


I bought the saw about 15 years ago and it's served me well. It spent the last 6 years or so in parts in my basement with a stack of junk on it. I thought that giving it a home would inspire me to finish building the windows in my house and my kitchen cabinets. While those best intentions are on hold, it's found it's way into my chairmaking, along with a few of it's minions.

We all have to live with the demons of our choosing, and one of mine is that I try choose my method because it is the best way to use the materials or create the result. I promise my customers that they'll never have to pay me to be romantic. (insert joke here).

Obviously, working green wood with hand tools has fit the bill for my chairs and my quest for relevant process. As long as I was making round spindles, shaving them from start to finish made sense. Not only are they stronger, but perhaps most importantly, shaving them to a finish is easier because once I've established the surfaces along the fiber line, I never have to wonder which direction to cut. It's always from the thick part toward the thin, which makes getting a lovely tooled finish simple.

When I started making the chairs with the flat spindles, which get scraped and sanded on their wide face anyway, the priority of easy shaving gave way to wanting a constant thickness for more even bends. So now, I can't believe I'm saying this, I shave the spindles from green wood and then pass them through my planer, flipping them a few times, to take off the last 1/16".


Of course, passing green wood through a planer just seems wrong, but the results are proof in the pudding. I use bending forms that capture the spindles from both sides, and any unevenness in the thickness or shape would be reflected in the part. Below are the planed spindles. The flat surfaces are even, but the edges retain that lovely organic feel of shaved wood.

I know that I could plane these by hand, but given the presence of the planer, I'd have to admit to myself that I was acting just out of aversion to the power tool, then again, I could do worse things, like sending green wood through a planer!