As I mentioned in the recent post, I have been batting the idea of teaching a perch class back and forth with my friends at Lie-Nielsen this summer and we finally pulled the trigger. It's a two day class and spaces are limited to 10 students. Check out their site for the details.
This is one of my favorite chair projects. I did all the writing for my book sitting on one, so I assure you, it's a comfortable seat!
Jon Binzen is somewhat of an unsung hero in the world of woodworking. He has been creating the back cover for Fine Woodworking for many years as well as some of it's best features. I've been lucky enough to work with Jon a few times and recently, with his help and advocacy, I wrote an article for Fine Woodworking on spoon carving. It's been a long time since the magazine featured spoon carving and I'm proud to be in it. That said, there are lots of great spoon carvers out there and I can name a few that I think deserve to be heard more than me. Jon also shot a video about my spoons that you can see here.
Here is the final video in the Perch series. Thanks for your patience and keep sending me the photos of the perches you've made!
Last week, I had a great time working with Elia Bizzarri. He is a talented chairmaker and we had a fine time comparing notes. I am looking forward to the class that we are teaching at Arrowmont in March. There are a few spots open for the class (including potential scholarship positions) so check it out or spread the word.
The perch is a bit awkward to hold steady at this point in the process. Usually I use a combination of wrestling holds and clamps. To get clear shots of the cutting, I had to use less steadying force, so please forgive the shaky action.
Here's a link to view the video directly on Youtube.com or just watch it below.
Here is the video of the assembly of the perch. It went smoothly which is encouraging news for the new measuring and drilling method. You'll notice in the video that the joints are more than a tight fit. They are what I call a hammer fit. I aim to make the tolerance between the mortise and the tenon between 1 or 2 thousandths of an inch. It may take some getting used to driving such tight joints and learning to make corrections while doing so (once driven even partially home, the joints are near impossible to twist), but I feel that the results warrant the extra attention.
Here is the link to see the video direct on Youtube.com
Here is the installment of the "Making a Perch" series that covers drilling the undercarraige mortises. I've built on some previous techniques that I've adopted to make it even simpler. I use one angle for all of the mortises into the legs. If you didn't get a chance to see the series on my new method for drilling out the undercarraige, you might want to check it out. Here is the first part of the series entitled "A New Way". The other postings are available in the June 2008 archive to the right, just click on the arrows to access the next in the series.
Now I've eliminated the need to use string and a straight edge to locate the axis of the stretcher and simply raise the mortises to the same height off of the table and then use the table as my axis reference. I literally woke up in the middle of the night with this one, and it still sounded good in the morning so I gave it a shot!
Once the mortise locations are parallel to the table top, I use a board with an average angle to mark an axis on the legs (I don't even know the number of degrees, I simply set a bevel next to each leg and tweaked it until it seemed reasonably close to all of them and then cut the board to match).
The marked axis will diverge from the actual axis of each leg, but this doesn't matter. The marked axis is held parallel to the benchtop in V blocks and then drilled using the same board and angle as a guide. It may seem complex at first, but soon you'll see that the method eliminates the confusion and slop of multiple readings, numbers and settings and uses only solid, exact references, the benchtop and the board.
To state it in steps:
1. Level the mortises to the benchtop
2. Mark the legs with the angled board
3. Mount the leg in V blocks and level the mark on the leg to the benchtop
4. Drill using the angled board
If you are new to this idea, or the drilling of undercarraige joints, you might mistake this method for using a "close enough" approach. It's actually just the opposite, if the process is followed, it is the most exact way I know to drill these holes.
Here is the video, I hope that it looks as simple as it is!
and here is a link to the video on Youtube.com so that you can view it in high quality
Whenever a student leaves my shop and heads home to build another chair, almost invariably, the first thing they do is carve a seat. Seat carving holds a magical draw. Perhaps its because it is so rare that a modern woodworker gets to step so deeply into the organic world of shaping wood. It's kind of odd when you think about it. Wood is an easily shaped material that is happy to take on just about any form, yet we spend most of our time trying to get it "in line".
The perch seat is small enough that just about any solid wood that one is willing to carve will do the job, but for reasons that I think become clear in the video, I chose white pine for my seat. I hope the video demonstrates the ease and fun to be had in making the seat and invite any questions that it may arouse.
On a technical note, I've had comments from some folks that the volume is too low on the video. I haven't found any way on my end to boost it any higher but have found a volume adjustment on the bottom of the video box. Just click on the speaker icon and turn it up. I've also found that going directly to Youtube.com and using the "view in high quality" option at the bottom of the video box is worth the effort. Try this link to get there. To see all my videos just search my name and then click on it in the line beneath the title of any video that comes up .
One of the persistent difficulties to working green wood is understanding its advantages and the processes that can exploit them. How wet? How dry? When do I shape it? It can be confusing to the newcomer. This installment of the perch building process gives a great opportunity to clear up a few things about green wood. There are only a few reasons to work green wood, and if you take them into account, it should be pretty clear when and how to use it.
Number One: green wood splits and shaves along the fibers which allows for stronger, yet more flexible parts. This enables the thin turnings and solid bends.
Number Two: green wood cuts easily with handtools, enabling quick shaping without the need for powertools
Number Three: green wood is cheap and easily found, with the only drawback being that trees don't come in squared lumber. Of course, in green wood chairmaking, the parts rarely use the type of flat references that dried lumber provides
When using green wood and making process decisions, I ask myself which of these benefits is essential and which is merely helpful. In making the stretchers for this perch, I have tried to take advantage of the green wood advantages where possible and abandon them where the returns diminish.
There are a few options when making the stretchers for the perch.
One, I could have split the wood green, turned it green, dried it and then sized the tenons to the final dimension. This works fine and has the advantages of the strength of the split wood and the ease of cutting green wood. The drawback is the time it takes to dry down the piece and the need to dramatically reform the tenons before assembly.
Option two is to split the wood into billets, rough shape the stretcher, dry it down and then turn the entire piece once it's dried. Once again, the benefits of the green wood splitting and roughing help out and turning the final shape from a slightly oversize rough wouldn't be too difficult in the dried wood. Plus, I would be able to turn the tenon to the finished dimension at the same time that I turn the rest of the stretcher to shape.
Option three is to saw the blank from a dried piece (being careful to follow the fibers as though it was split), turn the stretcher (not as much fun in dried wood), dry it down, and then turn the tenons to final dimension. This is the option that I chose, mainly because the curly maple that I am using is already in the dried plank form. I am definitely sacrificing the ease of cutting for the benefits of speed in drying (the plank is already air dried) and the ability to cut close to finish dimensions.
Turning is different from shaving, in that the center axis of the turning can be easily made to follow the fibers through either splitting or sawing. I would never substitute sawing for shaving when making spindles or bends.
In the video, you'll see me turn the stretchers with the tenons oversized .025". This is because the wood is already dry and experience tells me that it won't shrink dramatically in the kiln. If the wood was green as in option 1 above, I would oversize the tenons .060" or .080". I know that talking about thousandths of an inch can be a bit odd at first, but don't be intimidated, it's just a way of talking about the movement of the wood that is tough to describe accurately with out resorting to such tiny increments. My goal is always to turn the tenon to a size that will leave me trimming a minimal amount after drying. The goal is a final tenon of .625" or 5/8". When the piece comes out of the kiln, I want the dimensions of the tenon, as measured along the growth rings to be just a few thousandths oversize, for easy trimming to the final .625". It is of course easier to hit this mark if the wood is dry to begin with, which is why I tend to exercise option 2 above as my general practice.
To sum up, when deciding how and when to use green wood, the considerations of strength, ease of working, availability and flow of process, all come into play. If you find one factor that calls for the sacrifice of another, just make sure that it's one you can live with.
Here is a video of the reaming process. We finally get to see all this unusual geometry add up to a chair. It's important to have faith in the strange numbers and angles. I hope the video helps with this vital and difficult step. Next I'll be covering measuring the stretchers and carving the seat. Any feedback about the info presented is helpful as I try to fill in the gaps.
Here is the next installment in the perch making process. This video covers the hand flattening of the seat and the drilling for the legs. Of course you could use a planer and jointer to get this seat flat, but I use my handplanes, which only takes me a few minutes and teaches me a lot about the nature of the specific piece of wood that I'm using. I'm sure that there will be a few questions, so let me know if there something that I can clarify.
There are a few reasons that I drill the holes by eye. One is that the reaming process gives the opportunity to refine the angle of the hole, but most important to me is the speed and portability of the process. I could set up a drill press or some other semi-permanent rig, but then each time that I wished to change an angle I would have to adjust the jigging. Getting comfortable drilling by eye only takes a couple of practice holes and then you'll have a skill that you can take anywhere, at any angle, to any piece.
Thanks for all the great feedback on the Perch posting. There have been a few topics brought up that are worth addressing. The seat material can be any wood that you care to carve. If you are using a softwood such as pine, I suggest using a 1 1/2" to 1 3/4" thick piece. If you are using a hardwood, you could go as thin as 1 1/4". The perch presents a great opportunity to become accustomed to drilling and reaming. Those who are new to the process, may benefit from creating a practice seat out of softwood (my first practice seat was 2X4's glued up!). This way the process will show it's quirks during the dry run.
As far as tools for the perch, I would suggest the 6 degree reamer from Elia Bizzarri at handtoolwoodworking.com. This is one of the last great woodworking bargains. The seat of the perch is only scooped out 5/8" at the deepest point. This is shallow enough to carve with a gouge and finish with a scraper, but if you are thinking of making more than one, I suggest the travisher that Elia sells (based on my design, but I have no stake in the business). It's a great tool and works beautifully. Perhaps your first perch sale or gift can cover these costs!
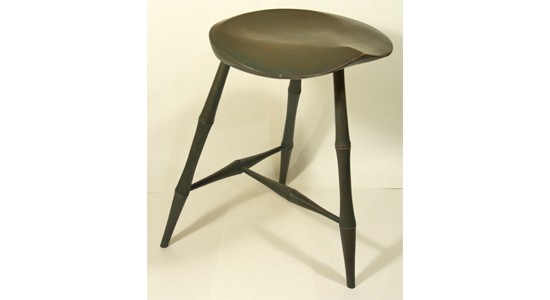
By its nature, the perch is a custom object. The goal is to tilt the sitter forward to encourage the lumbar curve to do its job. Each person will need a different height. The perch that I show is good for an average sized person (finally being average pays off!). I custom size them by putting books under the feet of the perch or the sitters feet until they are comfortable. One of the reader comments mentions a web page that describes the concept beautifully www.acmandal.com
As I mentioned before, the perch was a collaborative effort with input from Galen Cranz and Curtis Buchanan. Galen has literally written the book on chairs. The problem is that she finds that our entire relationship to chairs is faulty at best and unhealthy at worst. We live in a world designed to suit the work and dining surfaces we create, and let our bodies take up the slack! She inspires me to try to improve the design of my chairs to better suit the sitter. Her book is a must read. The Chair: Rethinking Culture, Body, and Design (Hardcover) by Galen Cranz (Author)
I hope these diagrams are easily read. These are just suggestions for the legs, if you are without a lathe, just shave the legs with a drawknife and round them with a spokeshave, don't let tools stop you!
Here is a video of the leg turning, I hope it helps
I was considering posting the plans for my perch as a holiday gift to ChairNotes readers, but as with so many thoughts, time seemed to run short and other priorities took hold. But then someone contacted me the other day to request the plans, and put it right back at the top of the list.
I designed this perch with Galen Cranz and Curtis Buchanan a few years back when we were teaching a class on body conscious seating. Galen, an expert in The Alexander Technique and now head of the Architecture Department at UC Berkely, set the goals:
To use windsor technology to create a seat that would make sitting upright easier and encourage proper alignment of the vertebrae.
The perch does this by keeping the pelvis rolled forward, similar to when you are standing. This way, the natural spring S curve of the back is maintained. I love watching people faces as they sit on the perch for the first time. It's near effortless and nothing like they expect.
This is also a great project to undertake as an introduction to windsors. The legs can be turned from dry wood, as long as it is straight grained, and the seat isn't deeply scooped, so you can forgo some of the coarser carving tools. My one warning is that your friends and family will line up for theirs, so either be prepared to make a lot of them or keep it hidden when they are around!
Below is the pattern for the seat. I hope that you can make out the numbers. Obviously, the exact shape of the seat can vary a bit.
Perhaps the strangest part of the perch, especially to experienced chairmakers, will be that the legs all rake towards the front. The front leg is quite a bit shorter than the rear and causes the forward tilt in the seat. It tilts so far forward in fact, that the legs take on an even rake, both forward and back. I've drawn a quick sketch of the perch and then one next to it that shows the legs when the seat is resting horizontally. Odd isn't it! So take a moment to get used to it and start gathering materials.
I'll post the leg patterns next as well as a video of the turning process. Then I'll continue to post on it until it's done.
Reproduction of this material by written permission only
Warning
Woodworking is inherently dangerous. The techniques described in Chair Notes are attempted at the risk and liability of the reader. Often in images, safety guards are omitted for clarity. It is the responsibility of the reader to use all safety devices including eye protection.