Showing posts with label Leg Turning. Show all posts

Friday, March 3, 2017

Catching Up: The Winter

This summer will be a bit subdued as far as travels go, which is going to be lovely for me after the fall and winter of action. After returning from Purchase, I immediately launched into teaching a 22 person class in the Cabinet Program at North Bennet Street. I spent the better part of January working with the students there.

Here is the chair that we made. It's a scaled up version of my kid's hoopback (which is one of my personal favorites to have around the house). I made this version larger to better serve the students at the school as their bench chair. I think it's very cool that they get to make their own shop furniture. Scaling it up posed the usual challenges of adjusting the rake and splay of the legs so that the chair doesn't take up too much floor space, which is especially important in the tight spaces of the school.

As the class was winding down, I went down to Colonial Williamsburg to present, along with the outstanding Don Williams and the folks from the Cabinet and Jointers shop, on chairs...of course.

 The auditorium at the museum is first class with two cameras and projection to really get up close. Here Kaare is giving me a "hand" pumping the treadle lathe. Frankly, it was a bit much for me to turn, pump and talk! I got lots of help after wearing out Kaare from the jointers apprentices.
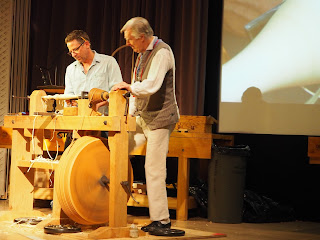
photo by Tom McKenna
For the presentation, I thought it would be fun to work out a new continuous arm and Kaare Loftheim, master cabinetmaker, agreed. Here is the chair that I made, based on a few photos in books and online. As usual, I learned some fun things about design and got to finally turn some Rhode Island balusters!
 Here is the complete chair and the one that I demonstrated
 The seat shape and the legs were a lot of fun.

 Plus I took a little more time with the distressing, placing a thin coat of shellac inbetween the undercoat and top coat of dark green. I was very pleased with the results.

 The swelling on the lower section gives ample material for the joinery, I'm not sure how much that played into the design thinking at the time, but it was apparent to me. The lower portion takes on much more of an important role in the look of the leg, which gives a nice balance. The image below is not good for proportions because of my phone lens, but you get the idea.

It was a great trip and an honor to be invited. If you ever get the chance to attend, I highly recommend it.
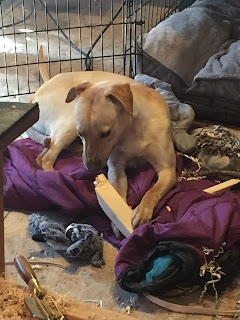
And here is your Georgie update! She is thriving and turning out to be the easiest dog I've ever had. Playful and loving but extremely calm on her own. She is now acclimated to all the shop noises and all my hustling about. When it gets to be too much, she just retires to her crate for a nap! We are still working on new experiences. The first time she saw the television she freaked, but now she sits calmly while it's on, I don't think that she had ever heard a voice come from a box.

I know it's gratuitous, but I"m smitten
Lil would approve of her technique
The truck is becoming a safe space, this is their first ride together


Wednesday, October 23, 2013

Magic?


I've been recovering from my trip to WIA this week.  I felt incredibly proud to be there with Claire Minihan, Tim Manney and Caleb James. The next time you hear someone grumbling about todays youth...just send them my way and I will blow them out of the water with the talent and incredible work ethic of these three. I could go on and on about the show, it was a highlight of my year.


Here is a stool that I brought along. I really shouldn't have heaped building this onto my plate while preparing to leave, but I had this itch to build something new and fun and it certainly fit the bill.


The "magic" part of this is twofold. First of all, in the first photo, it looks like a 3 legged stool in the photo even though it has 4. With curved legs like this, that can only mean one thing. The sightlines run directly from the front leg to the rear on the opposite side of the seat. I've never done this before and am very pleased with the results.


The rear legs are closer together in the seat and are reamed at a slightly greater angle.

The other "magic" is the finish, which only took a few hours start to finish and came out great. I was hoping for a worn black lacquer look to go with the Asian style and am very pleased. I'll share the process in another post soon.

Tuesday, September 17, 2013

Nice to Meet You

Since I moved to Sterling, Massachusetts, I've been swamped with projects and traveling and had little time to get to know my community or let them know me. That changed when I talked to Dave Gibbs at the Sterling Historical Society about combining our efforts and interests. The Society has a lovely collection of Windsors that were made here in town as well as a barn full of the old tools from its workshops. The first floor of the barn is relatively empty, and I thought it would be a great location to host some 6 person classes. So, next summer, I hope to schedule three classes there, but I'll post more on that once we work out the details.
To help introduce me to the community, the Sterling Historical Society hosted a demonstration at the local American Legion post and Ross Jones of Harvard Video Productions filmed it for us. Here is the video of the demonstration.
If it doesn't appear on your screen, click here to go to the original site.


As you can see, I am elated to be starting this project. I think 6 is a great number of students for a class. Plenty enough for a group energy and atmosphere but few enough for lots of personal attention.

And if I got you interested in my talk with Dudley Hershbach, here is a great interview with him that I found every bit as engaging as sitting next to him on the plane.


and once again, the link if you don't see the video here.

Monday, July 16, 2012

The Summer Jam Up!

 Posting on the blog usually takes a dive in the summer as the rest of my activities heat up, and this is no exception. But I have tons going on and lots that I want to share, so here is the valve wide open to clear some out!!
Here is my favorite mallet. I made it 12 years ago when I first moved from NYC to the country. I vividly remember trekking through 2 foot deep snow into the back of our rented 50 acres, where I found a fallen soft maple tree. It just seemed impossible that wood just lay on the forest floor after only seeing it on racks at Rosenzweig Lumber in the Bronx for so many years. So I grabbed a chunk, not caring if it was the best mallet wood, and I headed home to turn a mallet.

In time, I came to favor this mallet, not for its hardness, but its lightness. I have other denser mallets, but I feel they lack sensitivity, plus, I'm willing to beat this little piece of wood up if necessary.


But the other day, this mallet saved the day. I was watching my goats run about in their paddock (we've arranged them so we can watch them from the couch) when I notice a black mass running about, seemingly outside of their fence line. I thought it was Silky, but how could she get through the electric fencing?! As I walked to the window, it was obvious, that wasn't Silky, but the biggest bear that I've seen since leaving the safety of Manhattan.
As I ran across the kitchen and through my shop, I did what any self respecting woodworker would do, I grabbed my favorite mallet.
By the time I got out there, the goats were huddled in the paddock opposite of where the bear was and when I got close enough, I chucked the mallet.
It whizzed just past the head of the bear and made a thud in the flowers behind it, just enough to let her know that this was no easy meal, and she took off.
The next day, I retrieved my mallet from the flower bed, what? you didn't think that I was going to look for it then did you? there's bears out there!
So now this little chunk of wood has rest even higher in my esteem,
I think I'll name it Thor.

In between fighting off the local wildlife, I have been finishing up a settee order and decided to try out a product that my pal Jack McCallister suggested. I don't know about you, but I hate steel wool. I've done my best to eliminate rubbing out the whole piece with steel wool alone by using gray scotchbrite pads. But they only take the sheen so far and tend to be a bit aggressive, at least until they've worn down a bit. Jack suggested this stuff called Mirka Mirlon that you can find online.
I got the grey ultra fine and am very pleased with what it can do. It took too long to rub with just the ultra fine Mirlon, so I still start with the scotchbrite, except for the seat which scratches easily. And it also doesn't come up to the sheen that I like, so I finished with a quick touch with 0000 steel wool.


So if I'm still using scotchbrite and steel wool, what's the point? Well, the Mirlon does some things that the others can't. When rubbing down parts with sharp edges, like the turnings, it doesn't burn through the paint much at all, plus, you can easily form it into a "flossing" type action to buff out the turnings.


I love the way that the turnings rubbed out and I barely used any steel wool at all.


The photo above is before oiling, and the one below is after.


Like I said, there is more coming, so stay tuned!

Tuesday, August 17, 2010

Turning Practice

I recently wrote guest blog entry and made a video for Highland Woodworkings blog and I wanted to make sure that I posted the link. You can click here to view the post and video.
I've finally figure out my new editing software and should have more videos coming soon!


And for all our old friends, here is the Chairnotes covergirl last week on our brief vacation to the Fingerlakes in upstate New York. We were visiting a local goat farm when we came across this pooch who happened to be the spitting image of our beloved Daisy dog. Someone once described heaven as seeing all the dogs you've ever loved running up to greet you. I think the look on her face says it all.

Monday, December 7, 2009

Hunkering Down


Yep, the cold has finally come to New York and we are all running around making sure that we are ready. Mikey seems pretty secure with his room full of hay, and not a moment too soon.


We decided to give the chickens run of the garden, after taking the last mint out for some ice cream. These are the girls that we got last year, and I'm happy to say that they are still laying, although slower because of the short days. They have been working the compost pile over and nipping away at the last remnants of greens.


This week is all about turning. I'll be teaching turning this weekend at North Bennet Street and am getting warmed up by making parts. Turning often is the best way to turn well, and I'd hate to be rusty in front of a crowd. I made couple of jigs to help things along at the lathe. A steady rest, which I'll detail in the next post, and this little handy center marker shown below.


I used an old hacksaw blade that I ground to a knife edge on the back and sunk into a saw kerf. It really comes in handy when I trim my roughed out blanks and need to recenter. I know that you can buy one, but it seemed like a perfect candidate for a shop made solution.


A couple of hammer whacks and rotations and you've got it.


I've found it particularly helpful when recentering a piece that is dried and gone oval. I just use a few more rotations and don't expect the lines to all meet in the center, instead, they leave a little vacant circle right in the center.

Wednesday, April 15, 2009

Good and Better

Here is Wayne Grove making spindles last week. Wayne was in my class at Peters Valley last year and made good on the promise to come up and make a chair with me. He has already made a slew of chairs in his time, so we spent a lot of the week discussing the finer points and trying to raise the bar in quality, technique and focus.


I've heard it said that "better is the enemy of good", and if I understand the quote, I am not much of an adherent to it. To me, a huge part of my interest lies in looking deeper beyond the skills that I already possess, even if it means the occasional (or often) ruined workpiece. I find trying irresistible and the consequence of failure tolerable. This is definitely evident in my turning. I can't tell you how many times I've gone back for "one more clean up pass with the skew" and blown off an entire detail!

But thanks to those efforts, I've gotten to control my skew.
Below on the left is one of the legs that I turned at the NWA showcase out of soft maple next to one that I did in the shop in hard maple.


Of course, standing in front of a crowd full of observers and questions while trying to explain my caliper is bound to lead to a drop in focus and quality. When I got back to the shop and set out to turn more legs, with a slightly more robust pattern, the time and quiet let me shoot for "better".


Hopefully you can see the sharper edges and more delicate shaping in the leg on the right.
Perhaps viewed under the paint and from across the room there wouldn't seem to be much of a difference, but by making the details more refined and challenging there was a huge pay off,
I had fun.

Here's Wayne gluing up his undercarraige. We used my new marking method and it worked out great.


Today is one of those days. All errands, paperwork and computer work (why should I be any different, right?!" I started by getting photos taken of the chair that's heading to Maine for the faculty exhibit at the Center for Furniture Craftsmanship. The chair is cherry (remember me cutting it down last fall), white oak and butternut, with walnut wedges.


Here's a detail of the arm joint. For a diseased tree, it sure had some lovely wood.


I am close to loading up the next video on skew technique. We are getting closer to actually cutting wood, but not quite!

Tuesday, December 9, 2008

The Perch Legs (Video)

,

Thanks for all the great feedback on the Perch posting. There have been a few topics brought up that are worth addressing. The seat material can be any wood that you care to carve. If you are using a softwood such as pine, I suggest using a 1 1/2" to 1 3/4" thick piece. If you are using a hardwood, you could go as thin as 1 1/4". The perch presents a great opportunity to become accustomed to drilling and reaming. Those who are new to the process, may benefit from creating a practice seat out of softwood (my first practice seat was 2X4's glued up!). This way the process will show it's quirks during the dry run.

As far as tools for the perch, I would suggest the 6 degree reamer from Elia Bizzarri at handtoolwoodworking.com. This is one of the last great woodworking bargains. The seat of the perch is only scooped out 5/8" at the deepest point. This is shallow enough to carve with a gouge and finish with a scraper, but if you are thinking of making more than one, I suggest the travisher that Elia sells (based on my design, but I have no stake in the business). It's a great tool and works beautifully. Perhaps your first perch sale or gift can cover these costs!

By its nature, the perch is a custom object. The goal is to tilt the sitter forward to encourage the lumbar curve to do its job. Each person will need a different height. The perch that I show is good for an average sized person (finally being average pays off!). I custom size them by putting books under the feet of the perch or the sitters feet until they are comfortable. One of the reader comments mentions a web page that describes the concept beautifully
www.acmandal.com

As I mentioned before, the perch was a collaborative effort with input from Galen Cranz and Curtis Buchanan. Galen has literally written the book on chairs. The problem is that she finds that our entire relationship to chairs is faulty at best and unhealthy at worst. We live in a world designed to suit the work and dining surfaces we create, and let our bodies take up the slack! She inspires me to try to improve the design of my chairs to better suit the sitter. Her book is a must read.
The Chair: Rethinking Culture, Body, and Design (Hardcover)
by Galen Cranz (Author)


I hope these diagrams are easily read. These are just suggestions for the legs, if you are without a lathe, just shave the legs with a drawknife and round them with a spokeshave, don't let tools stop you!

Here is a video of the leg turning, I hope it helps

Tuesday, September 23, 2008

High Speed

Here is a short video that I made while turning the staircase balusters. I sped up the video (I'll post the real time version next) to show how the baluster takes shape in stages.

I try to group tasks so that the piece retains mass, which helps reduce vibration, and to change tools less frequently. Also, by having intermediate steps, I repeat tasks, such as turning all the beads at once, or roughing out, without having to constantly change my focus. All these things help make a complex turning more simple.


Watching this in fast motion makes it look way too effortless. Believe me, turning dried red oak like this took all the concentration I could muster!

Sunday, April 27, 2008

Double Bobbin Turning


In keeping with the turning theme, here is a short video of turning a double bobbin chair leg. Yes, its the one that looks like bamboo, or a stylized version of it. This simplified style has always been attractive to me. The actual turning of it is pretty simple and a great way to pick up skills that are essential to the more ornate and difficult balusters. I will be making videos of specific techniques geared towards learning these techniques, but for now it just so happened that I had 6 of these to turn for the settee that I am making, so here it is.

Thursday, April 10, 2008

Turning Chair Legs pt.2

Here is part two of the leg turning video. I do a lot of skew work here and frankly, I need to do more posts explaining this dreaded tool. So view this video like the cooking shows where they pull the finished turkey finished out of the oven. I'll focus on the skill building and actual techniques in future posts.

No need to be intimidated, the baluster leg is simply a series of beads and coves. There are just some basic concepts to cover first.

Tuesday, April 8, 2008

A Better View

I decided to build a jig to hold my camera above the lathe to get a closer and clearer view of the action. I also played around until I found that the DIVX format was a much better choice for clear video. I think you'll agree that this is much better. I reshot my leg turning video from the other day and will now proceed to do a series of how I finish the leg off.

Let me know if the new video works well for you.


I am having some technical difficulties that are making my web work painfully slow, I'll be back soon to show the rest of the turning and then some detailed instructions on turning basics.