Showing posts with label Joinery. Show all posts

Saturday, March 15, 2014

Seth Wins the Day


Here are a couple of tenon cutters. The one in the back is a poplar base with a frog from a standard Bailey style plane. The one in the front is made of rosewood (fancy eh?) and has a frog from a Bedrock plane. I made the one in the back years ago,  and today, Seth Weizenecker made the one in front. The cutter Seth made is simpler to make and works amazingly well.

I like using the frog from a plane in my tenoning fixture because of the control that it gives over the adjustments, but as you can see, I had to mount it on a small angled block to get the low cutting angle that I wanted. What I didn't know, was that Bedrocks frogs are far simpler and screw easily to a flat surface, with a beautifully low angle built right in!

Here it is in use. And the shaving...amazing.
In order to get the clearance angle on the bevel, Seth ground the blade to about 24 degrees, which is rather low for standard work (in my experience) but for this dedicated task, it peels the wood great.

Notice the low angle of the frog and the bevel of the blade
Don't be confused by the shiny chip breaker, which looks like a blade, it's a Hock chipbreaker.
He began the process by drilling and reaming a hole as you'd expect, then he planed down the top until an even gap opened at the top of the mortise. Then he screwed the frog on. How simple is that!

These days, I am acutely aware of the value of having talented people around, well done Seth.
Now I am going down to his shop to steal all the Bedrock frogs, shhhh

Tuesday, March 11, 2014

Simpler Sighting

I just finished teaching the continuous arm class at Highland in Atlanta and as usual, the cauldron of the classroom helped with the evolution of technique.
Chair started popping up everywhere on the last day!
 But first, here is a cool photo that Seth Weizenecker took of one of the students.


Seth was indispensable helping me teach this class and now I am recharging at his home in Asheville before our class next week. I'm told that there is still one opening if anyone wants to jump on it, it will be a load of fun. Contact Bill Palmer at herebrooks@aol.com if you want more info.


Watching students work through the process is always fascinating and gives me a chance to rethink or retool to make it simpler. This isn't a dumbing down, it's about expanding what is obvious to me so that I can bring folks onboard. Evaluating the results while reaming is one of the most important jobs in making chairs this way. The trouble is that I have to describe not only what I do, but what I see. During this last class, I thought about the bevel square that I use to sight whether the reamer is at the correct angle and realized that it might be made easier with a very simple tweak.

Here is the bevel square retrofit with a nice wide blade so that you can easily sight down the flat plane. And by cutting out one side of the bevel square base, it's easy to see the alignment line when looking over the top of the blade. The photo below shows looking over the top of the bevel square a bit too far.
Looking over the top at the wide flat face of the bevel square
Here is the correct alignment for assessing the position of the reamer. The arrow on the square touching the line makes seeing, and thankfully teaching, the correct alignment easier.
Lining up the face (and arrow) with the base line shows that the reamer is too far forward

 It's a little thing, but Seth and I saw a marked difference in the ease with which it helped the students "get it", and that's enough for me. I will be refitting all of my square, that I use in the shop, and to teach.

The side view of the set up


As usual, thanks to my friends at Highland for all their help, especially Ed Scent, who makes it all happen.


Tuesday, September 17, 2013

Nice to Meet You

Since I moved to Sterling, Massachusetts, I've been swamped with projects and traveling and had little time to get to know my community or let them know me. That changed when I talked to Dave Gibbs at the Sterling Historical Society about combining our efforts and interests. The Society has a lovely collection of Windsors that were made here in town as well as a barn full of the old tools from its workshops. The first floor of the barn is relatively empty, and I thought it would be a great location to host some 6 person classes. So, next summer, I hope to schedule three classes there, but I'll post more on that once we work out the details.
To help introduce me to the community, the Sterling Historical Society hosted a demonstration at the local American Legion post and Ross Jones of Harvard Video Productions filmed it for us. Here is the video of the demonstration.
If it doesn't appear on your screen, click here to go to the original site.


As you can see, I am elated to be starting this project. I think 6 is a great number of students for a class. Plenty enough for a group energy and atmosphere but few enough for lots of personal attention.

And if I got you interested in my talk with Dudley Hershbach, here is a great interview with him that I found every bit as engaging as sitting next to him on the plane.


and once again, the link if you don't see the video here.

Sunday, February 10, 2013

A Lesson from Our Flat Friends

I finally got around to completing my glueless continuous arm. I must say, assembly without glue is rather painless. Building the chair wasn't wildly different from my normal procedure, but it did shift my awareness about the joinery and push me to think a bit differently.


With most through tenons, such as the spindles, it's easy enough to slightly shoulder the tenon so that the arm can't slide down any further and then to oval the mortise at exit so that the wedge distorts the tenon and locks it in place. It's a version of the hammer eye joint, with it's hourglass shape that holds hammer heads in on their handles.
Tapered tenons, such as on the ends of the legs don't present a problem because the weight of the sitter in use keeps them tight. But the tapers at the top and bottom of the armposts have more complex stresses and the glueless chair got me to thinking about my approach to them.

http://www.woodworkings.ca/HandWork/Mortise-and-tenon-Joints.html

This is where our flat friends come in. When wedging a rectangular tenon in a through mortise, the practice is to flare the mortise and use 2 wedges close to the edges of the tenon to distort the tenon to fill the flare.


 The usual approach when making a chair is to use a single wedge in the middle, which adds pressure to the fit of the joint, but doesn't create a distinct flare, at least not enough to create a "lock".
So with my glueless chair, I flared the opening where the tenon comes out of the mortise to create the hourglass shape and used two wedges to lock it in place.
You can see here that the tenon, although tapered, easily flared outward to create a "lock"
Here is the top after cutting the tenon flush.
I must say, even though time will be the real judge, I have a lot of confidence that this joint ain't goin nowhere. As I move on into glued chairs, I am definitely taking some lessons learned making this one, now where's that blue paint?

If you'd like to spend a couple of days with me on March 9th and 10th while I demonstrate building this chair, check out the website at the Connecticut Valley School of Woodworking for details.

Here is a pic of Nick Clayton with his recently completed comb back. Nick lives nearby and was able to come to class periodically over a couple of months.


 I think that the quality of the chair benefited from the extra time and relaxed approach we took. Either that or the kid's a natural! It's one of the nicest comb backs I've seen, well done Nick.


Monday, January 30, 2012

Jig, Crutch, Contraption, Heresy

I'm going to show some interesting (I think) jigs and jig alterations that we used in Melbourne, and before I get any berating emails and comments about going over to "the dark side", please remember, a traditional Japanese woodworker might walk into your shop and look at your workbench, vise and adjustable planes in bewilderment of the overkill of it all.

My goals in making and teaching chairmaking have more to do with making a great chair, having fun, and opening doors to accuracy and understanding. As I do this, I often try to isolate the variables at play and even if I abandon the idea, the thought process that I engage almost always deepens my understanding.

The first class in Melbourne was a continuous arm rocking chair, and once I realized what a different experience the troublesome timbers were giving the students, I set out to make a way to tame the rocker slot beast. In past classes, I've used the router to cut all four rocker slots in about 6 minutes and by the end of a class like this, students are bleary eyed and exhausted.

So I gave instructions on how to lay out the rockers and cut them by hand, and then we proceeded to use this set up to get 12 chairs to rock exactly the same, with nearly no balancing or fitting and no layout.


Here's the deal. Legs don't matter on a rocker. Yep, that's right, they are not the reference that counts. What counts is the relationship between the rockers and the seat. If the rockers are in line with each other, and have the correct position in relation to the seat, then the chair will rock beautifully. Of course, if the rockers are poorly positioned, the chair with tip to far one way or the other, so when setting rockers, the art of balancing them to each other and also to the seat at the same time is a challenge.

So, given my success in routing rockers in the past, I set out to make a jig that responded to the variables that count. By placing the chair upside down in the jig, I've already nailed one vital reference, the seat plane.


The next variable is the splay of the legs (and therefore rocker). The idea here is to split the difference between the front and rear leg splay and then to split it again from one side to the other. By coming to a single angle that the slots are cut and the rockers get beveled on the bottom, you can be assured that the curve remains consistent and balancing them will be possible. Imagine if the two rockers sit at different angles to the floor, they will actually be acting as different curves and become a nightmare to balance.

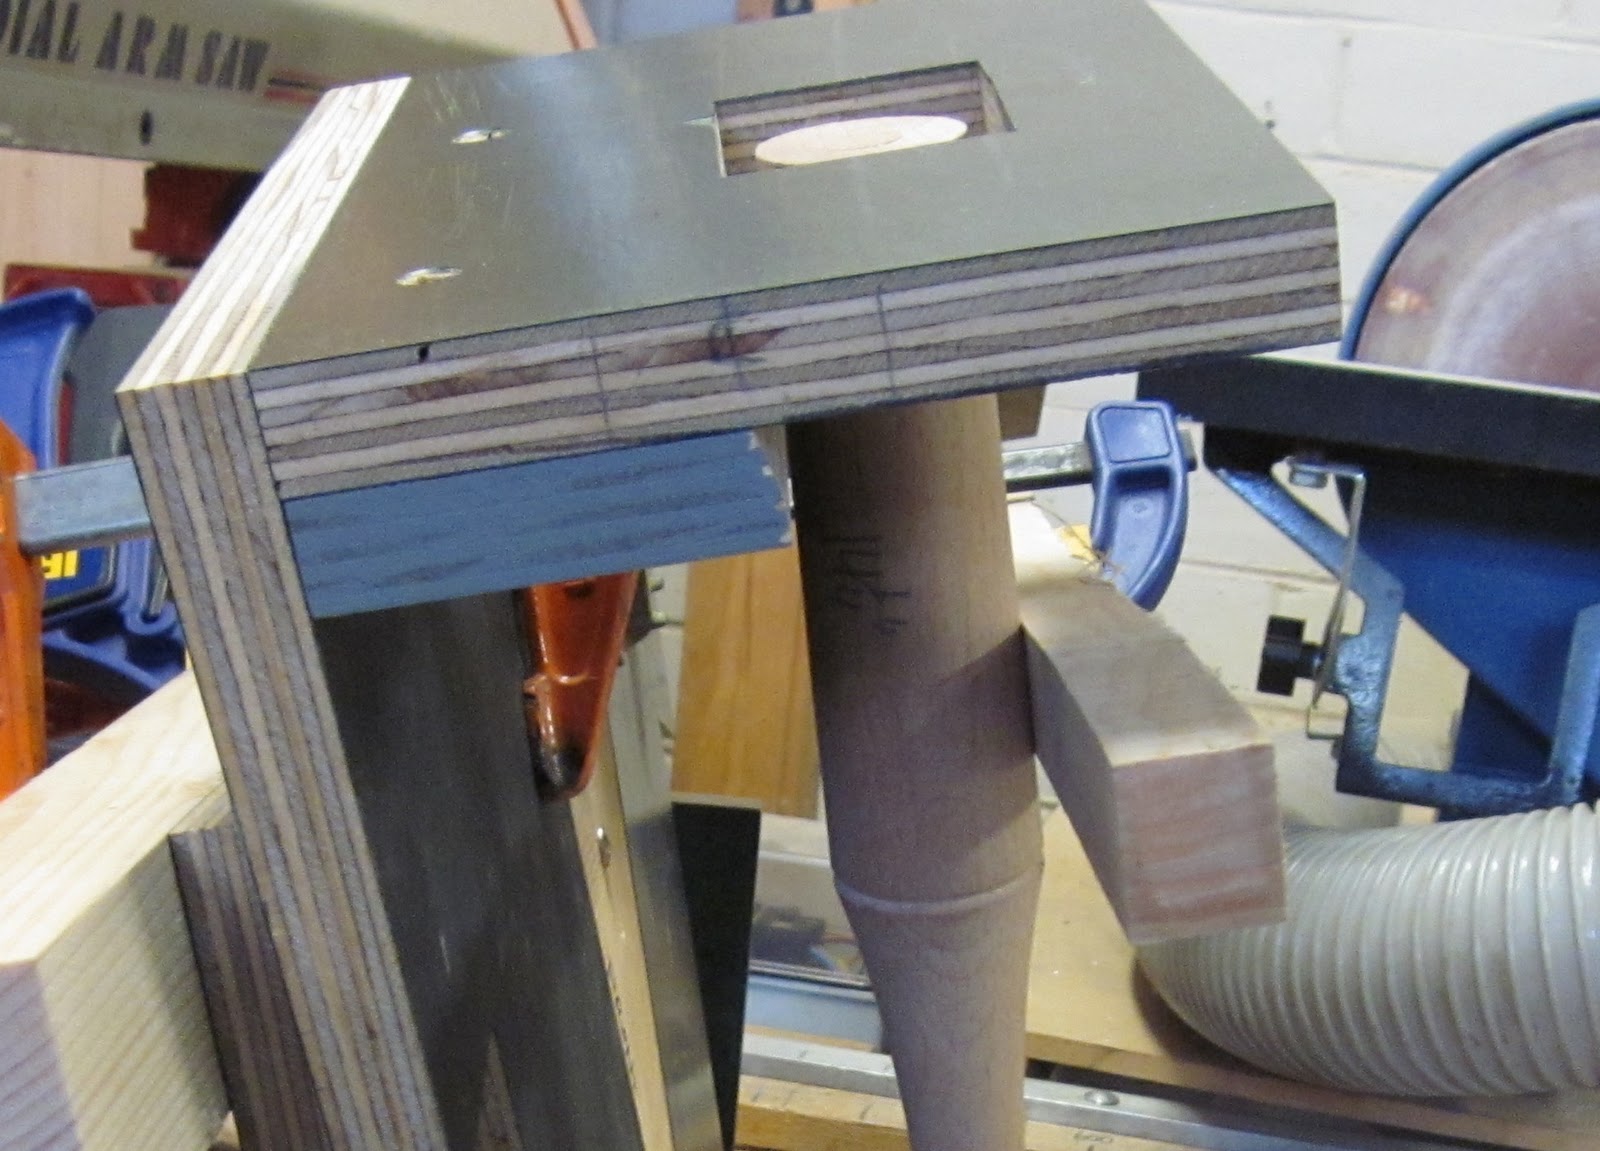
To knock out this variable, the jig that we used has a tilting board that is set to one angle for all of the legs. The only concern then, is that the legs register in the jig so that the slots are cut in the center of the leg at the full depth of the router cut, so there is no weaker side.


To achieve this, I cut a beveled edge on the bluish piece of ply that is attached below the  surface where the router runs. When the chair is pushed up against the bevel edge of the plywood, the leg is in position to ensure that the deepest part of the cut is centered, regardless of the splay of the leg. It's all about relating the path of the router to the platform and then the leg to the path of the router.

The final variable is the height of the rocker slots as they relate to the seat. This is really where this process earns it's keep. By setting the heights of the two platforms in relation to the seat, the position of each rocker will be identical to all the others (the fact that they will perfectly align back to front is not even an issue with this thing!) The depth that each leg is cut might be different, but once again, it aint the legs that matter, it's the rockers relationship to the seat.

One clamp pulls the legs against the beveled board and the piece is ready to be routed. 

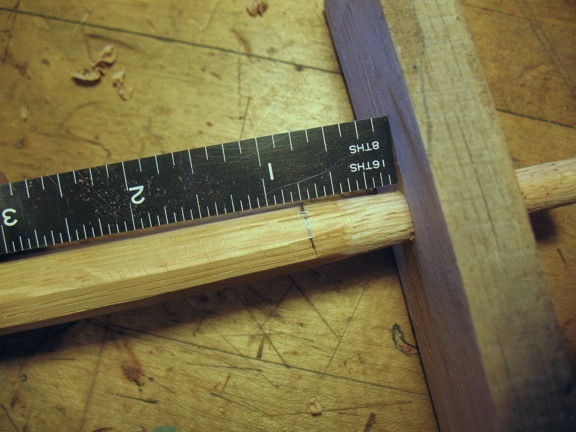
Once we routed one rocker, we simply made an exact pattern of the two slots in space (knowing that they would all be the same) and made our rocker pattern to coincide.


This was a first go at this, and the results were amazing. All 12 chairs rocked the same and except for a couple of warped seats that threw it out a hair, there was no fussing or trimming. I don't know about you, but I've never found joy in shaving the end grain in rocker slots.


There is an even simpler way to rig this, and I will be constructing and showing it when I can, but I wanted to introduce this concept, if for no other reason than to get the point across that by isolating the variables that count, we can arrive at a new understanding of rocking chair construction that even a "purist" would find useful.


It's enough to make a Tasmanian smile!!

Monday, July 18, 2011

The Student's Eye View

While I have to go unpack my tools, I figured that I'd let Charles Hamm, one of my recent students at the North Bennet Street School, fill you in on the class.


You can check out his pictorial blog here. He is enrolled in the 2 year cabinet making program and is also making all sorts of cool puzzles that you can see on his web site. I love teaching at North Bennet Street because of the talent and enthusiasm of the students, and Charles is a great example.

Wednesday, January 26, 2011

Fighting Back

When I got into the shop this morning the building was "cold soaked" as my pilot friend Gerry would say. I was out of the shop for two days in a row and that was enough. Luckily, I'd thought ahead and brought my stones and steamer in the house. I probably should have just poured out the water, but I know how much my wife likes seeing woodworking tools in the kitchen.

I realized that the walnut rocker that I am making would hit a dead stop if I didn't get the seat glued up. My preference is to use hot hide glue for this, but I didn't want to take all day to get the shop warm enough to glue up. So I snuck into the house with my glue pot and clamps to get the job done.


This is a photo before gluing. I don't think two spring clamps would get the job done. But I am rather proud of my screw clamp improvisation!


There's two things to remember when doing this. Hide glue, even fresh, smells bad to spouses. So get it out of the house before they return. Also, if you leave the glued up joint in the house, your dogs will lick the joints clean. I brought it back to the shop , foreseeing the dog issue.

From what I've read, it's most important that the glue is still flowing when the joint is assembled and clamped. After the glue gels, which is in a minute or so, much of the bond is established, but you still need to avoid shocking it for 24 hours or so. Yeah, the hide glue has some foibles, but at least I can control them and in the end, I love seeing the cut offs where the wood breaks as opposed to the glue line.

Working with the walnut feels like having cake for breakfast. I tuned up my No# 8 Bailey and dedicated it to edge jointing. I pulled it off the shelf and felt like I had a weapon!


My other stab at winter actually has to do with a bottle of Titebond 3 that I bought recently. I looked for a date on it but couldn't find one, first mistake. Then I glued up a seat with it anyway, second mistake. When I saw the cutoff break cleanly on the glue line, I sawed back through the joint, planed it again and glued it with hide glue. Ah, the joy of doing something twice!

But in the name of preserving the bottle (I'll do some sample joints to test it's strength, who knows, maybe the failure was mine) I used this little trick. I'd love to build a cabinet above my kiln to capture the escaping heat and humidity, but until then, an old plastic bottle will do.


I just make sure that one of the holes is below the cover bottle and that's enough to keep the stuff from freezing, which I know will ruin it. Take that Old Man Winter, by the way, if you don't mind, you can dump all the snow you want, just leave my driveway out of it... please.

Wednesday, January 19, 2011

Two Ideas, One Great and One Questionable

I received an email from Paul Linden with this link to Drew Langsners blog that shows an idea so simple, yet smart, that I am not surprised that it came from Japan.


I've always wanted an indoor brake for smaller work, especially on days like Monday, when it was extremely cold and we had two chairs worth of parts to bust out. So, I cut a few kerfs in a large chunk of wood left over from the barn and had an instant brake!  When it's not in use, it becomes a low bench for sitting by the fire, not a bad alternative use. Thanks Paul and Drew for the enlightenment.

Now, it's into the breach. A recent commenter asked about a previously mentioned topic of the "preload" that some folks put into their undercarraige. I said that I'd address it later, but I suppose I let it go, and maybe for good reason. This is one of those contentious techniques that seems to bring out the partisan in folks, so I am loathe to go there.

For those who don't know, the idea is this. Add some nominal length to your stretchers and the legs will be under an outward tension that will resist spreading in use. Sounds fine, and I'm sure that in most cases, it doesn't hurt to do it. So why don't I do it?

It comes down the question, "What holds the chair together?" I think well sized joints with the proper moisture content hold together chairs. For instance, would you ever put an unglued,  undersized tenon in a mortise under "preload" and expect the legs not to spread when sat upon? Taking it just a hair further, ask yourself, what does wood do when stressed into a position? It tends to relax and remember the shape. So whatever benefit that you might gain from the "preload" is either minor or short lived.

"So what?" you might ask, if it doesn't cause problems, why not use it. Well, I'm not convinced that it doesn't cause problems. One problem that I see is the possibility that when the joints are as tight as they should be, that the amount that the "preload" misaligns the parts might be enough to cause one or more joints to not seat properly.
But the greater problem that I see stems from our common humanity, which in my experience says that relying on "preload" might become an excuse for some sloppy joinery habits. Misalignment can temporarily mask a baggy joint. I've found that insuring the proper sizing and moisture content of a tenon takes more care than adding a quarter inch to the stretcher length. There are plenty of ladderback chairs that have stood the test of time without the benefit of glue, just good joinery. So for me, that is the benchmark and where I choose to put my energy and reliance.

So there's it is, you might disagree, you might not care (which is basically my take), but more importantly, if you are like me, you make chairs to embrace a quiet and humbling experience where the process is the pleasure and the rigid world of flat and square gives way to curves and most importantly, flexibility.

Tuesday, December 28, 2010

A Modest Proposal (or two)

One difficulty that just about any budding chairmaker encounters is reaming. Aside from all the hubbub about which angle and what type of cutter to use, there is the plain old physical problem of reaming.  I recommend the reamers innovated by Jennie Alexander and produced by Elia Bizzarri, because they are easily made, maintained and alterable to whatever angle you please. They also cut with a slow scraping motion on both sides of the cutter, which keeps the user from going too far too fast. The one drawback that I've found is that it can be tough to learn to steer it in a desired direction while rotating the two handles.


I know that another method is to chuck a reamer, such as the one from Emhof into a brace and go at it. I've heard folks complain about the difficulty controlling the speed with which this can lead one astray. A while back, I started horsing around with an idea (surprising right?!) that might solve both issues. Why not chuck the slower reamer in a brace so that the circular motion of turning the reamer is easier?
Well, I did and it works great. I spoke with Elia earlier about the idea, and while he's not rushing to shift production just yet, perhaps a little more r and d will get the ball rolling.

To alter my reamer, I simply drilled a hole in the end on the lathe (to insure perfect axis alignment) and then epoxied a stem from an old auger into the hole. First though, I heated the end of the auger cherry hot to anneal it so that I could drill in a pin to resist the substantial torque of reaming. If anyone tries this, I'd love to hear about the results. I'll continue to put it in students hands to judge the potential value of the idea.


Here is a ladle that I recently completed in applewood. I've appreciated the kind response to my spoon postings and have been considering a new endeavor. I make spoons because I enjoy it, and I have a day job, so selling them has not really appealed to me.  But then I got to thinking (again?!) why not sell them and donate the profits to an organization that fights hunger? Spoons, hunger, it just seems right.


So here's how I'd like to work it. As I produce a spoon that I deem worthy, I'll post it on the blog with a set price, this one is $80. It is 17" long with a 3" by 4" bowl, perfect for soups and stews.
If anyone is interested in buying it, please email me  at peter@petergalbertchairmaker.com. If I get more than one interested party, I'll put the names in a hat and pick the buyer at random. I'll give 3 days to get your name on the list before contacting the buyer, then just mail me a check (including $8 for shipping) and I'll send your spoon.


I've denied all inquiries about advertising on this blog in an effort to keep it about my passion and sharing and I hope that you can understand my interest in using the blog this way.


Not all the spoons that I make will be in this price range, I've been making a lot of smaller ones suitable for cooking that will go in the $30 to $60 range. I just thought that I'd kick off the project with a real looker!


This piece of wood came from the base of an apple tree that I cut back in my woods and I had high hopes for it while it was still in the tree. Apple can be tricky, little knots or checks can squelch the best ideas, but this one made it all the way. I've finished the spoon with repeated applications of raw tung oil. The only care necessary is an occasional wiping with walnut or raw tung oil and avoiding harsh detergents or  long soakings.


I have been investigating various organizations and would welcome suggestions as to an appropriate  place for the funds.
Thanks for considering my proposal, hopefully we can all get something from it!

Thursday, October 7, 2010

Putting it Together

This post details the final steps in making and using the tenon shoulderer that I've been showing. There is just a little fit and finishing to be attended to before setting the blade and cutting some joints. As with any handplane or spokeshave, a solid mating between the blade and the blade bed will go a long way towards reducing tearout. I clean up the bed with a chisel until the blade sits flat.


Next, I set the blade in position and mark for the bolt that will hold it in place. The best way to secure the blade is with a threaded insert like Elia Bizzarri from Handtoolwoodworking.com does with his excellent cutters,  but I've opted for simply sizing the hole so that the bolt will cut threads in this super hard chunk of bubinga.


Once the blade is secure, adjust it so that it cuts right up to the transition point. The shaving should look something like this. You might have to open the shaving clearance up a bit.


If all is going just right, the tenon should fit snugly in the straight portion of the cutter, but no too tightly or it will burnish and resist glue adhesion. It isn't a bad idea to scuff sand the tenon to open any burnishing anyway.


Now it's time to analyze the cutter and come up with a reliable number for marking your shoulder location. You might recall from the last post that I located the transition, from the taper to the straight portion in the cutter,  1 inch inside the cutter.  But the cutter isn't an arm, and bubinga isn't oak, so I perform a real world test to discover the offset for marking.

First, run a spindle through the cutter. Then mark the spindle where it enters the cutter.


Next drill a hole in a block of oak, or whatever you plan to use for the arm bow. Make sure to drill the hole with the same method and bit that you plan to use with the cutter. Finally, insert the cut spindle as far as it will go and measure the distance to the line. In this case it's 3/4". Because the hole is just a bit larger, my offset distance changed. I attribute the difference to using the hand drill in oak versus the drill press in bubinga.


When it's time to make the joint, I simply mark the actual length to the bottom of the arm on the spindle, make a mark 3/4" lower on the spindle, and run it through the cutter until the lower mark contacts the outside of the cutter.

A rat tail file opens up the endgrain portions of the mortise where the tenon exits for the locking flare of the wedge.

Here you can see the spaces created on either side of the tenon.


 And finally the wedge seals the deal. You can see that I was a bit overzealous in my filing, or underzealous in my wedge making, but you get the idea.


When you are first using this joint, I recommend sticking to the center spindle on the back of a chair and the short spindles because they come into the bow nearly vertically, which makes the shoulder location easy to measure. Depending on the angle of the taper that you use,  measuring the spindle height to the more angled mortises will take a little experimenting. For my purposes, with a 6 degree plumbers reamer, I've found that by measuring to the highest part of the mortise under the armbow, that the shoulder seats nicely, but playing around will solve this for your cutter.

Good luck!

Tuesday, October 5, 2010

Making a Tenon Shoulderer

As I promised a few weeks back, I'm going to show how I make my tenon shoulderer for the semi hammer eye joint. I have been using this joint a lot and I am sold, it's just good chairmaking, and in some ways  it's actually faster.

But first I have a few announcements,

I will be teaching a class at Highland Woodworking in Atlanta this month. I highly recommend this class because of the format. It will be a two day seminar where I build a chair and demonstrate all the techniques that the class will cover and more. Then it's a hands on 5 day chair class. Often, I find that students have trouble conceiving of the whole process until they have built a chair and this can make each step a bit bewildering, so with the info up front, I'm looking forward to everyone getting that much more out of it. I hope to see you there.

I've also built a new web site (have you wondered where all my computer time has been spent lately?) Check it out at the usual address www.petergalbertchairmaker.com.
Of course it's not finished and some of the images and text need some work, but it has been useful in helping me define what I am trying to do with my chairs.

Also, on the site, you'll notice that the "Classes" page has some new information about my teaching. Lately, it seems that I've had trouble keeping up with the number of folks who want to come work with me, so I've added a 4 person course that I plan to teach twice next year. The first class is on June 6th and will be a fan back class. I will have a full time experienced assistant and we will shoot the works while building a lovely chair. Because I've decided to limit my one on one courses, I encourage anyone interested in taking the group class to contact me soon.

Now, on to the tool,

As I covered in the previous post, this isn't a true hammer eye joint because I don't ream the mortise on both exit and entry. It's really just a shouldered tenon that gets flared.  Below are a couple of tools that I've made for different sized tenons. You can see that they operate with a spokeshave blade and a block of dense hardwood.


The tool pictured in the front has some fancy adjusters that I made (just some bolts and washers really) but I've made plenty of them without as well. The first step is to choose the size that you want the mortise to be, here I am using a 3/8ths mortise. I selected a piece of hardwood about as wide as my blade, for convenience, because as you'll see, it isn't necessary.


Here is the layout for the bed angle and clearance for the chips. One of my goals is to keep the throat of the cutter tight to reduce tearout on the tenon. Start with a vertical line to the top of the hole and then make a line that contacts the top of the hole at a 30 degree angle. Then draw another line at that angle the thickness of the blade below the line you just drew. This is the actual bed for the blade.


Here is the layout for the tapered hole in the block. I've randomly chosen 1 inch in to be the transition from the taper to the straight portion of the tenon.


To ream this, place your reamer in the hole and measure back 1 inch. I put tape there to be clear. Then simply ream until the tape contacts the side of the block. A word about reamer angles. the greater the angle, the greater the stopping power of the shoulder, but also the more obvious, it's up to you.


Here I've cut out the bed angle on the bandsaw.


 When you put the reamer in the hole, it should stop making contact 1 inch in.


Now it's time to shape the blade. The blade only cuts the tapered part of the joint, so I simply measure in 1 inch and grind away material to create a transition in the middle. I find it helps to curve the blade edge at the point that the spindle enters the cutter to help prevent any tearout. I actually blunted the edge of the blade in the straight area, it doesn't make any contact anyway.

In the next post, I'll show how to put it all together and make the joint!