Saturday, December 19, 2009

Round 'n' Round

Here's a bit of an unsung hero in my shop, the tapered tenon rounder.

Usually, I try to make all of my tapers on the lathe, where they are done quickly and accurately. But on occasion, especially if the piece is already bent before shaping the tenon, I pull out my rounder. Elia Bizzarri sells a version of this tool, that while adjusted differently, cuts a beautiful tenon. You can see it on his sight www.handtoolwoodworking.com.

What I like about my rounder, besides being cheap (you do have an old frog laying around somewhere, don't you?), is that it's as adjustable as a handplane. The control that I have over the adjustments overcomes my usual hesitance to use and set up a jig. And the results are dead on. As with most of my jigs, I found a rare piece of water stained poplar laying around the shop for this one, I guess I'll have to find another use for all that exotic hardwood.


It's simple to make. First drill a hole in a block and ream it with the reamer that you are matching. Then, cut the top off the block close to the hole. I like to finish off with a handplane until I get a nice even slot along the top of the hole. Then cut a separate bed for the frog you are using and screw it to the block. Mount the frog and you're just about there.

I like to curve the blade a bit where the tenon enters, this help shear excess material down to the size that will fit in the hole. When making a tenon, I still find it helpful to rough shape it before using the rounder, this helps to ensure that the tenon is centered properly and saves wear and tear on the tool and my wrists! (quick tip: wear those rubber dipped gloves from the hardware store, they'll save your joints)

As you can see in the image, once the tenon exits the rounder, it becomes a straight tenon that equals the size at the end of the tapered hole, with this in mind, you can easily modify this design to make straight tenons as well.

Thursday, December 17, 2009

Your Turn

That's right, I've been posting here for a few years now, and the time has come for me to ask you for your experience. When I set out to make my Crested Rocker in fumed white oak, I found it much easier to work with air dried planks for some of the thicker parts. Air dried wood bends beautifully and not having to wait weeks for the parts to be ready was a real plus. Also, as it happened, I had a great deal of the stuff on hand and it was sawn right down the fiber line. Perfect.
My experience with the air dried stuff was great, but now I am writing an article about the chair and am trying to stretch the material choices to include kiln dried stuff. The only kiln dried white oak that I have was poorly dried and I wasn't at all surprised to see the nasty checks in it after I dried it down. My question is this, have you successfully steam bent kiln dried white oak?

I suspect that there are some kiln operators out there who don't know how touchy this wood can be during the drying process, especially at 8/4". I think that the stuff I have was probably run in the same kiln load as a bunch of 4/4 pine and they just blasted the poor stuff. Perhaps a proper kiln operation would yield a wood that could take the rigors of steam bending, or maybe I'm just tilting at windmills, whaddya think?

Below is a photo of a newcomer to my shop. I decided to work through my design with some of the walnut that I bought from Lou Irion. Boy did it bring back memories, that smell!


It's still quite odd to look at a plank and break it up into pieces, but I must admit that by the end of the day I had all the pieces bent or ready for the lathe. I'm excited to test some new waters.


I did some cutting with my drawknife while roughing out the stiles, what can I say, it felt like I've been practicing for this wood for 10 years.

Tuesday, December 15, 2009

Mr. Happy

No, I don't mean the hairy guy on the right, although he was pretty cheerful! This is Eli (smooth shaven) and Mike Javidi, they were my hosts, along with Mike's lovely wife Karin, for my weekend trip to Boston. Mike is about to graduate from the North Bennet Street school. While normally I am drawn to the canine and caprine, this little fellow got quite a hold on me.
Thanks for the gracious hospitality.


The students at NBSS are of the highest caliber and their motivation is impressive to say the least. I think that the seminar went well, although I underestimated the effect that 8 hours of talking can have on my throat. It felt as though I had swallowed a rasp.
Below is a photo of us playing in the dark. Each time that I did any carving, we turned out the lights and used a raking light. I know that overhead flourescents work well for machining, but I couldn't see the surface at all with them on.


My steady rest, which was meant to protect me from the embarrassment of screwing up a turning in front of 40 eyeballs, worked marginally well. I still got a bit of vibration and it got me rethinking the design. When I got home, I flipped the V block so that the long side was down and it seemed to work well, although it does interfere with cutting directly across the contact point when the piece gets small. I think that the reason that it might be a better way for smaller pieces is that it more directly opposed the ability for the piece to jump up and over the top of the tool.

Then I had an idea. As long as I am not cutting across the actual contact point, why not use a spring clamp to lock in the V block, Wow, what a difference. Who knows, maybe my prejudice against turning spindles for chairs will even change...probably not.


And finally, here's a photo that I couldn't pass up of the initial carving on one of the fan back crest's ears. Too fun.


Now it's up to Curtis to go up in January and show them how to put it all together. Lately, he's been trying to stick around home, but the call to North Bennet Street is just too strong to resist.

Friday, December 11, 2009

Steady Rest Detailed

Here are the details of the steady rest that I made the other day. The dimensions work well but don't consider them as written in stone, I was just wingin' it.
*I've made a couple of advances in this design that can be seen in the "Mr. Happy" post*


As you can see, the construction is simple, it's a housing (like a book with no pages) and two pieces that float in it, a wedge (which rides on another wedge that is part of the housing) and the V Block. As the wedge drops in, it pushes the V block into the workpiece.

It's important to note that the floating parts need to be slightly thinner than the fixed wedge so that they move freely. I also eased the edges and waxed all the rubbing parts. After some experimentation, I noticed that the weight of the floating wedge is critical to achieving the desired pressure on the workpiece. I made the crude move of drilling a hole in the top of the wedge and jamming an old auger bit in for extra weight. A more elegant and adjustable solution would be to put a nail in the top and stack washers on it as needed. The correct pressure will hold the piece firm but not burn as it spins, remember, it's there to stop major deflection of the piece, not slow down the motor!

The other feature that seems to help is that the V notch is not simply a 90 degree notch set evenly in the side of the block, but is offset to lower the apex. I did this to more directly oppose the force of the cutter. The spinning of the work piece helps the notch climb into place and lock on.
It's also helpful to ease the edges in the V notch, to make sure that the contact isn't just made at the edge, of course it will just wear the edge away quickly in use, but everything will go smoother if you get there first.
Watching the wedge lower as you cut across the contact point is pretty fun but don't forget to make something while you do it!

Wednesday, December 9, 2009

Steady as She Goes

In making choices about the tools and processes that I use, I try to reconcile whether I am going to continue learning and enjoying working that way and if my skills and chairs will keep developing. For instance, using the skew for the finish of my turnings, as opposed to sandpaper, took quite a while to conquer, but now it's great fun and the work keeps getting better and faster.


The same has gone for steadying vibration on the lathe. I've taken some steps, such as weighting the lathe with cinder blocks and bolting it to the floor and wall, but I've always tried to manage vibration with sharp tools, reasonable cutting pace and my hand steadying the piece when needed. I figure if I can turn on my little rumbler, I can turn anywhere. When demonstrating at Peter's Valley Craft School, I even pulled out their ragged old Delta benchtop lathe and let the Oneways sit idle. Just like home!

But this weekend I'll be demonstrating one of the toughest turnings I do, which is the fan back side chair post. It's long, thin and detailed. Now I could practice and probably get pretty proficient, but I don't make many of these and I just don't see it happening. Plus, as Curtis said when asked about demonstrating this turning, "I could try, but everything has to be just right".

With all this in mind, I set out to make a steady rest. Most designs out there seem like a pain to make and set up and they rely on contacting multiple points, which means more set up time and less time turning, plus they get in the way of cutting.
Then, I remembered a steady rest concept that I'd seen and even used almost 10 years ago. It's simple and it works. Basically it's a V block that's held against the spinning piece by a wedge and gravity. It's easy to make, self centers on any size spindle and beyond that, you can cut right across the contact point and the wedge drops deeper and the V block advances giving constant support. That's right, you can cut right across the piece at the steady rest, AWESOME!

Below is the rest in position. First I removed the wedge and V block from the base and placed it about 1" behind where the work piece. Then, I clamped it to the lathe bed with a couple of little C clamps. Next I cut and smoothed an area for it to make contact. I put a little wax on as well for good measure. The V block is made of a very dense exotic that a student gave me (you were right Peter, it does come in handy!).


Here you can see that once I turned the detail intensive parts, I was able to rough out the long "vase" right across the steady rest.


Once the entire piece is turned, I go back and remove the V block and wedge and skew carefully across the contact area to finish the piece. Below is another image of the rig with the V block and wedge in position.


I'm going to make some measured drawings to post, but I just couldn't wait for them to be done to share this. Now instead of spending the entire time worrying about the wood climbing over the top of my tool, I am able to focus on the quality of the shapes and surface, it's a compromise that I can live with.

Monday, December 7, 2009

Hunkering Down


Yep, the cold has finally come to New York and we are all running around making sure that we are ready. Mikey seems pretty secure with his room full of hay, and not a moment too soon.


We decided to give the chickens run of the garden, after taking the last mint out for some ice cream. These are the girls that we got last year, and I'm happy to say that they are still laying, although slower because of the short days. They have been working the compost pile over and nipping away at the last remnants of greens.


This week is all about turning. I'll be teaching turning this weekend at North Bennet Street and am getting warmed up by making parts. Turning often is the best way to turn well, and I'd hate to be rusty in front of a crowd. I made couple of jigs to help things along at the lathe. A steady rest, which I'll detail in the next post, and this little handy center marker shown below.


I used an old hacksaw blade that I ground to a knife edge on the back and sunk into a saw kerf. It really comes in handy when I trim my roughed out blanks and need to recenter. I know that you can buy one, but it seemed like a perfect candidate for a shop made solution.


A couple of hammer whacks and rotations and you've got it.


I've found it particularly helpful when recentering a piece that is dried and gone oval. I just use a few more rotations and don't expect the lines to all meet in the center, instead, they leave a little vacant circle right in the center.

Monday, November 30, 2009

Come to Life pt. 2

In bringing the series on drafting to a close, I thought that I'd show the process from conception to completion. Below is the thumbnail of the Balloon Back childs chair that I will be teaching next year at The Center for Furniture Craftsmanship in Maine. I designed it with the time limit of the one week class in mind. It hits all the chairmaking high points but is still comfortably achievable, plus, its a sweet little piece, great size for a kid, but also big enough for an adult to use as a stool.


Below is the actual measured drawing that I used to make the pattern and build the piece.


And here's the finished piece. It was so fun to make that I'm starting another right away.
It's a good size project for experimenting with finishes, the one below is a mix of blue and black with a shellac top coat. I've been playing with the shellac lately, but that's another post!


If you look at the image below and then back at the first drawing, you'll notice how close they are to each other. Usually, my quick sketches are meant to capture the intended "gesture" of the piece, then I try to measure it out and build it without killing the fresh quality of the sketch. It's tough to do. All to often, the piece gets muddled, compromised and downright embalmed and it takes some further study of the sketch to pull it off.

Friday, November 27, 2009

Full Frontal

Today, as I headed out to my photographer to have some shots taken of the child's balloon back that I designed to teach in Maine next year, I grabbed this recently finished rocker to document as well. When designing a chair, I've often dreaded the full front view. The symmetry can make it difficult to create a dynamic look and balance in the proportions is touchy to say the least.


I've changed the spindles to make them wider in the midback region. I credit this change with making the center of this chair more lively than it's predecessors. Also by twisting the spindles to orient them for alignment in their widest part, the back has a seamless feel to it, a fine improvement.
With respect to the finish, I painted certain areas a slightly darker black to help define the transitions from one shape to another. The effect on areas like the arms and spindle deck adds a crisp somewhat formal quality that I like.


The backs of the spindles are also a shade darker.


Last week I had a young couple in the shop making their first chairs. Here's Prentice splitting up a slew of spindles.

They lucked out on the first day, I think that the days of shaving away the day on the porch are just about gone.


The assembly took an interesting turn when we realized, much too late, that Kyle and Prentice had switched undercarraiges and put them in the wrong seats!! Actually, it was pretty impressive as both went together just fine. Being new to chairmaking, I don't think that they understood what a good job they must have done on all the preceding steps to have interchangeable undercarraiges. Of course, when they switched arm bows later on (honest, I'm not making this up!), it became apparent more quickly. I guess sharing can be taken too far.

As they packed up, I couldn't resist this photo. It captured so much about them.

Now that the holidays are upon us, I'm taking some time to work on some writing and preparing to head back to Boston to teach a weekend seminar to the students at North Bennet Street. Just thinking about the cannoli has me ready to hit the road.

Saturday, November 21, 2009

Guest Blogger Elia Bizzarri


Here is a description of using and maintaining the travishers that Elia Bizzarri makes. I recommend this tool as a great value, but more importantly, it's made by a chairmaker who understands how to make a tool that really performs. While I helped Elia design the tool but am not in any way financially invested.


These travishers, unlike most on the market, operate via a slightly curved sole which gives depth-of-cut control while the tool is in use. There is no fussing with the blade to get the depth set, leaving you with only one possible shaving thickness. Sharpening is also easier because the back of the blade is concave to make removing the burr faster, plus the blade has no tangs to get in the way when sharpening the bevel. The handles are designed for chairmkers and the curve of the blade closely matches the curves in a Windsor chair seat, leaving a smoother surface.
Use: In my shop, travishers are an intermediate tool in the seat carving process between initial shaping with an inshave and fine tuning the surface with a card scraper. Travishers remove the gross irregularities and they do it in a hurry; they are the jack plane of seat carving. That said, the body mechanics involved in using a travisher are somewhat counter-intuitive and can take some getting used to.

As with most edge tools, practicing NOT cutting is the best way to learn to use a travisher correctly. Hold the travisher in two hands, thumbs resting on the flat pads on either side of the throat, with the blade facing away from you (travishers are usually pushed). Put the travisher onto the work, then roll your wrists up and away from you until the blade is no longer in contact and the sole of the travisher is all that contacts the work (see photo). Now push the tool, trying to keep the blade from cutting.


As uncomfortable as this may seem, this is where you should start each and every cut. Once you get the feel of not cutting, straighten your wrists slightly and the blade will come in contact with the work. Straighten them more for a heavy cut, less for a light cut. End the cut by rolling your wrists away from you to bring blade out of the cut; it's awkward, but rolling your wrists down will make the tool cut deeper before exiting the cut.
Blade Adjustment: As I already mentioned, these travishers are meant to be used in a way that gives you control over the depth of cut as you are using the tool. However, if you need to increase the blade exposure, inserting pieces of paper between the blade and the body will raise the blade; evenly scraping the sole will have a similar and more permanent effect. Carefully filing the shoulders which the blade seats on will lower the blade. It doesn't take much; one thickness of paper will have a noticeable effect.
Sharpening: Sharpening most tools is the same basic process: you sharpen the bevel with a coarse enough stone to be expedient, work up the grits to polish the surface and make a longer lasting edge, then remove any burr you've created by working it back and forth with your finest stone until it breaks off, leaving a crisp edge. There are many ways to do this, most of which work. Here are some thoughts:
The Bevel: A deburring wheel called a Beartex wheel (from MSC or Highland Hardware), followed by a hard felt or leather buffing wheel, is a quick way to sharpen the bevel. The Beartex is like a very aggressive buffing wheel and the tool can overheat or the edge be rounded over in a hurry, so it takes a little getting used to. Putting your wheel on a homemade threaded-rod mandrel, chucking it in a variable speed lathe and reducing the speed could solve this problem.

A safer method would be to screw the blade bevel-up to a wooden form and use some kind of slip (diamond, Japanese waterstone...) An old Japanese bench stone, the face rounded with a rasp, gives plenty of room for the hands if you plan on a lot of sharpening. The bevel can then be polished on a felt or leather wheel by skewing the blade on the wheel to give maximum surface contact. Start with the heel of the bevel contacting the wheel (to give you a frame of reference), then move the blade across the wheel towards the edge until you see a very slight feathering of the polishing compound curling up off the edge. This indicates that you are right on the edge. A heavy curl indicates you have tipped the blade too far, changing the shape of the bevel and blunting the edge.
The Back: The back of the blade must be kept flat. If the back is rounded over or made convex, however slightly, the tool will not cut, so only sharpening stones should come in contact with the back. No strops and definitely no buffing wheels. The back comes flattened and polished, so, unless you run the tool into a nail, your finest grit stone should be enough to remove the burr after sharpening from the bevel.
If the Beartex wheel gets away from you and grinding the bevel is the only option, a small grinding burr chucked into an electric drill should do the trick.


--
Elia Bizzarri - Hand Tool Woodworking
101 Nicks Bend West
Pittsboro, NC 27312
919-967-3321
www.handtoolwoodworking.com

Tuesday, November 17, 2009

Plotting Curves

Now that I have a new scanner/printer (aaaarghh!!), I am able to continue the drafting series, although the images may vary a bit as I work out the bugs in my new tool.

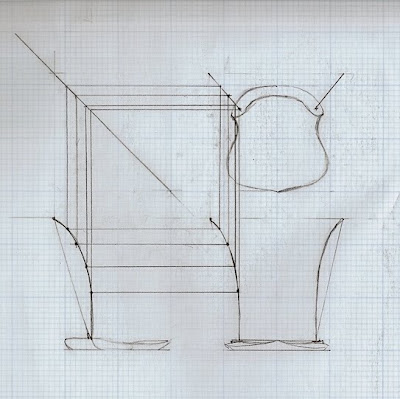
Below is a three view sketch of a basic chair top design. It shows two posts as they emerge from the seat. To start, I thought that it would be best to have the posts be straight, to determine their basic limits.


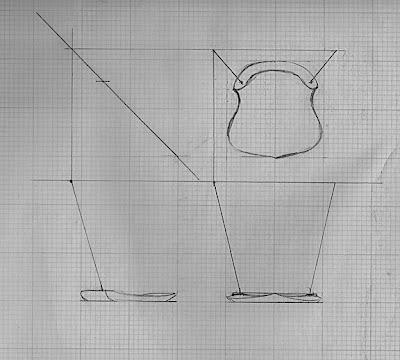
As I covered in previous posts, information is taken from one drawing to the next to create the three views. When I design a chair, I work from some basic limits. For instance, I generally know where in space that I want the crest to sit, and you can imagine that the points on the end of the posts in each drawing would be in contact with the crest at that point.


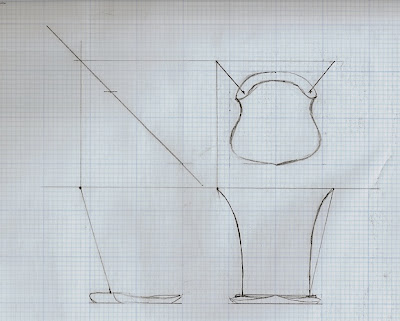
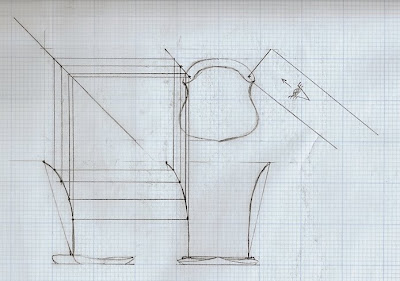
Well, that being the case, it may not matter if the posts are straight or curved, as long as the top points are at the correct spot to support the crest at the chosen position. So for fun, let's throw in some curves. Initially, I like to focus on the front view, although it might change later based on the results in the other views. This curve is a bit extreme for an actual chair, but I thought that it would help to illustrate the point.

One very important factor to note about the chair that I am drawing, is that the curve that I am going to draft still sits in the sight line plane. In other words, just like the straight post, when viewed from above, the post will look like a straight line, so the overhead view won't change as I plot the points.
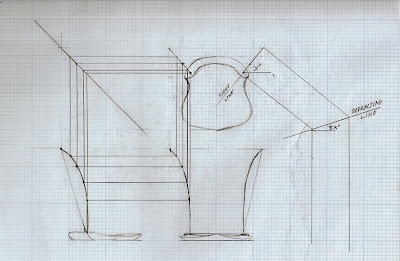
Below, you can see that I've plotted a point to start the side view.


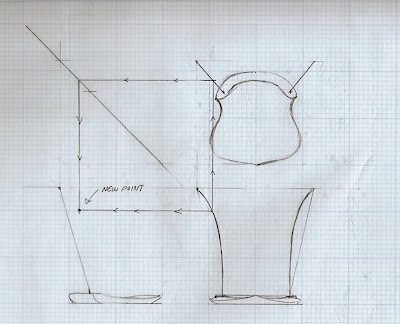
I do this by selecting a point on the front view of the post and drawing a line horizontally to the side view. Then I project a line vertically from that same point and then "refract" it back down to the side view. Where they meet is my new point. It's fun to watch the curve emerge as I plot more points.


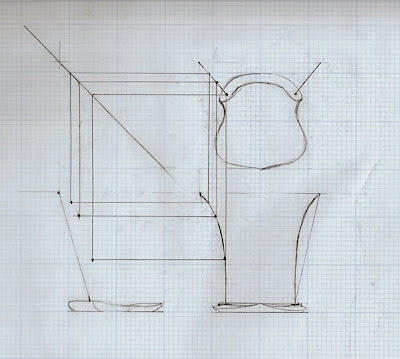
And here's the finished curve, truly a bit extreme!


Now with the side view apparent, it would be a good time, if making an actual chair design, to adjust the side view and then plot the points back to the front to see how to possibly temper this intense curve. In this instance, the side view is extreme because of the limit that I set in the beginning that the overhead view remain straight. Getting into curves that lie in a tilted sight plane is a bit heady for this example, and frankly, it makes my head spin.

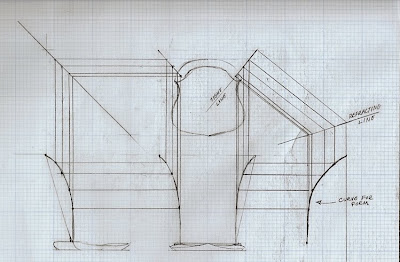
Now, this is all fine and dandy, but if I was actually making a form to bend this curve, the information to shape it isn't apparent in this drawing, after all, the actual curve isn't seen fully in the front or side view. What we need is a profile of the curve, or in other words, the view from the side of the sight line.

I figured out this method years ago and then promptly forgot how I'd done it! With my recent renewed interest in drafting my curvaceous chair, I rediscovered the method.

Basically, we want the view that the creepy eyeball in the image has. So by extending lines at 90 degrees to the post in the overhead view and refracting them at 1/2 the angle of the sight line of the post, we can begin the same process that we followed before to get the side view of the curve.


Below is the resulting curve. Hopefully you can imagine that if you rotated the curve that I plotted on the right, it would be the same as what you see in the other images.


Sitting down, working this out and thinking this way has help me understand more of the geometry involved in the chairs that I am making and the factors that I can control to make them more beautiful and comfortable. While it may seem like too much of a throwback to a time passed, to me, it's just like the time spent making chairs by hand, time well spent.

Monday, November 9, 2009

New Happenings

Recently I got a counterbore from Morris Tools in Tennessee for my arm to stile joints. Boy does it make a difference.


I used to first drill a "shoulder" with a large forstner type bit and then finish it with a smaller bit for the actual mortise. It wasn't impossible to line them up, but it took some doing. Once I reground and sharpened the cutting spurs on the counterbore, it drilled a gorgeous joint and the alignment was a non issue. Below is the finished mortise.


Also on the tool front, I've been meaning to mention that while in Atlanta, I noticed that Highland Woodworking carries the diamond profile parting tools in the 1/8th inch size. Folks have contacted me looking for this elusive creature after I posted that it was my preferred size for turning but especially for the way it works with my caliper. The smaller cutting edge means less vibration and resistance but still cuts a wide enough kerf to easily measure.

I'm not sure what it says about me, but one of the most exciting and fun things to enter life here is our new ice cream maker. It's of the old wooden bucket variety (but with a motor, sorry galoots) and we've been putting it through its paces. It fits perfectly with our plan to have our goat milking in the spring. After vanilla, we decided to try mint chip, but no extract and green food coloring for us, I found a recipe and headed to the garden to pick the mint. Yes, Sue is still mad that I put mint in the garden, we'll never be rid of it!
Below is the mint steeping in the milk.

Here is the finished custard.

And into the freezer.

And the finished ice cream (actually, I probably stopped a bit short, but it froze in the freezer fine)


By the way, half of the sweetener in the mix is maple syrup from last spring, just one more reason to look forward to next years sugaring season.