Friday, March 25, 2011
The New Digs
No, you don't want to do it. There just ain't much fun in moving a workshop. While I kept reminding myself that I have very few tools compared to a "power" woodworker, it was still difficult to see all of my tools go into travel mode. But as Helen Keller said "Life is either a daring adventure, or it's nothing at all".
This is what it looked like when they all landed in my new shop. The space is actually larger than my shop in NY, with a full second story for storage. I had to take a deep breath and shut the door to go help Sue to get the house in order first, but on day 2, I was able to sneak out and bring some order to the chaos.
This move has been a wonderful reminder of what is truly important to me. I have my family, my animals, my shop and all the experience (read mistakes) that I've had as a woodworker. As the dust from the move settles, I am chomping at the bit to get in there an make some shavings.
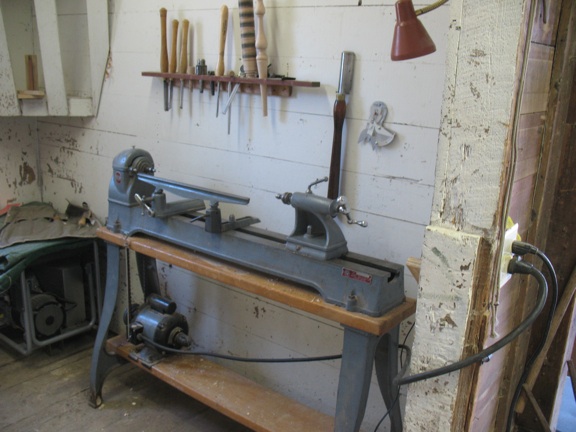
Here is the lathe room. I am very excited to have a separate space for this notorious mess maker. It's an old horse stall complete with the horses names on the door.
This shows the proximity to the benchroom. And right off the back of the shop is the chicken coop and goat loafing shed. I'm not one for omens, but finding a place in a single morning that we could rent that had all these amenities sure seemed like we were being called here. The place even came with 5 more chickens. Here is the rooster up high checking me out. I went in yesterday to pull out a dozen brown and green eggs!
Thanks to everyone who has written and called to show support and offer help. This transition has been challenging to say the least, but now that we've made it, I'm just plain excited for the potential here. Next week I'll be preparing to go to Kelly Mehler's in Kentucky. Kelly runs a top notch program and frankly, two weeks of chairmaking sounds pretty good to me.
Tuesday, March 8, 2011
Smart Moves
Here is Dan Monsees a couple of weeks ago splitting out some stock. This is Dan's third go round with me and I was impressed by his choice to make a simpler, rather than more complex piece. Perhaps you remember his triple back sack back from last fall. His choice really opened up our time together to cover some of the finer points as well as some extra topics. I really enjoyed it, it was a smart move on Dan's part, his other smart move being to use the snow to hold his split stock!
Sorry for the delay in announcing the winner of the last spoon drawing. It was John McAlevey. In a moment you'll understand the delay better.
Anyone who has read the blog for a while, knows that Sue and I have hewn a little paradise out of the wilderness here, so it might be a surprise to hear that we are moving. Sue got a new job at a fantastic library in central Massachusetts and we will be living there as of next week. We've rented an 1832 farmhouse with a barn for my shop and yes, room for our goats, dogs and chickens. Finding the right rental house for our strange needs seemed like it would be impossible, but we did it in a morning! Plus it's right down the road from Sue's new library. I like to think that it's a good omen.
Here are some photos of the new Library. It's the Gale Free Library in Holden MA.
It's a beautiful historic building and she will be it's new director. She deserves this.
Check out the front doors!
Besides being the Chair notes covergirl, Sue is exemplary at her job. She interviewed at a number of libraries in many states and was offered every job. We felt that this one was the right job in the right area.
I'll post more about the new digs soon.
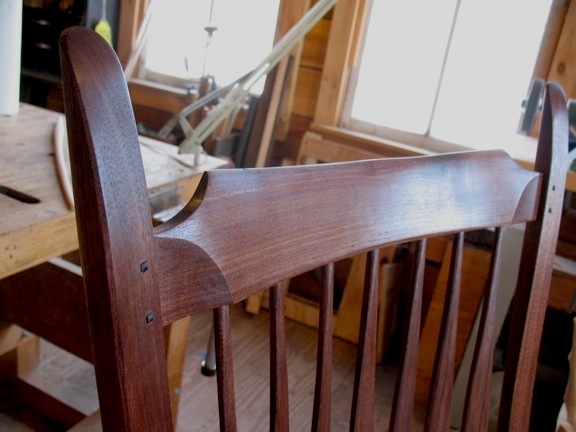
Here are some photos of the finished rocker in Walnut. One day I hope to own one myself.

So, life moves on. It's been an interesting and emotional ride uprooting from our home in New York. But it's brought back into focus for Sue and I that embracing change can be invigorating, as well as daunting. We are sad to leave our good friends here, but past moves have taught us that good friendships travel well.
Thanks to all of my students who have been so understanding and changed their travel destinations, the new shop is actually larger, plus it has a goat room in it, and what could be better than that!
Labels:
Covergirl,
Farm Life,
Students Work,
Studio Photos
Friday, February 18, 2011
Breaking the rules, but not the edges
In finishing up the walnut rocker this week, I figured it might be worth sharing some of the techniques that I use to get fluid shapes and crisp edges. Walnut has such a clarity in grain and texture, that it calls for extra attention when treating the surfaces. While many of the parts are shaved with a spokeshave to their final state, such as the legs, others, where I want to stress the shape and wood grain are scraped and sanded.

There is a rule of thumb when it comes to shaving, scraping and sanding. You don't follow sandpaper with an edge tool. The sandpaper leaves grit embedded in the surface that can dull or cause minute chipping of the blade, and generally, I adhere to this principle. But in this case, I bend or even break the rules to get the desired result.
After my initial scraping, it sand the carved area with 220 grit sandpaper and a felt block. I try to be very thorough in producing and even scratch pattern. After I've done this though, invariably, I notice the unevenness that I missed in the scraping. So I pull out the scraper again and lightly scrape the surface, and the low spots remain dull while the highs get cut. It's always surprising how much this helps the overall shape become fluid.
I figure that the scraper is an intermediate tool anyway, and easy to sharpen, so I don't mind following the sandpaper. Then I sand again through to 320 grit and feel the surface with my hand flat on the seat, quickly running it in all directions to feel for more subtle discrepancies.
I don't carve a gutter in seats that are left natural, preferring to leave a simple, clean transition from the carved area to the flat. This can be tough to do, and makes me realize that the gutter isn't just decorative, but serves as a sort of trim, to help cover the sins of less than perfect transitions!
To get the sharp edge that I want, requires first that the carved shape be even and fluid. I do this as normal, with a travisher, scraper and then sandpaper. But sanding a perfect edge into the transition can be tough because it's actually quite an obtuse angle.
But I still try my best. Now here is where I really break the rules. I reach for my handplane to surface the flat. Before I do this, I brush the surface and use a microfiber cloth to remove as much of the embedded grit as I can. Then I plane down a few shavings and the crisp edge appears.
As I said, this only works if the carved shape and surface is even and fluid. But it solves the transition issue in a wood that shows every detail.
Here is the seat after the whole deck has been planed.
Here is the latest spoon available for purchase! So please email me if you want your name put in the hat.
This is apple wood and has some striking figuring in the bowl. It's $45 plus $5 shipping.
It is a good shape for all around kitchen use. Good luck!

There is a rule of thumb when it comes to shaving, scraping and sanding. You don't follow sandpaper with an edge tool. The sandpaper leaves grit embedded in the surface that can dull or cause minute chipping of the blade, and generally, I adhere to this principle. But in this case, I bend or even break the rules to get the desired result.
After my initial scraping, it sand the carved area with 220 grit sandpaper and a felt block. I try to be very thorough in producing and even scratch pattern. After I've done this though, invariably, I notice the unevenness that I missed in the scraping. So I pull out the scraper again and lightly scrape the surface, and the low spots remain dull while the highs get cut. It's always surprising how much this helps the overall shape become fluid.
I figure that the scraper is an intermediate tool anyway, and easy to sharpen, so I don't mind following the sandpaper. Then I sand again through to 320 grit and feel the surface with my hand flat on the seat, quickly running it in all directions to feel for more subtle discrepancies.
I don't carve a gutter in seats that are left natural, preferring to leave a simple, clean transition from the carved area to the flat. This can be tough to do, and makes me realize that the gutter isn't just decorative, but serves as a sort of trim, to help cover the sins of less than perfect transitions!
To get the sharp edge that I want, requires first that the carved shape be even and fluid. I do this as normal, with a travisher, scraper and then sandpaper. But sanding a perfect edge into the transition can be tough because it's actually quite an obtuse angle.
But I still try my best. Now here is where I really break the rules. I reach for my handplane to surface the flat. Before I do this, I brush the surface and use a microfiber cloth to remove as much of the embedded grit as I can. Then I plane down a few shavings and the crisp edge appears.
As I said, this only works if the carved shape and surface is even and fluid. But it solves the transition issue in a wood that shows every detail.
Here is the seat after the whole deck has been planed.
Here is the latest spoon available for purchase! So please email me if you want your name put in the hat.
This is apple wood and has some striking figuring in the bowl. It's $45 plus $5 shipping.
It is a good shape for all around kitchen use. Good luck!
Labels:
Finishing,
Seat Carving,
Spoons
Subscribe to:
Posts (Atom)