This post details the final steps in making and using the tenon shoulderer that I've been showing. There is just a little fit and finishing to be attended to before setting the blade and cutting some joints. As with any handplane or spokeshave, a solid mating between the blade and the blade bed will go a long way towards reducing tearout. I clean up the bed with a chisel until the blade sits flat.

Next, I set the blade in position and mark for the bolt that will hold it in place. The best way to secure the blade is with a threaded insert like Elia Bizzarri from Handtoolwoodworking.com does with his excellent cutters, but I've opted for simply sizing the hole so that the bolt will cut threads in this super hard chunk of bubinga.

Once the blade is secure, adjust it so that it cuts right up to the transition point. The shaving should look something like this. You might have to open the shaving clearance up a bit.

If all is going just right, the tenon should fit snugly in the straight portion of the cutter, but no too tightly or it will burnish and resist glue adhesion. It isn't a bad idea to scuff sand the tenon to open any burnishing anyway.

Now it's time to analyze the cutter and come up with a reliable number for marking your shoulder location. You might recall from the last post that I located the transition, from the taper to the straight portion in the cutter, 1 inch inside the cutter. But the cutter isn't an arm, and bubinga isn't oak, so I perform a real world test to discover the offset for marking.
First, run a spindle through the cutter. Then mark the spindle where it enters the cutter.

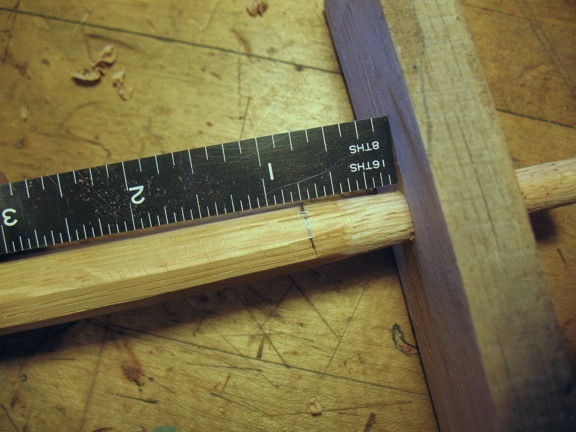
Next drill a hole in a block of oak, or whatever you plan to use for the arm bow. Make sure to drill the hole with the same method and bit that you plan to use with the cutter. Finally, insert the cut spindle as far as it will go and measure the distance to the line. In this case it's 3/4". Because the hole is just a bit larger, my offset distance changed. I attribute the difference to using the hand drill in oak versus the drill press in bubinga.
When it's time to make the joint, I simply mark the actual length to the bottom of the arm on the spindle, make a mark 3/4" lower on the spindle, and run it through the cutter until the lower mark contacts the outside of the cutter.
A rat tail file opens up the endgrain portions of the mortise where the tenon exits for the locking flare of the wedge.

Here you can see the spaces created on either side of the tenon.

And finally the wedge seals the deal. You can see that I was a bit overzealous in my filing, or underzealous in my wedge making, but you get the idea.

When you are first using this joint, I recommend sticking to the center spindle on the back of a chair and the short spindles because they come into the bow nearly vertically, which makes the shoulder location easy to measure. Depending on the angle of the taper that you use, measuring the spindle height to the more angled mortises will take a little experimenting. For my purposes, with a 6 degree plumbers reamer, I've found that by measuring to the highest part of the mortise under the armbow, that the shoulder seats nicely, but playing around will solve this for your cutter.
Good luck!

4 comments:
Hi Peter,
This is a really excellent post. Everything is so easy to understand.
Thanks,
Tico
Tico,
thanks, I think these are well worth the effort.
Good luck
Pete
Absolutely gentlemen, this information has answered and confirmed many queries, all your posts are educating Pete,
Thanks
MiM
MiM,
I'm glad to hear that it helped, basically, I was trying to clarify the process for my own understanding!
Pete
Post a Comment