Thursday, October 7, 2010

Putting it Together

This post details the final steps in making and using the tenon shoulderer that I've been showing. There is just a little fit and finishing to be attended to before setting the blade and cutting some joints. As with any handplane or spokeshave, a solid mating between the blade and the blade bed will go a long way towards reducing tearout. I clean up the bed with a chisel until the blade sits flat.


Next, I set the blade in position and mark for the bolt that will hold it in place. The best way to secure the blade is with a threaded insert like Elia Bizzarri from Handtoolwoodworking.com does with his excellent cutters,  but I've opted for simply sizing the hole so that the bolt will cut threads in this super hard chunk of bubinga.


Once the blade is secure, adjust it so that it cuts right up to the transition point. The shaving should look something like this. You might have to open the shaving clearance up a bit.


If all is going just right, the tenon should fit snugly in the straight portion of the cutter, but no too tightly or it will burnish and resist glue adhesion. It isn't a bad idea to scuff sand the tenon to open any burnishing anyway.


Now it's time to analyze the cutter and come up with a reliable number for marking your shoulder location. You might recall from the last post that I located the transition, from the taper to the straight portion in the cutter,  1 inch inside the cutter.  But the cutter isn't an arm, and bubinga isn't oak, so I perform a real world test to discover the offset for marking.

First, run a spindle through the cutter. Then mark the spindle where it enters the cutter.


Next drill a hole in a block of oak, or whatever you plan to use for the arm bow. Make sure to drill the hole with the same method and bit that you plan to use with the cutter. Finally, insert the cut spindle as far as it will go and measure the distance to the line. In this case it's 3/4". Because the hole is just a bit larger, my offset distance changed. I attribute the difference to using the hand drill in oak versus the drill press in bubinga.
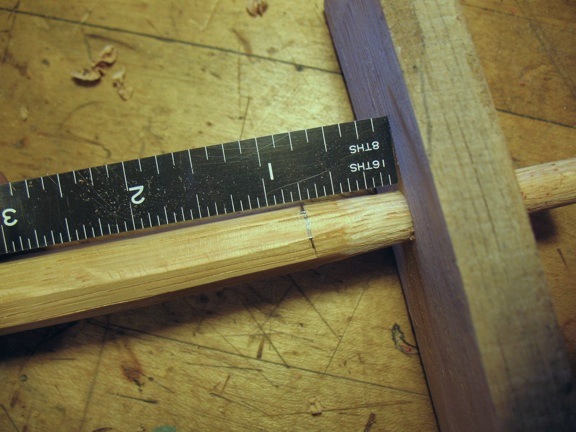

When it's time to make the joint, I simply mark the actual length to the bottom of the arm on the spindle, make a mark 3/4" lower on the spindle, and run it through the cutter until the lower mark contacts the outside of the cutter.

A rat tail file opens up the endgrain portions of the mortise where the tenon exits for the locking flare of the wedge.

Here you can see the spaces created on either side of the tenon.


 And finally the wedge seals the deal. You can see that I was a bit overzealous in my filing, or underzealous in my wedge making, but you get the idea.


When you are first using this joint, I recommend sticking to the center spindle on the back of a chair and the short spindles because they come into the bow nearly vertically, which makes the shoulder location easy to measure. Depending on the angle of the taper that you use,  measuring the spindle height to the more angled mortises will take a little experimenting. For my purposes, with a 6 degree plumbers reamer, I've found that by measuring to the highest part of the mortise under the armbow, that the shoulder seats nicely, but playing around will solve this for your cutter.

Good luck!

Tuesday, October 5, 2010

Making a Tenon Shoulderer

As I promised a few weeks back, I'm going to show how I make my tenon shoulderer for the semi hammer eye joint. I have been using this joint a lot and I am sold, it's just good chairmaking, and in some ways  it's actually faster.

But first I have a few announcements,

I will be teaching a class at Highland Woodworking in Atlanta this month. I highly recommend this class because of the format. It will be a two day seminar where I build a chair and demonstrate all the techniques that the class will cover and more. Then it's a hands on 5 day chair class. Often, I find that students have trouble conceiving of the whole process until they have built a chair and this can make each step a bit bewildering, so with the info up front, I'm looking forward to everyone getting that much more out of it. I hope to see you there.

I've also built a new web site (have you wondered where all my computer time has been spent lately?) Check it out at the usual address www.petergalbertchairmaker.com.
Of course it's not finished and some of the images and text need some work, but it has been useful in helping me define what I am trying to do with my chairs.

Also, on the site, you'll notice that the "Classes" page has some new information about my teaching. Lately, it seems that I've had trouble keeping up with the number of folks who want to come work with me, so I've added a 4 person course that I plan to teach twice next year. The first class is on June 6th and will be a fan back class. I will have a full time experienced assistant and we will shoot the works while building a lovely chair. Because I've decided to limit my one on one courses, I encourage anyone interested in taking the group class to contact me soon.

Now, on to the tool,

As I covered in the previous post, this isn't a true hammer eye joint because I don't ream the mortise on both exit and entry. It's really just a shouldered tenon that gets flared.  Below are a couple of tools that I've made for different sized tenons. You can see that they operate with a spokeshave blade and a block of dense hardwood.


The tool pictured in the front has some fancy adjusters that I made (just some bolts and washers really) but I've made plenty of them without as well. The first step is to choose the size that you want the mortise to be, here I am using a 3/8ths mortise. I selected a piece of hardwood about as wide as my blade, for convenience, because as you'll see, it isn't necessary.


Here is the layout for the bed angle and clearance for the chips. One of my goals is to keep the throat of the cutter tight to reduce tearout on the tenon. Start with a vertical line to the top of the hole and then make a line that contacts the top of the hole at a 30 degree angle. Then draw another line at that angle the thickness of the blade below the line you just drew. This is the actual bed for the blade.


Here is the layout for the tapered hole in the block. I've randomly chosen 1 inch in to be the transition from the taper to the straight portion of the tenon.


To ream this, place your reamer in the hole and measure back 1 inch. I put tape there to be clear. Then simply ream until the tape contacts the side of the block. A word about reamer angles. the greater the angle, the greater the stopping power of the shoulder, but also the more obvious, it's up to you.


Here I've cut out the bed angle on the bandsaw.


 When you put the reamer in the hole, it should stop making contact 1 inch in.


Now it's time to shape the blade. The blade only cuts the tapered part of the joint, so I simply measure in 1 inch and grind away material to create a transition in the middle. I find it helps to curve the blade edge at the point that the spindle enters the cutter to help prevent any tearout. I actually blunted the edge of the blade in the straight area, it doesn't make any contact anyway.

In the next post, I'll show how to put it all together and make the joint!

Sunday, October 3, 2010

Something in a Brown

For a long time now, I've tried different recipes and ideas to paint my chairs in a way that has that rich look of old brown patina. The first thing that comes to mind when you see the chair should be "wood", not "paint". While the black over red has always given a rich result, it still doesn't have that look of an old tool handle or banister that I've wanted.  And the brown paints offered by the milk paint companies have left me uninspired. So while tinkering with my new birdcage armchair, I figured I'd try something new, and from the results, I think that I'm on to something worth sharing.


Above is the chair in progress.

Now I think it's pretty obvious from this blog, that I don't have problem sharing information, but I am shy to admit that I had a brief moment where the notion of a "secret recipe" seemed appealing, but then I thought, "what if I get hit by a bus tomorrow?", it would be lost! 
 Then I thought, "wait a minute, Jeffesonville doesn't even have public transit!", anyway this went on for a few minutes and then I of course decided to share. 


First, a quick word about surface preparation. As much as I like not sanding on the lathe, the burnished surfaces of a skew won't hold the paint well enough to pull this off. So take that perfectly skewed turning that you always make (right?!) and rough it up with some sandpaper. I know, sacrilege.

Like I said, I haven't found just mixing brown paint to be very attractive,  layering a few colors is one of the keys. So here's what I did to get my results. First, the "secret" ingredient in the process is Van Dyke Crystals. These are basically processed walnut hull that dissolves in water to make a stain. I stained the entire chair with this first. Yes, I know, this is no breakthrough, lots of folks do that!


Here's where it gets different, mix some barn red paint from the Old Fashioned Milk Paint Company, but instead of water, use the stain. Yep, the stain. It makes sort of a rich, blood rich as a matter of fact, red. I thin the paint more than the direction recommend, basically just thin enough to pass through a paper cone paint strainer. Paint the chair as usual.

For the next coat, mix equal parts black and barn red, and once again, use the stain as the liquid. This is brown, not gorgeous, but a good brown. Paint as usual.

The third coat is plain old black, very thin. You can use the stain again or not. And here is where the subtleties of choice come in. You could use the stain and add some red to keep the chair a lighter brown. But I went for black. 

It's vital to let each coat dry thoroughly to retain it's contribution. I burnished the chair with steel wool as usual and here's the final difference. Oil it with the Dark Tung oil from the good folks at the Real Milk paint company. I love this stuff. It colors any pores that were reluctant to  take the paint, which is common in oak and gives a lovely warm cast to the paint. Also, it's not toxic, so you can use it with out a full hazmat suit. After a few coats, you might desire to use a harder finish, such as Minwax Antique Oil or just a varnish oil mix.

A little extra rubbing with steel wool warms the surface color

I haven't gotten that far because I can't stop rubbing it with the tung oil!


You can get the Van Dyke Crystals from Garrett Wade (I hope this makes up for my "gentleman gardener crack last year!). When viewed from across the room, the chair has a striking dark silhouette, but as you get closer, the variety of colors in the surface get warmer and more interesting.


Not my last experiment in the finishing arena, but a great start!