Showing posts with label Splitting. Show all posts

Sunday, October 5, 2014

Sequestered

I was talking to my brother the other day and had to tell him that while I enjoyed hearing from him, he will not here anything different from me for a few weeks. I'm drawing.
Here are the portfolios housing the nearly completed drawings for the upcoming book. I think there are somewhere around 350 of them.


The old adage about a person who defends themselves in court having a fool for a client might also apply to illustrating ones own book. There have been many times that I cursed myself for taking the project down this path, but now that I am nearly done, and have learned so much about how effective illustrations can be in relating process, I am nothing but excited. Every time that I've thought, "this might be easier to take a photograph", I've realized that I could give much more information or clarity in a drawing. Hopefully the reader will agree.


This project has been hugely cathartic to me, not that I needed more catharsis this year. It's been a great chance to take stock of the last 15 years of learning, making and teaching. In a way, it feels like I am clearing the slate for more information in my own head. But for now, here I am, all day, everyday, drawing. The book should be in the hands of the designer within a few weeks and we hope to the printers soon after.


Tuesday, September 17, 2013

Nice to Meet You

Since I moved to Sterling, Massachusetts, I've been swamped with projects and traveling and had little time to get to know my community or let them know me. That changed when I talked to Dave Gibbs at the Sterling Historical Society about combining our efforts and interests. The Society has a lovely collection of Windsors that were made here in town as well as a barn full of the old tools from its workshops. The first floor of the barn is relatively empty, and I thought it would be a great location to host some 6 person classes. So, next summer, I hope to schedule three classes there, but I'll post more on that once we work out the details.
To help introduce me to the community, the Sterling Historical Society hosted a demonstration at the local American Legion post and Ross Jones of Harvard Video Productions filmed it for us. Here is the video of the demonstration.
If it doesn't appear on your screen, click here to go to the original site.


As you can see, I am elated to be starting this project. I think 6 is a great number of students for a class. Plenty enough for a group energy and atmosphere but few enough for lots of personal attention.

And if I got you interested in my talk with Dudley Hershbach, here is a great interview with him that I found every bit as engaging as sitting next to him on the plane.


and once again, the link if you don't see the video here.

Wednesday, October 24, 2012

Among the Trees

Every time that I step outside I seem to be fighting the trees. When they talk about the amazing colors of fall in New England, no one seems to mention that the clean up is worse than at Woodstock. I've been blowing leaves with abandon and clearing paths to the firewood that I split last spring.


After two eye blistering days at the computer and drawing board, I took to the woods to take down a couple of trees for next year. I know that winter is bearing down on me and I am woefully short on firewood for this year, but I still reverted to my favorite posture in the woods, playing.

I got a new hatchet at a garage sale recently and it holds an amazing edge. It's one of those blades that rings out when you tap it. So I took a few minutes and hewed one side of this ash log.

It isn't exactly a hewing axe, which would be flat on one side, but I sharpened it so that it was close to one and for a lefty too.
I got it reasonably flat. The blade held the edge and took great shavings but it would have been better with the correct geometry. It was all that I could do to keep from building a fort.


Wednesday, January 19, 2011

Two Ideas, One Great and One Questionable

I received an email from Paul Linden with this link to Drew Langsners blog that shows an idea so simple, yet smart, that I am not surprised that it came from Japan.


I've always wanted an indoor brake for smaller work, especially on days like Monday, when it was extremely cold and we had two chairs worth of parts to bust out. So, I cut a few kerfs in a large chunk of wood left over from the barn and had an instant brake!  When it's not in use, it becomes a low bench for sitting by the fire, not a bad alternative use. Thanks Paul and Drew for the enlightenment.

Now, it's into the breach. A recent commenter asked about a previously mentioned topic of the "preload" that some folks put into their undercarraige. I said that I'd address it later, but I suppose I let it go, and maybe for good reason. This is one of those contentious techniques that seems to bring out the partisan in folks, so I am loathe to go there.

For those who don't know, the idea is this. Add some nominal length to your stretchers and the legs will be under an outward tension that will resist spreading in use. Sounds fine, and I'm sure that in most cases, it doesn't hurt to do it. So why don't I do it?

It comes down the question, "What holds the chair together?" I think well sized joints with the proper moisture content hold together chairs. For instance, would you ever put an unglued,  undersized tenon in a mortise under "preload" and expect the legs not to spread when sat upon? Taking it just a hair further, ask yourself, what does wood do when stressed into a position? It tends to relax and remember the shape. So whatever benefit that you might gain from the "preload" is either minor or short lived.

"So what?" you might ask, if it doesn't cause problems, why not use it. Well, I'm not convinced that it doesn't cause problems. One problem that I see is the possibility that when the joints are as tight as they should be, that the amount that the "preload" misaligns the parts might be enough to cause one or more joints to not seat properly.
But the greater problem that I see stems from our common humanity, which in my experience says that relying on "preload" might become an excuse for some sloppy joinery habits. Misalignment can temporarily mask a baggy joint. I've found that insuring the proper sizing and moisture content of a tenon takes more care than adding a quarter inch to the stretcher length. There are plenty of ladderback chairs that have stood the test of time without the benefit of glue, just good joinery. So for me, that is the benchmark and where I choose to put my energy and reliance.

So there's it is, you might disagree, you might not care (which is basically my take), but more importantly, if you are like me, you make chairs to embrace a quiet and humbling experience where the process is the pleasure and the rigid world of flat and square gives way to curves and most importantly, flexibility.

Monday, January 10, 2011

Promises Kept, finally

As promised, here is a short video that demonstrates the factors in play when splitting green wood for chair parts. Please be kind if I butcher the physics a bit and remember, we're chairmakers, not aerospace engineers (even though you might be!)
It may not be my slickest editing job, but hopefully it will help clear up a bit about using the froe and getting more parts from less wood.


And here is the next spoon for sale in the Spoons for Hunger Project! I keep learning so much while making these things that I just can't resist.


It's a great size for everyday use in the pan and on the table. Once again, it's applewood (I am blessed with apple trees!) and I am asking $45 and $5 shipping.


If you are interested, please put spoon in the subject bar and email me at peter@petergalbertchairmaker.com.


I may not get back to you (last time I answered 15 emails!), but rest assured, I got your name and will announce the winner in about 4 days. Thanks

Sunday, December 26, 2010

A Brief Reprieve (from holiday joy)

I don't know about you, but after 3 days of eating and merriment, this is how I felt.


It was actually a great relief to get back outside and get my bones moving, and with an approaching storm, there was no shortage of chores. First, my brother Andrew wanted to split out some hickory for some more firewood carriers. By the way, the full instructions on these is in the Fine Woodworking compilation book "Bending Wood" which I recommend for a number of good articles.


I haven't forgotten about my promise to make a video about froe usage and splitting, but frankly, it was cold out there!


Here he is getting reacquainted with the froe. I split out a bunch of white oak for a crested rocker that a student will be building in February as well as some for a clients birdcage armchair. I thought that it would be better to get it all done rather than digging it out of 10 inches of snow tomorrow.


I've started setting up my blacksmith shop under the shed next to the shop. I have a lot of work to do to get it up and running, but just seeing all the equipment in one place is inspiring. I fed my brother a huge meal before asking him to help me move the anvil bolted to the stump 75 yards, ah family...


Here are a couple of my xmas presents, blades from Pinewood Forge! Del Stubbs makes amazing tools, beautifully shaped and tempered to hold a razor edge. I honestly don't think that I'd be as motivated to carve spoons if it wasn't for his blades. I like to put on my own handles, which saves $12 and gives me lots of options. My handles tend to be ugly but they feel great in the hand. The oblong holes can be a little tricky, but epoxy covers a lot of sins. If any one shows interest, I'll show my technique.


And Tee in Atlanta would never forgive me for neglecting the animal photos. Here is Maggie with her chubby kids. They have a toasty barn to retreat to when they so desire.


These handsome fellows are thriving, but like the rest of us at the holidays, they are looking a bit swollen!


Wednesday, October 20, 2010

Splitting Boards (Not Hairs)

In the never ending search for methods to make my work more efficient and enjoyable, I've started having my hard maple sawn into planks. 

If the main reason to split the parts from the log is maintaining the straight fiber line and turning green wood, then I've lost nothing in this process and gained quite a bit. The problems that arise when dealing with the logs are spoilage (I like splitting only what I need, instead of a whole log at once, but in summer, this is a recipe for spalting), waste through splitting,  and the troubles associated with moving a whole log.


By having my logs (which are chosen for their straightness) sawn by a conscientious sawyer, I get the best of both worlds, plus, if the boards sit for a while in the stacks, they dry, not rot!

As you see above, the first split is down the pith. Because the 2 inch chunks of maple that I split off don't deflect much, I can generally just make my way across the board splitting off the blanks. If the sawn line deviates from the fiber line a bit, I can subtly adjust the way that I mount it on the lathe to 
correct the problem.


I've found that this works well even with air dried maple, and for my oak turnings, I've been splitting oak boards. The main benefit that I've found with the oak, is that the parts don't check while drying, which is a problem that I kept having when splitting and turning green oak. I'm not going to lie to you, turning dry wood ain't nearly the joy of green wood, but as with most things, you will draw your own lines in the sand!

Yes, I actually built a new brake! Here is the layout for the hole locations in the side. The numbers locate the holes from the left and bottom edges.


I did choose to include a leverage arm. I put notches in it to hold the straps in place. Knowing where the stresses most affected my old brake, I reinforced this one with plywood scraps from the start.


On the home front, here is Seth (remember him building my countertop) and his lovely bride Johanna at their wedding in Salem. They stopped by for a couple of days on their way to their new home in Asheville.


And for my goat fans (this is you Tee), here is the Chair Notes covergirl with her favorite little fellow. Boy has he grown!


He's a bit dopey but she loves him (yes, I know what this implies).
All of our others are healthy, happy and living as a herd. I'm heading to Atlanta tomorrow to demonstrate and teach at Highland Woodworking, I hope to see you there!

Friday, October 8, 2010

Proof of Concept

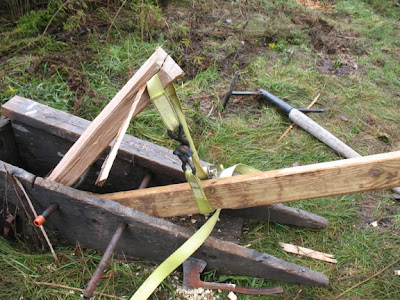
Every year, my brake gets a little uglier. Usually it breaks through abuse, the freeze, thaw cycle and the life outdoors, but I scab on some old scrap of wood and keep it going, always promising myself that soon I'll build another. Yesterday I had an idea that might just spur me on to really do it.


After giving my talk about splitting, you know, that one about how when both sides of a split piece deflect the same amount, the split always runs straight, I had an idea. Whenever I come up with something that I haven't seen or tried, I try to find the shortest distance to the "Proof of Concept". I did it with my caliper (the first one used an old plane blade and some rubberbands) and I do it with my chairs.

So while looking at the brake, it dawned on me how easy it would be to hook up a lever to increase the leverage on the larger side to get the equal deflection while splitting. My student this week was game so we took a few minutes and rigged up this fine looking contraption.


Here is Peter (there are a strange number of Peters in woodworking) applying the necessary pressure and splitting off a small crest for his comb back. It worked like a charm, too well actually, as he was able to make the split run into the larger piece!
Most of the time when splitting, we strive to split equal sized parts because even deflection is relatively easily achieved, but necessity means that we must often split off a third of a chunk, and this is where the extra leverage comes in handy.


The biggest problem with the "Proof of Concept" moment, is that I am often so enthralled by the crude simplicity of the thing, that I'll use it that way for years!


Here is Dan finishing up his triple back a few weeks ago. I really like this chair and hope to own one myself someday!

Saturday, April 5, 2008

Riving Brake

A quick note, my web site now has the ability to process credit card orders for the Galbert Caliper. I will be revamping my entire site in the next week or two. What ever happened to the simple chairmaker life!?

I have tried throughout the writing of the blog to keep it relatively free of commerce, I believe that the woodworking world has plenty of that to go around.
I will be focusing on turning more in the near future, but for specific Caliper info, please look to my web site as I will be adding more specific content there, where commerce belongs.


Here is the brake that I use when riving green wood. Riving is merely the act of splitting the wood along the fibers and the brake simply holds the wood and allows you to use leverage to control the splits. I enjoy the crudeness of my brakes, which last about 5 years in the yard. As you can see, any piece of metal (or wood?) will serve as the crossbars.
The one change that I'll make on my next one is that the piece of wood along the bottom of the brake will extend further out each end to give less chance of it lifting off the ground when riving large pieces.


Here you can see that the placement of the rods allows me to rive different sized blanks but still have them rise at a comfortable working angle. Make yours junky like mine, I am pretty sure you'll discover necessary changes and build the next one differently to suit your needs. A brake is one of those tools that should be a slave to function, save the pretty stuff for later!

Wednesday, March 26, 2008

Splitting Maple

Looks like winter is having its last gasp around here! One or two quick blasts and it should be over.


I recently purchased a beautiful hard maple from my sawyer. It looks like a cartoon drawing of a perfect tree. The heart is about the size of a quarter and the rest is clear straight wood.
I have resorted to sawing maple on my previous log which did not like to split, which taught me a few things. There seemed to be a higher yield by sawing and the blanks were easier to handle and chuck up than splits. This may be true, but my instinct is still to reach for the sledge and wedges rather than the chainsaw mill.


Above is a photo of the layout that I have commonly used to split maple. Really, it is the layout that works best with ring porous hardwoods, and I've used it out of habit. There are some problems with the layout such as the circular lines, the odd shaped trapezoid pieces and the fact that no line runs all the way from the bark to the heart.

Below is the layout that I now try to use with my maple. It more closely mimics sawing the wood, which gives square blanks and a clean grid that always goes straight from one side to the other.


There are only a couple of difficulties with this layout. To start the split, I score a line 1/4 inch deep along the entire length by striking a wedge or hatchet. This helps to direct the fracture. It is usually necessary on large pieces to simultaneously drive wedges along the length of the line to prevent weak areas from cracking. The other difficulty is the patience required. Oak and hickory etc... have weak layers between strong fibers, and the splits love to stay on the fiber line. With maple and other more homogenous woods, the splits tend to be more influenced by the mass of the splits. When the mass of the two parts being split is uneven, the line will run out toward the weaker side. By tapping the wedges gently, the fibers have more of a chance to separate, rather than shear under the uneven influence. I know that the impulse to swing a sledge hammer like you're driving railroad spikes is tempting, but in this case, it's all about finesse. It takes some practice, but I have found the higher yields and simpler approach worth it.
Good luck.

Monday, March 19, 2007

The Road to Bending pt.1


I recently got a question about my steamer setup and it got me to thinking about covering the topic of bending wood. As I thought about it, I realized that most of the important action comes long before the steamer gets turned on!
Bending green wood gives chairmaking its creative freedom. I can draw a line on a piece of plywood, cut it out, and bend a piece to shape within minutes. It is truly acrobatic. To get this freedom, there are a few basic techniques to follow, luckily, the bending is built into the nature of the tree.
The strength of a tree depends on its flexibility, the ability to bend in the wind will be the same characteristic that we exploit in bending with steam. To preserve this characteristic, we split the wood. Careful splitting with a froe can produce pieces very close to finish dimension and with the long fibers intact. The froe is a levering tool. The split is guided by driving the froe into a bolt of ring porous hardwood (oak, ash, hickory etc...) and pulling on the handle, which torques the blade. Splitting a bolt into equal halves normally results in a straight split. Proceeding slowly will allow the fibers time to separate, think of pulling apart a stalk of celery. If the desired piece is less than half of the bolt or the split starts running towards one of the sides, you can pull on the larger side and redirect the split. Dave Sawyer has a great way of explaining this. He says that the goal is to equalize the curve that each side has leading to the split. If the curves are the same, the split will run straight. I've found that this can be achieved not only by pulling on the heavy side but by adding more weight to the light side. I do this by placing the heavy side down, with the froe in the split, and putting my weight on the light side (see photo, with strangely disembodied arms). This has the desired effect of equalizing the curves by stressing the heavy side and restraining the light side. Often, I will actually apply a constant force to the froe, not quite enough to run the split, and then pull down on the light side as described. It takes less stress for the wood to split along the fibers, as opposed to breaking them, and when the pressure that I am applying by pulling on the wood is enough to equalize the curves, the split will run start running. This may sound complex but it is simple in practice and vital to both following the fiber line and getting the most out of my logs. Here are a few tips to using the froe
1. The wood will always split easier in the radial plane
2. Try to keep the pieces as square in cross section as possible, the more extreme the rectangle, the more difficult it becomes to direct the stresses effectively
3. Split off any wavy pith wood first, the tensions in wavy wood can throw off your judgement about what is equal mass
4. Split off the sap wood, often weakened by decay, it may be necessary to split it halfway and then flip the bolt and come in from the othe side. Adding mass to the sap wood by pulling on it may help the split run straighter. If it does run out, no big loss, it's waste anyway.
5. Let the wood do the splitting, don't bully it. Wait until the wood responds and then listen. When the noise of fibers separating stops, proceed with more pressure
6. Blame your froe! I am in the process of discovering what a good froe needs to be and the store bought one that I've been using since my antique one broke, ain't it! The blade is too wide and too fat at the top. The pressure it exerts is overwhelming and tough to control. More on this later
I'll be continuing this line of info through the bending process, I hope it's helpful and appreciate feedback