Showing posts with label Maple Syrup Making. Show all posts

Wednesday, April 3, 2013

Spring Report

From my lack of posting lately, you have probably surmised that it's been a busy couple of months. I have been working to wrap up projects, some new tools, some new techniques and of course some classes. I've been teaching weekends at the North Bennet Street school in Boston. After their initial taste of chairmaking from Dan Faia and Elia Bizzarri, some of the students decided to bring me in to teach some other designs. It's a fun place to teach with lots of talent and energy.

But as with all things in this world, choices must be made and consequences endured, so my maple syrup season has been whittled down to a couple of days of running out to the rig to check the fire, while tending to other business. It's the exact opposite of the way it is meant to be, which is an excuse to hang out outside for 8 hours tending a fire and watching the spring arrive. But, I needed to do it, even if it wasn't the ambling joy of burning wood and time together.

But that said, my efforts last season to improve my rig worked great and I was able to get more than a gallon each day that I boiled. Enough for me and my helpers.
Speaking of helpers, he are pics of Dan and Tim helping me split out parts for a class that I am teaching next week at the Port Townsend School of Woodworking in Washington state.


I am excited to go to the northwest, I haven't been there in 20 years. This is my first time teaching there and I am excited to be expanding to the west. There is one spot open if you are interested.


I forgot how much work it is to prep an entire classes worth of material. I've never missed Greg so much.

I did finally get a chance to paint the "glueless" chair. It hasn't fallen apart yet!
I have been experimenting with some new paint and new techniques and am excited to share the results. I have some more testing to do, but I think that I might be on track to the fool proof finishing that we all want (especially this fool).

I set out to paint the chair blue, and I did, but the layering, and shellac (hint) shifted the color to the green
In case you missed it, check out Jameel's blog over at Benchcrafted.
 
He made his "smarthead" shavehorse and made some updates and additions to the plans. It boggles my mind how pretty he makes everything. I wonder if his sock drawer is a mess.
I am getting very excited for the class at Kelly Mehler's where we will be building this project as well as forging blades, getting down and dirty with our tools and as always, having a ball.
Happy Spring!


Wednesday, March 21, 2012

The Travisher Refined

My love affair with the travisher began many years ago when I made my first one. Watching the shavings fly while the tool rides along the curves of a seat is pure pleasure. I've made many others since, but have always suspected that there was room for improvement. So recently, I set out to make a better travisher with the goal that it would be easier to use, more precise and more durable.
Here is the result.

The shavings that you see are from the endgrain of a pine board. I've added a brass sole plate to the tool after noting how quickly the sole, even out of rosewood wears. The rest of the tool is made from walnut.


I shaped and mated the brass to the blade, which I bent and heat treated to hold an edge appropriate to the use of the tool. Andy Jack and I have worked out the process to a point where the results are consistent and can hold a great edge.

Here is throat.


The radius of this travisher is a bit tighter than I used to make, about 3 1/2" and the blade is consistently set proud of the sole plate around the radius.

For a travisher to work properly, the sole must be slightly angled upward and curved so that the contact point allows the user to vary the depth of cut. It's very rewarding to put these details into the brass plate, knowing that they will last.

Andy and I are going to produce these, in limited numbers, for $200. I'm proud of the tool and as usual, it's all just a ploy to spend more time hanging out with Andy. Please email me (peter@petergalbertchairmaker.com) if you are interested in purchasing one and we will let you know the lead time.

You may have noticed my absence from posting for a while, and a few of you might have guessed, it's Maple Syrup season! Well, this year, I promised myself to go all out as a celebration of our new home and a hard and busy year. So, with the help of my brother Andrew, my pal Dan and the generosity of Ray Duffy, I built a new evaporator from a 275 gallon oil tank and bought some lovely pans to get a boil rate of about 12 gallons an hour. That means a gallon of syrup takes less than 4 hours to make, versus about 10 hours on my old rig!


Here is the tank, with a door from a barrel stove kit.

And here it is boiling away!

The pans are set up like a snaking trough where in fresh sap is introduced on one end which pushes the condensed sap through to the end where it is near finished syrup. It was a ball to watch and you can see how we drew the syrup off of the finishing pan up front. We tinkered with the rig a good bit, and on the last boil of the season, we got the whole surface boiling beautifully.

Here is the product.

You can see the different grades. The one jar is upside down to sterilize the lid. This is the best syrup I've made, with a distinct maple flavor and no sugary bite. I can't wait for next year.

But now, I'm off to Kelly Mehler's to teach with Greg Pennington for a couple of weeks, always a great time.

Tuesday, February 21, 2012

My Favorite Day

The phrase, my favorite day, could be taken a few different ways. Some might think that it's a reference to the "best" day of my life, like one would think of the birth of a child, or a game winning catch etc...but I mean something else.

Since I started trying to work for myself many years ago, it's been a constant struggle, not just to pay bills, but to make sure that the business that I was nurturing, was making me as happy as I had intended. Sure, with being my own boss, there is always the privilege of deciding my priorities and how to spend my time, but as anyone who has tried knows, it can be a huge burden. Just because you know your craft, doesn't mean you can manage your self with ease.

In the past few years, I've become aware of all the components that go into making a great day at work, and home, so that my favorite day can be revisited over and over.

 The other day, I had an especially good one. It started in the shop, doing some finishing work on a couple of walnut chairs.
 
 When I took a break to feed my animals, I realized that my little goat Silky was in season. Sue and I have gone back and forth about the logistics and priority of whether to breed her this year, and with the opportunity presented, we both firmly came down on the side of Do IT! So this summer, we'll have kids, milk, cheese and yogurt.

When we returned from the farm where her suitor lived, my brother set up my sap boiler to make some syrup, while I got back to work in the shop.
I don't have to tell you how much I love syrup season. I just ordered a new larger pan and will be building a new rig when I return from a seminar in Rochester this weekend. This rig was built by my friend Ray Duffy.  It works great, but if I'm going to make syrup for all my friends in the neighborhood, I need more capacity.

One of the easiest components to "my favorite day" and most readily accessible, is right here. I love working in the shop, having an idea and sitting down at the end of the day and sharing it. It's the perfect end to my work day. With that in mind, I am working on ideas for expanding this part of my day.

As for sharing ideas, here is one that I haven't directly featured, probably because I use it so constantly that I don't even notice it. Those who have taken classes with me will recognize this.


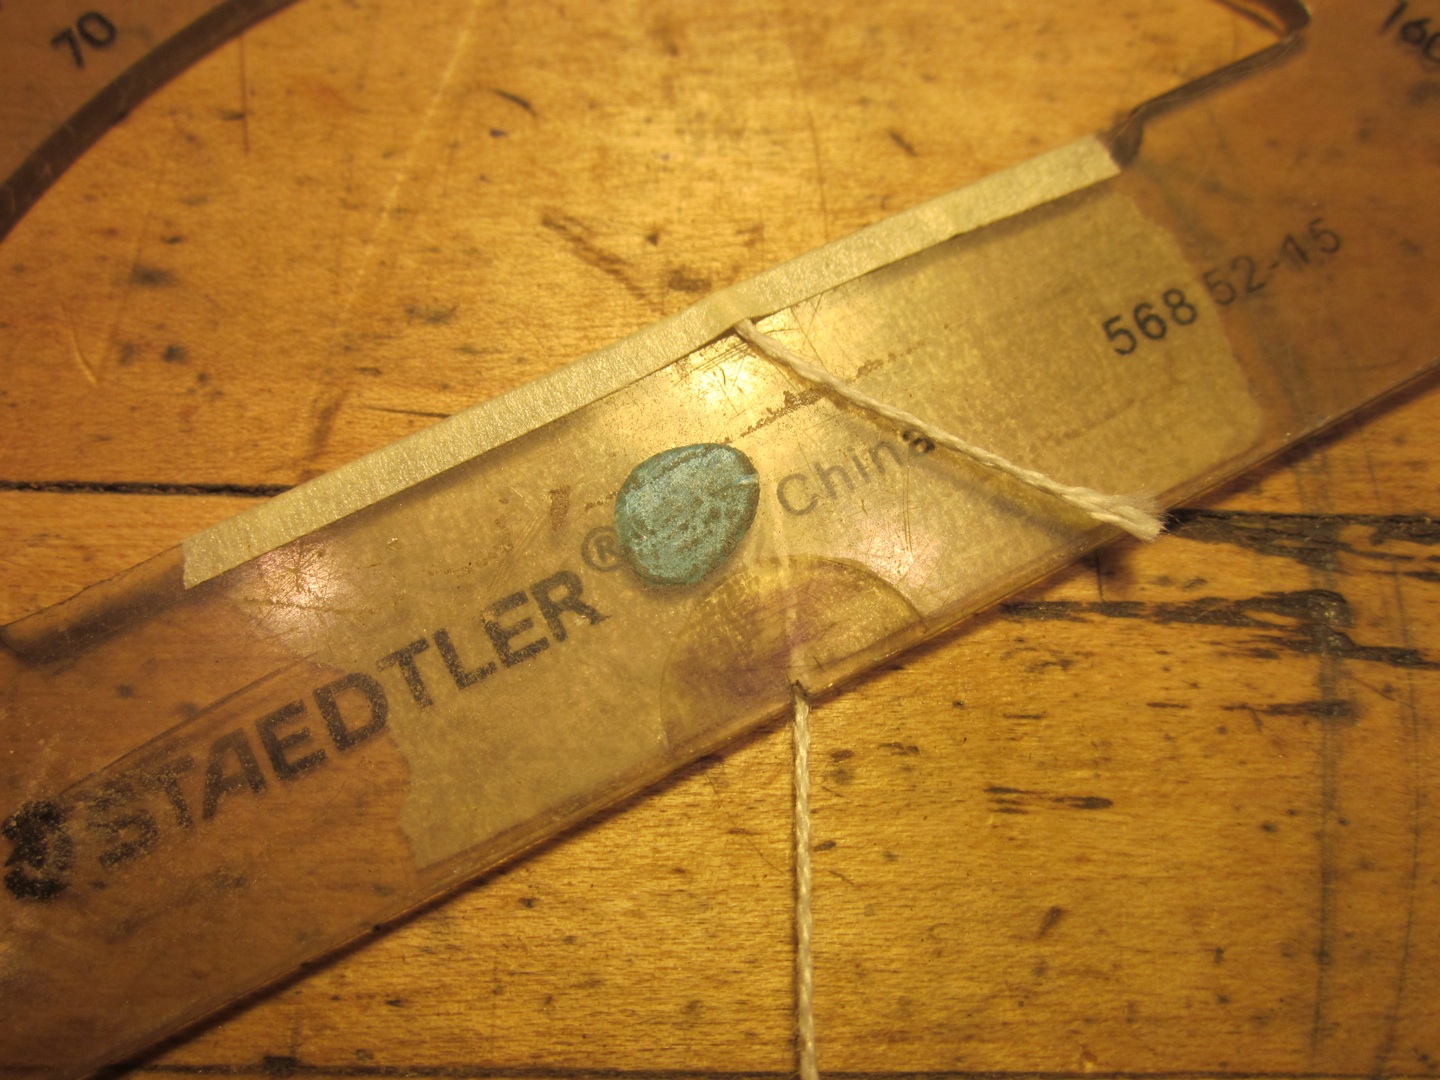
I use this to measure the angle of the center spindle in relation to the seat once the crest or arm is in place, amongst other things. This critical measurement has everything to do with the comfort and consistency of my chairs. Most of these protractors have two fins that stick down below the flat bottom. I simply grind them off and level them to the bottom with some sand paper on plate glasss.

Then, I make a small notch at he point where all of the angles originate and tape a piece of kite string to the back.
 Here is the protractor in use. Just place it over the center hole and position the string on the crest where the center spindle will hit. Then read the angle.

Of course the angle is different for different chairs. Most of my straight, round spindle armchairs sit at 12 degrees, side chairs at 8 to 10 degrees and curved spindle chairs vary with the curve, and the intended use.

Today is a sunny day, the sap is flowing, I have work in the shop to do and I've already posted, looks like it's going to be a good one!

Wednesday, March 10, 2010

Fast Forward


I can always tell when my world is spinning a bit out of control when I can't find the time to post here! Over the past years, posting here has given me a sense of time and balance that I miss when things get too fast. From the image above of the Chairnotes Covergirl on the beach, you'd think all was smooth sailing. But after a few short days in Florida, we returned to this!!!


I managed to dig out some wood from the snow bank and head down to Kelly Mehler's School in Berea to teach a continuous arm class. I really can't say enough about the wonderful school that Kelly has down there. It is a reflection of him and his wife Terri, thoughtful right down the visit from the masseuse on Wednesdays! The fact that some of the students were on their ninth return trip says more than I could say. Here is Jim Crammond, who was also in my class at Arrowmont last year.


The first day of class, we managed to heat the whole building with our effort!

Seeing the bows like this brought out the art student in me.

Everyone's chair was together by 5:15 on the last day of class after a lot of hard work. I was very please with the quality of the chairs, which is largely due to the assistance of Greg Pennington (third from the left), who's high caliber chairmaking skills and humor kept the class flowing. I'm already looking forward to teaching another class there next year and I'd welcome suggestions about the project for the class.


After the thirteen hour drive home, I saw that the snow had converted to "corn snow" which is a pebbly, icy kind of snow that signals the beginning of maple syrup season. If you want to meet me in my best mood of the year, come right now and walk to the taps with me.


Here is Seth tapping his first tree.


And now the collection begins. I hope to boil the first batch by the end of the weekend.


Warm jars of fresh syrup should be just the cure for this hectic ride.

Monday, November 9, 2009

New Happenings

Recently I got a counterbore from Morris Tools in Tennessee for my arm to stile joints. Boy does it make a difference.


I used to first drill a "shoulder" with a large forstner type bit and then finish it with a smaller bit for the actual mortise. It wasn't impossible to line them up, but it took some doing. Once I reground and sharpened the cutting spurs on the counterbore, it drilled a gorgeous joint and the alignment was a non issue. Below is the finished mortise.


Also on the tool front, I've been meaning to mention that while in Atlanta, I noticed that Highland Woodworking carries the diamond profile parting tools in the 1/8th inch size. Folks have contacted me looking for this elusive creature after I posted that it was my preferred size for turning but especially for the way it works with my caliper. The smaller cutting edge means less vibration and resistance but still cuts a wide enough kerf to easily measure.

I'm not sure what it says about me, but one of the most exciting and fun things to enter life here is our new ice cream maker. It's of the old wooden bucket variety (but with a motor, sorry galoots) and we've been putting it through its paces. It fits perfectly with our plan to have our goat milking in the spring. After vanilla, we decided to try mint chip, but no extract and green food coloring for us, I found a recipe and headed to the garden to pick the mint. Yes, Sue is still mad that I put mint in the garden, we'll never be rid of it!
Below is the mint steeping in the milk.

Here is the finished custard.

And into the freezer.

And the finished ice cream (actually, I probably stopped a bit short, but it froze in the freezer fine)


By the way, half of the sweetener in the mix is maple syrup from last spring, just one more reason to look forward to next years sugaring season.

Monday, March 23, 2009

Spring Things


I worried all winter. Worried that I wouldn't make it back in time from Arrowmont to fully enjoy sugaring season. This may seem like a small concern, but for me, it's the one ray of hope that gets me through those last long months of winter. Luckily, I came home right on time. I won't be making as much as last year, but I'll stock Sue and I for the year. The photo is of my pal Andrew manning the rig. He came up from the city to brave the dawn cold and watch the sunrise over the boiling pans.

As the day wore on, it warmed up nicely, giving Lily a chance to lay in the sun and dream of chickens.


With spring so heavy in the air, we decided to expand our little enterprise to include goats. Below you see the chairnotes covergirl and interspecies peacemaker introducing our new additions to our dogs. We were lucky to find a wonderful local goat farmer who bottle feeds his goats to make them very human friendly. They like nothing more that to hang out and walk around with you, while tending to the lawn. I hope Mark from Jericho Farms is reading this. It was under his tutelage (and he thought he was taking a class from me!) that I started to understand the concept of living with the land, not just on top of it.


We hope to breed the female this winter for some spring kids and milk for yogurt and cheese. I guess I have another reason to look forward to spring.

Friday, March 14, 2008

The Decorative Edge

Painting chairs has always been challenging to me. Not because of the covering of the wood grain, I like the unified silhouette of a painted chair. I see painted chairs as belonging to two different concepts. One, normally a layered black on red, seeks to give the impression of a patina or stain, which gives the impression of age and a stately "wood" appearance. The other is a distinct color choice, such as green, red or blue that shouts, "I've been painted".

Coming from a fine arts painting background, the latter choice has always been more difficult for me. Perhaps I know all too well the potential for drawing attention to a poor choice!

Recently, I have been continuing to develop my line of rod back chairs, and this little side chair seemed a perfect candidate for some risk taking in the paint department.


First, I used a few undercoats of the Real Milk Paint company's goldenrod and then a mix of reddish brown. I then finished it with the peacock mixed with a little of the conifer green. If you haven't tried the paint from this company, I recommend that you do. It is a very different paint. At first I was turned off by the more matte finish, but the wonderful colors, bullet proof results and ease of use drew me back. I've been promising myself that one day I'd work to find a way to use this paint for it's strengths, and here I am.


After achieving the color and finish that I wanted, something seemed to be missing. I have toyed with the idea of using decorative detailing on a chair ever since Curtis Buchanan's birdcage chair inspired me to become a chairmaker.

My resistance has been twofold, not knowing what to paint, and not being adept at decorative painting. But fools rush in right?! So I did some practice painting on some scrap with the goldenrod and found my confidence growing. I am pleased with the results, it really pulls the chair together and my wife said that it is her new favorite. Talk about a review that counts!


Here are some more details. Much like the surface shaping in my chairs that reveal the handwork as you look closer, I wanted the details to break down into simple almost crude strokes up close. However, from a few feet away they fall right in line.

I will go into more detail about the Real Milk Paint company product soon, it's a worthy topic.


On the syrup front, below is a photo of three jars. The middle one is the syrup that I made today, a little under a gallon in about 8 hours, not bad for a homemade rig. The two used pans that I picked up sped the process but more importantly, increased the quality of the syrup beyond my wildest expectations.


Syrup is graded by color. The lighter the syrup the higher the quality. On the right in the photo is store bought grade A amber. This is the best stuff you can get in the grocery store and is about $16 a quart. You'll notice that the bottles are always thin and wide, which makes the syrup look lighter. On the left in the photo is the syrup that I made in my previous deep pans. I think that the depth of the pans caused the heat to dissipate too slowly and the syrup to degrade slightly to a darker tone. I'll use this as cooking syrup. The success of the new pans seems to be due to their shallow depth (I kept about an inch or two maximum boiling) which allows the bubbles to reach the surface quickly and give off their steam without scorching the syrup.

It is hard to describe the difference in taste. Some folks prefer the heavier taste of the darker syrups, but the lighter, more delicate flavor of the higher grades has almost a buttery flavor. I am excited for the next batch, although, the quality of the syrup tends to degrade as the trees get closer to budding, but then of course, it is truly spring and you won't find me complaining.

Monday, March 10, 2008

Burning Up

Obviously I enjoy making lasting objects in wood. There are no other materials that draw me so strongly. Maybe it's being able to walk through the woods, standing in the shadows of the trees or the logic of the growth that allows for splitting, bending and carving, whatever it is I am hooked.

But there is another way that I use wood in my life, and that's to burn. I heat my house and shop with catalytic woodstoves. Every shaving and chunk of wood that won't make it into a chair goes towards keeping my home comfortable. Somewhere along the way, I came across an explanation of burning wood that connected the heat released during burning to the years of exposure to the sun. The tree takes the energy of the rays and transform it into energy for growth, and when burnt, gives back that same energy.
So whenever I look into a fire, I feel like I am seeing all the sunny days that the tree lived, a pleasant thought in the dead of winter.

My favorite fire is definitely the one in my syrup boiler. There is something close to perfection in the cycle of tree sap transforming into syrup by the heat of burning wood. As my wife can tell you, once the snow on the ground turns to the pebbly "corn snow", I spend way too much time out in the yard trying to improve my boiling rig. I take it as a challenge to create and channel as much heat, from as little wood as possible, to boil off as much water, in as short an amount of time, to get the most syrup, with the least energy expended.


This is my boiling rig. It consists of a 55 gallon drum with a hole cut in the top that houses three stainless chafing pans (like the ones in steamer tables). A hole in the end allows me to feed the fire inside and the sand at the rear helps to force the heat up to the pan in the rear on its way to the chimney. The sides of the drum are lined with corrugated roofing and backfilled with sand for insulation.
The pride that I take in my rig seems to be directly proportional to how ridiculous and half baked it looks.

This year I have also added a pipe and blower to help combust the wood fully and keep the fire high when adding fresh chunks. The key to a boiler is to keep the heat constantly high, no smoldering low fires. The chimney usually shows no sign of smoking, just waves of heat. This is vital when the goal is to turn 5 gallons of water into steam every hour.


Here is the forge blower that my friend Neil loaned me, a perfect addition. You can see the cooler in the back. It is one of about 6 that I use to store the sap as I collect it. This one has a tube that automatically feeds fresh sap into the one of the boiling pans. Below is a short video of the pans at a full boil. I cycle the sap through the pans so that the first pan gets the fresh sap and the last one has near finished syrup.


When I became interested in making syrup, I read a book called "Backyard Sugaring" by Rink Mann. It has been a great resource. Don't get the impression that a complex rig is necessary. All you need to do is boil water, period. When the sap reaches 7 degrees above the boiling temperature of water at your elevation, you have syrup. Filter it through a piece of felt and enjoy. But be forewarned, I started with 6 taps and a single pan over a fire pit, the challenge of increasing efficiency proved to much to resist!

Sunday, March 9, 2008

Tapping Time

Well, after resolving my computer glitch (it began with a cup of coffee and a high tech modem!) I found myself swamped with chairs, students and the joys of spring. Of course, for me, the joys start early because of maple syrup making season. While everyone else is having cabin fever and griping about mud season, I am in my element, emptying buckets and improving my boiling rig. Below is a photo of my rig going full blast at about 6 am the other day.


Few things make me happier than sitting outside watching the sunrise like this. And a mere 10 hours later, I had a lovely gallon of high quality maple syrup sitting glowing like the heart of the tree.


I know, the payoff sounds like a few dollars an hour for my labor, but money has nothing to do with it. The simple self sufficiency of making our sugar for the year, as well as for friends while getting a full share of fresh air makes it priceless.

Thanks to those who inquired about the status of the blog. Things have settled down a bit and I am looking forward to posting more often.

Sunday, March 11, 2007

Running with the Sap


Well, my computer is still being repaired, so I have retreated into the world that I understand. Making syrup and making spindles. I've been looking forward to this day since the sap stopped running last year! I love making maple syrup, it gives me an excuse to get outside during a time of year that would otherwise just be a transition time from dirty snow to mud. The other day when I made a small test batch, Sue held the jar of still warm amber syrup and said that it was "like holding the heart of the tree". Standing in the woods, checking my buckets (I have 28 this year, should be enough for about 5 or 6 gallons!) I love the barren stillness. It's quite a feeling to step into the shop and chuck a piece of maple in the lathe throw a scrap in the fire and realize I'd be lost without wood.