I am in Melbourne teaching some classes and have lots of good stuff to share. New woods, new tools, new techniques and new friends!
One of the main obstacles here, is the different variety of timbers that are readily available.
The woods here are absolutely unknown to me, such as gidgee, red gum, kaori, myrtle, houn pine and countless others.
Glen Rundell and Alistair Boell have worked very hard and exercised a great deal of ingenuity to make the available woods suit the windsor form. It makes me realize just how lucky I am to live where there is such an abundance of suitable chair wood.
Because the available woods don't split well, the spindle and arm stock is sawn first while green, being careful to follow the fibers. Once in billet form, it's on to the shavehorses, where the wood, a form of ash, behaved reasonably well.
Since I've been here, I've learned a lot that I look forward to sharing, and in the tradition of classroom innovation, some of the differences here have spurred on new thoughts that I'll take home to advance my own work.
One especially interesting technique that Glen and Alistair have developed, is this strap for bending the continuous arm bow. Even the most well behaved local timber won't bend without some form of strap, and these straps that they've come up with are ingenious, and work great!
Given the limitations of the wood, this class has proven itself to be a hardy lot, and quick with laugh to boot.
Wednesday, December 14, 2011
Tuesday, December 6, 2011
Warn your Family!
Lately I've been using Old Brown Glue in the shop, It's great stuff and when the shop is cold, I'd basically end up making my own liquid hide glue to combat the chill, so why not just go with it already formulated?
One problem that I've heard of folks having with the stuff losing it's quality has to do with constant cooking. The stuff is only liquid at 70 degrees and above, so folks tend to take the bottle and heat it in a hot water bath. But just like food, heating and reheating breaks it down. So my solution is to take the bottle when it arrives and pour the entire contents into an ice tray and set it in the fridge (not the freezer). When the stuff sets up, I empty them into a ziplock.
Each cube makes a normal sized chair. I simply melt one cube in a cup that I immerse in hot water. Reheating a few times won't affect the glue, but I do discard whatever is left after each chair.
Be sure to warn your family so that they don't mistake the glue for some tasty treat!
As usual, I have been discovering new uses for felt around the shop. This time, it's some soft felt that my friend Dana gave me. When working with shaved walnut, it's a bit too easy to ding it up, but the felt on the clamps works great with no loss of gripping power.
I am heading to Australia today to teach a few classes at the Melbourne Guild of Fine Woodworking.
I'm hoping that the longer days will give me a chance to catch up on my blogging!
Below is a gift from my hosts, a real Aboriginal boomerang. I've always been fascinated by these objects and have longed to make one. They fit my definition of a perfect wooden object. The wood is perfectly suited to this use for its strength, beauty, workability and durability. I nearly choked when they presented it. I'm looking forward to the new woods that I'll experience there.
And for my friends in Atlanta, here are the kids in their new home. I was going to leave them and my brothers house until I returned, but it just didn't feel like home here without them. This is the view from the kitchen window. They are loving the new surroundings.
See you on the other side!
Monday, November 21, 2011
Not What I Meant!!
I've been getting some feedback that tells me that my last post might have been misconstrued. My pal Dan came over and said, "So, you finally got sick of people bugging you!?"
Then, a few sheepish "I hate to bother you" emails and I figured that I need to clarify. I pointed out the search box because I thought that it would be helpful. Please feel free to contact me, but be patient for my reply, as lately I've been overbooked!
Here is some of what has been taking my time. The class in Atlanta was small, but a great success. I've been using this simple drilling aid to help students drill the bow.
I know, I know, it's better to teach skills then jigs, but coming in at the end of a 65 hour work week and asking students to drill their bows by eye (which is a very achievable skill, by the way) proves to be a bit inhumane. Some visual guidance is helpful, such as placing a spindle near the hole and against the bow, but I figured, why not take a minute and make the aid more focused.
The jig is basically a tuning fork shaped block of wood with a dowel drilled into it that fits in an aluminum tube that sits in the mortise in the deck. The aluminum tube make the jig adjustable for height. The rubberband around the dowel locks the height.
Here you can see that pointing the top of the "tuning fork" helps find the center. Notice that the spring clamp is place so as to not affect the position of the "fork".
I've used this in a couple of classes now, and the chairs come out great and the meltdowns have stopped! There are plenty of hurdles in this race and I think that this fits fine within the goals of learning, having fun and building a great chair.
Plus, the result speak for themselves.
Here is another student from last week. Jack has made about 30 chairs, so he was ready to tackle my most complex style.
We had fun making this one and I got to bone up on teaching it, which is good because it's one of the classes I'll be teaching soon on my travels.
Jack really befriended Rocket, I had to tear him away from the poor dog just to get some work done! So Jack, this one's for you.
Labels:
Drilling Technique,
Shop Tips,
Students Work
Friday, October 28, 2011
What you might not know about this Blog.
I get a lot of emails and calls with questions, and I welcome them. After all, I'm just another guy in his shop, scratching his head and looking for answers. The blog technology has proven to be a great way to share information, and in recent times, I've found myself searching for things that I've covered in it.
Here's what you may not know. The little white box in the upper left corner is a search box. Besides using the catalog of titles on the right to access info by category, you can just put a key word in the box and every post that is relevant will pop up. It's a great way to cut through to just the info you want.
Give it a try! But rest assured, I still welcome the calls and emails,
My other workshop |
Give it a try! But rest assured, I still welcome the calls and emails,
Thursday, October 27, 2011
Tool Junkie Heaven
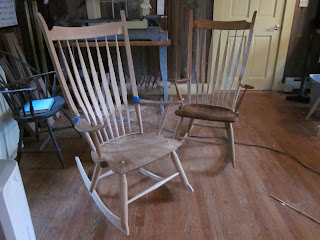
Last week, I had Glen Rundell from Australia here to build a Crested Rocker, like the one in last years Fine Woodworking (shameless plug). Glen is also hosting me in Melbourne as I teach 3 classes and give a lecture this winter. You can see more about this at the Melbourne Guild of Fine Woodworking (shameless plug #2).
Here is Glen in the new shop. Technically, he is the first person to build a chair inside these walls in 150 years or so!
Here is his chair in progress. Note how perfectly the spindles are sitting, even though they are only drilled into the seat, nice drilling Glen!
Here is the finished, though not glued (shipping you know) chair. The blue tape is a new aesthetic that I've been working with!
and here is Glen, hamming it up with his new tool chest.
He bought this patternmakers chest, full of the tools of the craftsman, including his brand and glasses (see Glen's face) from Patrick Leach. I first stumbled upon Patrick's website about 13 years ago while learning more about handplanes. It is the most exhaustive source of handplane and tool knowledge that I've come across. What I didn't know, was that he lives about 30 minutes from my new house.
So I went with Glen to pick up some tools that he'd ordered.
Now, we've all stood at a dealers table full of tools that we've only seen in pictures in complete awe. Well, this is where those tools live. Unbelievable.
Patrick was generous to let us take photos of his tool crazed man cave.
When you keep your Stanleys like this, then you are either a dealer, or have hoarding issues, or both!
Frankly, I think that keeping these moulding planes in an original Starret display case is just rubbing it in.
Then Patrick took us on a tour of the inner sanctum. His private collection.
One could spend weeks in here. Patrick has a variety of old chests and collections that he refuses to break up. Good on you Patrick.
He pointed out with pride these salesman sample books of ivory rules.
I left Patrick's with a simple froe blade, secure in the knowledge that if I ever need a tool, any tool, I know where I can get it.
Labels:
History,
Students Work,
Tools
Tuesday, October 25, 2011
Rocky Brook Chair Shop
I've taken some field trips recently and have learned more about the chairmaking that took place on our property. The original builder, in 1800 was named Newton Burpee, and he built chairs in the Rocky Brook Chair Shop across from the house. It was a stream powered operation. The part of the land with the stream was later sold into conservancy.
Here is a painting of the chair shop that I came across at the local historical society.
You can see the tree and wall on the left side of the painting are still quite clearly visible. The foundation is still quite intact, but is more difficult to see in the photo.
Here is another painting from the other side, showing the dammed up pond.
And here is the pond now.
This wheel was in the shed behind the house and came from either the chairshop or the mill next to the house.
As you can see, Sterling was quite the hub for chairmaking. Here is the chair room at the historical society. It was a delight to walk in this room.
The curator was clearly excited to have a chairmaker back in town and offered to let me take the chairs to my shop to study etc...very kind.
The chairs below were produced by Newton Burpee in the shop.
Here is his brand.
They also had some lovely Birdcages in the display.
I love seeing the slenderness of the parts. Below is a map of all the chairshops in Sterling in the 19th century. Each shop is a red dot. The curator of the museum said that wherever there was a stream, there was a shop.
Usually, I'm not one to revel in the history of the chairmaking, preferring to think that my role is about the future of the craft, but living in this house and this town has certainly brought the continuum of it all into focus.
Monday, October 24, 2011
Shop Vac Turning
Here is a short video of Glen Rundell roughing out some blanks using my shop vac and a large gouge. I started roughing this way a while back, and besides the noise of the shop vac, I can't find a reason not to do this. Besides the heavy shavings that get sucked away, the fine dust never makes it airborn!
I have new contact info for anyone trying to call or write me.
You can reach me at
127 Beaman Rd.
Sterling, MA
01564
(978) 563-1425
I have new contact info for anyone trying to call or write me.
You can reach me at
127 Beaman Rd.
Sterling, MA
01564
(978) 563-1425
Labels:
Shop Tips,
Turning Technique
Sunday, October 23, 2011
Field Trip, Part1
After moving, I finally have internet and phone access again, so it's time to catch up on all the goings on here. Seth and I recently traveled to Irion Lumber out in Pennsylvania to get some wood. I needed some air dried walnut for some chairs and Seth was in the market for the wide butternut that Lou Irion had in stock. We were not disappointed. Here is Seth inspecting one of the 20" plus board that Lou had set aside for chair seats. Look at these monsters!
The field trips that I've been on recently have been helpful in calming all the chaos that goes with moving again. Irion is a paradise for the wood lover. Lou comes from a furniture making background and not only knows what we are looking for, but is helpful in meeting our specific needs. It didn't hurt that he knew that we were 8 hours from home.
Below is Seth in the air drying shed. There are many buildings on the property that hold the dried stuff, and when the doors slid, my jaw nearly hit the ground.
Usually, I am not a typical "woody" swooning over figure and exotic colors and widths, but this place is simply amazing.
Thanks Lou, for letting us look through the stacks and hanging out in the rain!
Subscribe to:
Posts (Atom)