Tuesday, September 7, 2010

Next Year Already

Here are the studio photos of the fan back side chair that I'll be teaching at Kelly Mehlers School in Berea next year. You can check his web site soon for more info. For those of you who don't want to wait until next year, there are still openings for the class at Highland Woodworking in Atlanta.


A fellow that sent me to this link about an inshave made by Pfeil. While I already have way more than I need in this department, I am very curious about it. I love their carving tools and the price seems very reasonable for the kind of quality that they produce. If anyone has any experience with this please let me know, thanks.

Friday, September 3, 2010

The Hammer Eye Joint, sort of...


I used to have and enjoy the Fine Woodworking books that compiled all  of their readers tips and tricks. One of them that really caught my eye was the hammer eye joint cutter submitted by some fellow named Dave Sawyer from Vermont. At that point, I'd never heard of Dave and never come close to making a chair, but something about this joint intrigued me.

The Hamer Eye Joint, sort of

Basically, the joint is like that which holds a hammer head on the handle. The hammer head has an hourglass shaped mortise and the handle tapers on the bottom of the tenon and is flared with a wedge on the top. This creates a mechanical lock that won't let the hammer hear move either direction. Brilliant, and it works in chairs too!
The Shouldered Tenon
One of my goals has been to build a chair wherein the glue is an afterthought, a sort of belt and suspenders approach. Even once the glue has turned to dust, I'd love my chairs to stay tight.
 The reason that I say that it's "sort of" a hammer eye joint, is that I've begun using it, but with more of a shoulder at the base than a taper that I'd ream. The shoulder, which you see int he photo above, is made with a simple cutter, like a straight pencil sharpener (I'll show how to make it next).
  
Measuring the Spindle
To get the shoulder line in the correct spot on the tenon, it's vital to get an accurate measurement of the length of the exposed spindle. Here you see my recent student (and guinea pig) Peter measuring the length with some taped together bbq skewers (is there anything they can't do?).

Once the tenon is cut (we'll go into this later), all thats left is to flare the top of the mortise with a file, only the end grain portions, so that you have an oval that the wedge will fill.
Notice the Gaps

When done correctly, the shoulder on each spindle stops the arm as you tap it down, and in the correct position. And then the wedge seals the deal.

The Flared Tenon End
Once locked in place, and combined with the moisture swelling of the superdried tenon, it's as solid as can be. This is especially desirable on the short spindles, where the thin arm offers very little glue surface and the joint takes a lot of stress through use. Of course, pinning the tenons is also a fine solution, but I think the results justify the little extra effort it takes to make this joint. Actually, I've found that it cuts down some of the spindle shaving time, so it's a win win.

Here are a couple of recent students with their finished chairs. I'll be making a few announcements soon about my teaching schedule and classes. Thanks to both of these fine fellows for their help experimenting with this joint.

Peter Nissen
Mark Foehl


Thursday, September 2, 2010

Magic Numbers

When I first read about working with green wood, I recall being overwhelmed by all the talk of equilibrium moisture content,  tangential to radial shrinkage ratios and wet dry hygrometers. Clearly, you need an advanced degree to sidestep the lumberyard and work with green wood!
 

Of course, in time, I came to understand what all of those things mean, but most importantly, I came to recognize that there are a few common sense pieces of information that can replace them. 

The basic notion has two parts, 
Part 1. Wood has moisture in it and shrinks as the moisture exits and swells when it comes in.
Part 2. Wood shrinks more along the growth rings than it does across them. This is why  becomes oval when turned green.

I used to split all my turning stock green and immediately turn my chair parts, leaving the tenon ends oversized. Then I'd dry the tenon ends and re-turn the final tenons once the wood stopped shrinking. Now I prefer to rough out all my stock green, then air dry it in my shop for anywhere from a few weeks to, well, forever.
This gives me less warping and distortion after turning, a slightly better surface quality and less waiting time for the tenons to be superdried once they are rough sized. After the rough sized tenons are superdried, I chuck the turnings back in the lathe and take them down to the final size, removing just a few thousandths of an inch to get there.

So what are these magic numbers!? These numbers are the amount that I oversize a tenon based on the moisture in the wood. I know to expect a certain amount of shrinkage once the tenon goes in the kiln, and if I don't leave enough extra material, I won't have enough wood left to turn to the final size.

So let's say that I'm using a 5/8" mortise, which translates to .625". If the stock is green, I assume that the tenon will shrink along the growth rings (tangetial plane) about 60 thousandths of an inch, so I oversize the tenons by turning them to .695" or .700"(notice that I've added a little extra). The beauty in doing this green, is that you can estimate the shrinkage accurately. Because it hasn't even begun to shrink, it will be the same every time.


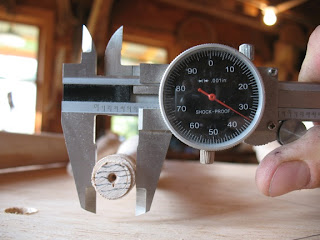
When using air dried stock, I oversize the tenons from 25 to 35 thousandth. So depending on how long the stock has been sitting around drying, I turn the tenons to .660" or .650". In the image above, I am measuring the tenon along the growth rings (tangentially), which I drew in pencil. This is the plane that shrinks the most. This tenon was turned at .655" and you can see that it has shrunk to .635". To me, this is close to ideal.


Here is the radial plane, and as you can see, it shrank much less, only 5 thousandths of an inch or so, which is to be expected. I am showing you this to knock home the idea that it matters a great deal which way you measure your tenons. Once you've done it a couple times, you'll get and get used to measuring them in the two orientations, then you can accurately tell when they've stopped shrinking and are ready to be final sized and assembled.

At first, it's reasonable to oversize the rough tenons too much, but with time, you'll get the rhythm and get closer to the final size. By the way, I have a special drill bit that I ground for those "special" tenons that shrink more than expected. Good luck!