Showing posts with label Farm Life. Show all posts

Monday, July 7, 2014

I'm still here

-->
I am always aware when too much time has passed between posts  because of the emails inquiring about my health, whereabouts and possible witness protection status. So I figured that an update was in order.
It has been an exceedingly busy year. As you may know, my book is in the final stages. I only have a couple of hundred more drawings to complete! I hope to see it in print this fall. Thanks for your interest and patience.
Around the shop we have lots going on. Besides Claire making travishers, I’ve brought another North Bennet Street grad into the fold. His name is Charlie Ryland and he has been helping me for the last few months keep up with my crazy work schedule. In the future, I hope to see him grinding drill bits for sale through the website. He’s a great addition to the team and you can meet him when we go to the Lie Nielsen open house next week or at WIA this fall in North Carolina.

I’ve had such a great experience  posting on the blog over the last 7 years and my goal is to expand this once I finish with the book and some other coming events.

One of the difficult parts of sharing my experiences online is moderating how much exposure of my private world is appropriate.  In continuing to share upcoming events, there are some changes coming that are sure to come with some questions, so I thought it best to come right out and share that Sue and I have decided to split up.
While it is clearly a sad thing to see a good thing come to an end, I am happy to say that we separated amicably and we remain good friends. I appreciate all the folks who have reached out to care for both of us through this last year. We are both doing well thanks to you all.

The completion of the book will hopefully go smoothly and leave me in a much more settled place where I can get back to what is most natural for me, namely horsing around making chairs and posting on the blog about my findings and fun.

Thanks for your continued visits to Chairnotes and please stay tuned for the changes as they come.

Monday, April 14, 2014

It was just a matter of time


I have a chainsaw, I have logs, I have goats...


I've been plugging away on loads of chairs and chair related projects, so I guess it's only natural to seek some sort of unrelated hobby for my free time!


My chainsaw is way too heavy to do any fine work, but I used it for the big chunks, then I turned to my favorite hatchet and finished off with a gouge.


 Between drawing the illustrations for my book and doing this, I feel like I'm right back in art school

But here, the critics are more forgiving.

Saturday, March 29, 2014

Lucky you! Pictures from my Southern Tour

Here are the bends from the class that I taught at Warren Wilson College just outside of Asheville, NC. I had Bill Palmer rig up a new steambox that we insulated and it held a nice high heat. We got 12 bends with no issues at all, which is a real achievement in a classroom setting. We were careful to open the door only briefly when retrieving our pieces and monitored the heat level carefully.
My favorite lunchtime retreat was to watch the new piggies running around on the college farm.
The class made balloon backs which might just be my new favorite chair to teach new chairmakers. It has the intense bend and plenty of opportunities to make sweet joinery. The shouldered tenon at the end of the bow is especially fun.

Here is a finished chair. Everyone finished up their chair before 4:30 on the last day and I was definitely proud of the way that they turned out.
They were very uniform too, they could have been a set. That would have suited Seth just fine as he now has the job of guiding a bunch of the students at the college through making a set for the college President. They are shooting high with their program of fine woodworking and I am excited to see where they take it. For the Presidents house, Seth designed the undercarraige that you see below. I like the cigar legs and higher stretchers, I think I'll swipe it.
Of course he was too busy helping the class along to finish his prototype, but you get the idea.
I also met a blacksmith while I was there by the name of Jason Lonon. He helped the college students make their own travishers and inshaves and he dropped by to talk tools with me.
Here is a drawknife that he made based coincidentally on one of my favorite styles.
A while back, I was fiddling with drawknife geometry and came up with one that I really love. I bent the handles a couple of ways to get it just right and now I keep it as a model for good geometry.
When held up to Jasons drawknife, they shared the same geometry, which took us both by surprise. He said that he would sell them for $200. You can contact him through his website at www.jasonlonon.com if you are interested in a gorgeous handmade drawknife.


Now I am back home, hoping to get in a boil or two (syrup season ran late this year), but mainly settling into not living out of a suitcase...for a while.

Oh, and last but not least, my Mom took great care of me in Atlanta, isn't she a doll!


Sunday, November 3, 2013

Fine Seats

 It's as busy as ever around here. I had two students in this week kicking off a bunch of fall classes that I have scheduled. Rick from Philly and Dave from Olympia made some really lovely chairs. I like the two person format, it's intimate enough that there is no lacking for attention and having multiple projects in play keeps the energy up.


Above is Ricks sack back seat. I always try to have folks do their seat clean up at the end of the day so that they can scrape to their hearts content. In this case, they really put in the time to get refined results.

Daves balloon back is one of the project chairs that I am including in my book, and the changes that I made to the design have made it more attractive and very comfortable. I don't have a photo of the finished piece because he already dismantled it for shipping. Take a moment to click on the image to see the fine job he did.
Winter is bearing down on us, as you can see it was already dark at 6 when Rick was driving his wedges.
Speaking of Winter, I took the time to get my ladies out of their summer home and into a shed for the coming cold. They free ranged the property for the summer, tearing up the gardens and entertaining the passers by.
They seem to be enjoying it, plus, I don't have to look all around the yard for my eggs!


And as with us all, they seem to appreciate a room with a view.


Wednesday, May 8, 2013

Box Shaped People


I bought a new push lawn mower the other day, and like a two year old at Christmas, I had much more fun playing with the box than with the mower.
I've spent lots of time thinking about the shaped of the spindles in the backs of chairs and because I use spindles, it's easy to get stuck thinking vertically. But the shape of the human body doesn't follow a singe vertical curve at every spot. So I started thinking about the relationships as they proceed horizontally. With the hardy cardboard, I mocked up this chair back by aligning four curves. It is surprisingly comfortable and sturdy.


 Each curve is actually slightly cones shaped. It was easy and took only a half hour or so, but it confirmed a lot of what I have been doing with my spindles and encouraged me to go even further.

Here is the view of the back. I started by pinning the piece together with drywall screws and adjusting them as I saw fit.

Then I took the small blocks of plywood and spun the screws until the plywood was sucked tight to the cardboard. The single board clamped to the workbench puts the support in just the right spot so I can rest my weight on it. From there, I mapped out the spindle shapes and will be making some patterns and dummies to further test it out. We will be working with this more to design some chairs at the class that Greg Pennington and I will be teaching at Kelly Mehlers in a couple of weeks.

As you can see in the chair below, I have been highlighting similar shapes in the flat spindles of my chairs for some time now.

This is my first walnut rocker with hickory spindles. Over time, the hickory will mellow to a lovely amber and the walnut will lighten. I didn't know exactly how I would feel about the contrast, but it is striking in person and quite pleasing.

I've accentuated the chamfers on the spindles which adds a lot of interest to their blonde color.
And spring is here, so we've got some new chicks in the house!!
Ten ladies should keep the whole neighborhood in eggs. The are growing like weeds, it's almost disconcerting.
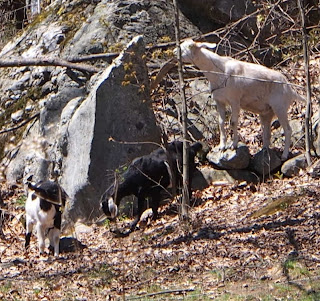
And I opened up the goat paddock into the woods so my kids could climb rocks and eat shrubs.
In case you don't see them, here they are, livin large, just like the rest of us.

Wednesday, October 24, 2012

Among the Trees

Every time that I step outside I seem to be fighting the trees. When they talk about the amazing colors of fall in New England, no one seems to mention that the clean up is worse than at Woodstock. I've been blowing leaves with abandon and clearing paths to the firewood that I split last spring.


After two eye blistering days at the computer and drawing board, I took to the woods to take down a couple of trees for next year. I know that winter is bearing down on me and I am woefully short on firewood for this year, but I still reverted to my favorite posture in the woods, playing.

I got a new hatchet at a garage sale recently and it holds an amazing edge. It's one of those blades that rings out when you tap it. So I took a few minutes and hewed one side of this ash log.

It isn't exactly a hewing axe, which would be flat on one side, but I sharpened it so that it was close to one and for a lefty too.
I got it reasonably flat. The blade held the edge and took great shavings but it would have been better with the correct geometry. It was all that I could do to keep from building a fort.


Monday, July 16, 2012

The Summer Jam Up!

 Posting on the blog usually takes a dive in the summer as the rest of my activities heat up, and this is no exception. But I have tons going on and lots that I want to share, so here is the valve wide open to clear some out!!
Here is my favorite mallet. I made it 12 years ago when I first moved from NYC to the country. I vividly remember trekking through 2 foot deep snow into the back of our rented 50 acres, where I found a fallen soft maple tree. It just seemed impossible that wood just lay on the forest floor after only seeing it on racks at Rosenzweig Lumber in the Bronx for so many years. So I grabbed a chunk, not caring if it was the best mallet wood, and I headed home to turn a mallet.

In time, I came to favor this mallet, not for its hardness, but its lightness. I have other denser mallets, but I feel they lack sensitivity, plus, I'm willing to beat this little piece of wood up if necessary.


But the other day, this mallet saved the day. I was watching my goats run about in their paddock (we've arranged them so we can watch them from the couch) when I notice a black mass running about, seemingly outside of their fence line. I thought it was Silky, but how could she get through the electric fencing?! As I walked to the window, it was obvious, that wasn't Silky, but the biggest bear that I've seen since leaving the safety of Manhattan.
As I ran across the kitchen and through my shop, I did what any self respecting woodworker would do, I grabbed my favorite mallet.
By the time I got out there, the goats were huddled in the paddock opposite of where the bear was and when I got close enough, I chucked the mallet.
It whizzed just past the head of the bear and made a thud in the flowers behind it, just enough to let her know that this was no easy meal, and she took off.
The next day, I retrieved my mallet from the flower bed, what? you didn't think that I was going to look for it then did you? there's bears out there!
So now this little chunk of wood has rest even higher in my esteem,
I think I'll name it Thor.

In between fighting off the local wildlife, I have been finishing up a settee order and decided to try out a product that my pal Jack McCallister suggested. I don't know about you, but I hate steel wool. I've done my best to eliminate rubbing out the whole piece with steel wool alone by using gray scotchbrite pads. But they only take the sheen so far and tend to be a bit aggressive, at least until they've worn down a bit. Jack suggested this stuff called Mirka Mirlon that you can find online.
I got the grey ultra fine and am very pleased with what it can do. It took too long to rub with just the ultra fine Mirlon, so I still start with the scotchbrite, except for the seat which scratches easily. And it also doesn't come up to the sheen that I like, so I finished with a quick touch with 0000 steel wool.


So if I'm still using scotchbrite and steel wool, what's the point? Well, the Mirlon does some things that the others can't. When rubbing down parts with sharp edges, like the turnings, it doesn't burn through the paint much at all, plus, you can easily form it into a "flossing" type action to buff out the turnings.


I love the way that the turnings rubbed out and I barely used any steel wool at all.


The photo above is before oiling, and the one below is after.


Like I said, there is more coming, so stay tuned!

Thursday, May 17, 2012

Sharp!

I've been working on a continuous arm settee and as I've been reaching for tools, I've been using my "sanding flap" wheel on the backs to help hollow them out for sharpening.  Today, I was finishing the cutout on the side of the seat, shown above, and figured it was a good time to take one of my favorite knives off the wall and give it a once over.

This cut is tricky on a regular seat, and even more so on a settee because the cove is all endgrain. Nothing but the sharpest knife will do.

So I got out my angle grinder (you have bought one, right!?) and went to work on the back of the drawknife. The knife that I use for this is very special. It doesn't have much steel left on it and I don't grind a bevel on it. Instead, I round the front (which rides in the cut) and flatten the back. Of course, a rounded front is very hard to sharpen because of the difficulty honing it. So the back is where the action is.

By flattening the back and honing it until a burr turns to the front, I get a great edge. I run through all of the stones on the back and only touch the front to the final stone and strop it lightly. I don't strop the back because I want it perfectly flat. With the hollowing help of the grinder, I got the thing sharper than I've ever had it and the cove on the seat was a breeze!
Click on the image for a closer look

Since I've been reforming my tools, I've picked up a new habit that I'm ashamed to say I didn't years ago. I've started oiling all of my edge tools with camelia oil before stowing them. It may seem like a little thing, but rust never sleeps and a sharp edge is a tiny place, easily affected.


Now I take the tool off the rack and give it a quick rub with a paper towel and let it sing.


Here is the settee, all legged up.

Since spring has sprung, I have been enjoying all the work that the previous owners of our house put into their gardens. Here is a rhododendron outside my shop window.


Great stuff, but poison to goats, so watch out.


Wednesday, March 21, 2012

The Travisher Refined

My love affair with the travisher began many years ago when I made my first one. Watching the shavings fly while the tool rides along the curves of a seat is pure pleasure. I've made many others since, but have always suspected that there was room for improvement. So recently, I set out to make a better travisher with the goal that it would be easier to use, more precise and more durable.
Here is the result.

The shavings that you see are from the endgrain of a pine board. I've added a brass sole plate to the tool after noting how quickly the sole, even out of rosewood wears. The rest of the tool is made from walnut.


I shaped and mated the brass to the blade, which I bent and heat treated to hold an edge appropriate to the use of the tool. Andy Jack and I have worked out the process to a point where the results are consistent and can hold a great edge.

Here is throat.


The radius of this travisher is a bit tighter than I used to make, about 3 1/2" and the blade is consistently set proud of the sole plate around the radius.

For a travisher to work properly, the sole must be slightly angled upward and curved so that the contact point allows the user to vary the depth of cut. It's very rewarding to put these details into the brass plate, knowing that they will last.

Andy and I are going to produce these, in limited numbers, for $200. I'm proud of the tool and as usual, it's all just a ploy to spend more time hanging out with Andy. Please email me (peter@petergalbertchairmaker.com) if you are interested in purchasing one and we will let you know the lead time.

You may have noticed my absence from posting for a while, and a few of you might have guessed, it's Maple Syrup season! Well, this year, I promised myself to go all out as a celebration of our new home and a hard and busy year. So, with the help of my brother Andrew, my pal Dan and the generosity of Ray Duffy, I built a new evaporator from a 275 gallon oil tank and bought some lovely pans to get a boil rate of about 12 gallons an hour. That means a gallon of syrup takes less than 4 hours to make, versus about 10 hours on my old rig!


Here is the tank, with a door from a barrel stove kit.

And here it is boiling away!

The pans are set up like a snaking trough where in fresh sap is introduced on one end which pushes the condensed sap through to the end where it is near finished syrup. It was a ball to watch and you can see how we drew the syrup off of the finishing pan up front. We tinkered with the rig a good bit, and on the last boil of the season, we got the whole surface boiling beautifully.

Here is the product.

You can see the different grades. The one jar is upside down to sterilize the lid. This is the best syrup I've made, with a distinct maple flavor and no sugary bite. I can't wait for next year.

But now, I'm off to Kelly Mehler's to teach with Greg Pennington for a couple of weeks, always a great time.

Tuesday, February 21, 2012

My Favorite Day

The phrase, my favorite day, could be taken a few different ways. Some might think that it's a reference to the "best" day of my life, like one would think of the birth of a child, or a game winning catch etc...but I mean something else.

Since I started trying to work for myself many years ago, it's been a constant struggle, not just to pay bills, but to make sure that the business that I was nurturing, was making me as happy as I had intended. Sure, with being my own boss, there is always the privilege of deciding my priorities and how to spend my time, but as anyone who has tried knows, it can be a huge burden. Just because you know your craft, doesn't mean you can manage your self with ease.

In the past few years, I've become aware of all the components that go into making a great day at work, and home, so that my favorite day can be revisited over and over.

 The other day, I had an especially good one. It started in the shop, doing some finishing work on a couple of walnut chairs.
 
 When I took a break to feed my animals, I realized that my little goat Silky was in season. Sue and I have gone back and forth about the logistics and priority of whether to breed her this year, and with the opportunity presented, we both firmly came down on the side of Do IT! So this summer, we'll have kids, milk, cheese and yogurt.

When we returned from the farm where her suitor lived, my brother set up my sap boiler to make some syrup, while I got back to work in the shop.
I don't have to tell you how much I love syrup season. I just ordered a new larger pan and will be building a new rig when I return from a seminar in Rochester this weekend. This rig was built by my friend Ray Duffy.  It works great, but if I'm going to make syrup for all my friends in the neighborhood, I need more capacity.

One of the easiest components to "my favorite day" and most readily accessible, is right here. I love working in the shop, having an idea and sitting down at the end of the day and sharing it. It's the perfect end to my work day. With that in mind, I am working on ideas for expanding this part of my day.

As for sharing ideas, here is one that I haven't directly featured, probably because I use it so constantly that I don't even notice it. Those who have taken classes with me will recognize this.


I use this to measure the angle of the center spindle in relation to the seat once the crest or arm is in place, amongst other things. This critical measurement has everything to do with the comfort and consistency of my chairs. Most of these protractors have two fins that stick down below the flat bottom. I simply grind them off and level them to the bottom with some sand paper on plate glasss.

Then, I make a small notch at he point where all of the angles originate and tape a piece of kite string to the back.
 Here is the protractor in use. Just place it over the center hole and position the string on the crest where the center spindle will hit. Then read the angle.

Of course the angle is different for different chairs. Most of my straight, round spindle armchairs sit at 12 degrees, side chairs at 8 to 10 degrees and curved spindle chairs vary with the curve, and the intended use.

Today is a sunny day, the sap is flowing, I have work in the shop to do and I've already posted, looks like it's going to be a good one!