Showing posts with label Bending. Show all posts

Monday, April 28, 2014

Hot Stuff

I recently rebuilt my larger steambox that I use for classes. I had such good results using the two steamers and insulated boxes in Atlanta and North Carolina, that I wanted to see what I could do.

Here is the box that I made. I used a tongue and groove that ran the length of the box to seal the sides and Gorilla glue to seal the joint. Since this photo, I've added a proper hasp.


The insulation is 1 inch thick foil faced and is just draped over the box. Without the foil face, the insulation will swell and warp. With this set up, and insulation on both ends, I was able to get the box up to 210.5 degrees f. With 212 degrees being the absolute highest that the temp can get without being pressurized, I call this a success.


When we opened and closed the door to retrieve the bends, the temp only dropped about 6 degrees and recouped the heat within minutes. One thing that I noticed was that one of the two steamer units went through water much faster than the other, and so I checked the wattage. Sure enough, my older one was 1250 and the new one that I bought at Highland was 1500. While the bends came off beautifully, I can only imagine that two 1500 watt units would be the ideal. Keep in mind that this box is 9 by 11 inches so that it can hold a whole class worth of parts and must keep the heat up with lots of door openings. On a smaller box, one unit is fine, especially if it's insulated.

Wednesday, October 23, 2013

Magic?


I've been recovering from my trip to WIA this week.  I felt incredibly proud to be there with Claire Minihan, Tim Manney and Caleb James. The next time you hear someone grumbling about todays youth...just send them my way and I will blow them out of the water with the talent and incredible work ethic of these three. I could go on and on about the show, it was a highlight of my year.


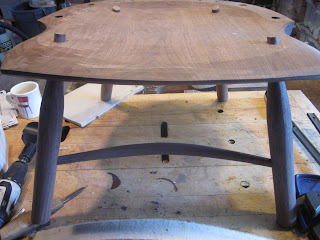
Here is a stool that I brought along. I really shouldn't have heaped building this onto my plate while preparing to leave, but I had this itch to build something new and fun and it certainly fit the bill.


The "magic" part of this is twofold. First of all, in the first photo, it looks like a 3 legged stool in the photo even though it has 4. With curved legs like this, that can only mean one thing. The sightlines run directly from the front leg to the rear on the opposite side of the seat. I've never done this before and am very pleased with the results.


The rear legs are closer together in the seat and are reamed at a slightly greater angle.

The other "magic" is the finish, which only took a few hours start to finish and came out great. I was hoping for a worn black lacquer look to go with the Asian style and am very pleased. I'll share the process in another post soon.

Thursday, April 18, 2013

Unambiguous

Making shapes in wood is what got me into furniture making. I recall seeing the sculptural curves in Sam Maloofs work and coveting his job. Don't worry, I won't be drawing any comparisons between what we do except to say that there is a lesson that I drew from looking at his results, and the results present in so many Windsors.
The basic idea is simple, each shape should have a geometric logic within itself and a sense of tension with the other pieces that it joins to. Without this, parts and entire pieces of furniture look "ooey gooey", like they are melting or have worn slack.
I have a few techniques that I use to help create the logic within a piece. Mostly, they involve following a series of geometric shapes as inbetween steps so that the final shape has a hidden framework that helps define it.

I was thinking about this today while shaping the curved stretchers for a rocker that I am finishing. I had some issues when bending the stretchers turned to their final shape, the tapers had too much runout and cracked. So I turned the piece at a cylinder and bent it. The bend went fine, but then it was up to me to carve the tapers.
As you can see, I shaved the round part into an octagon. Round is a time consuming and difficult shape to adjust and fair. When I have to remove a bunch of wood, I usually revert to the octagon, which makes it very simple. I just keep working on each facet until the taper of the facet is pleasing and matches the other 7. Then round is an easy step away. Note the felt on the bending form. It took a negative impression of the stretcher and left the surface of the walnut round and uncompressed.
Here is another shot of the stretcher, and yes, I can finally work outside.
Here is is inside the chair. I like the way that the stretcher "pushes" against the legs and echoes the curves of the rockers. The only issue is my every worsening reaction to the walnut, which might make this my last project with this great wood. But of course, never say never.


Tuesday, January 15, 2013

Yeah, But it's a Dry Heat

I am not a scientist. I think that the scientific method is one of the great achievements of mankind, but, I would never claim that I'd worked it thoroughly enough to deserve the designation. But I do want to know more about what I do, so the experiments march on.

Lately I've been thinking about bending. Perhaps it was having to bend some walnut after a recent bad experience that got the juices flowing. I read literature that remarked on the moisture content of steam as it related to wood bending and the concept that steam piped into a box might be lacking moisture. Of course, heat is the primary element in bending wood, but moisture is the conductor. As I understand the concept, the moisture can drop out of suspension in the steam en route to the box and what ends up making it into the box could be heat, but not as wet as it could be.

So to see if my steam needed wetting or if there was any difference in my bends, I attached a reservoir below my steamer that the hose from the steamer runs to so that the heat must pass through water as it enters the box, ensuring that the moisture content was at it's highest.


When I start up the steamer, the steam boils the water in the jar. So far, the results have been positive enough to warrant further testing.


Here are two bends. The same wood, air dried walnut, steamed for the same amount of time, 90 minutes. The piece that bent didn't raise a single fiber even though the fibers ran out the side more dramatically than the failed bend. And yes, the only difference was that one was steamed with the reservoir and one without. Of course, the successful bend was with the reservoir, and as far as free bending walnut, it's the tightest bend that I've done.


I've done other samples and gotten similar results. One factor that interests me is how this effects long steam times. Imagine that the steam isn't adding enough moisture, this may never be an issue with green wood or short steam times, but for working air dried or even kiln dried, this could make a difference.

Like I said, I'm no scientist, and I'd love to here from you about your ideas or experience. I am planning some tests with kiln dried white oak that I'll post soon.


Tuesday, August 28, 2012

Cool Links

Here are a couple of cool links that you might enjoy.
First, a video showing the results of tests concerning the effects of chipbreakers on planing. This is the kind of nerdy stuff that I love, not only is the information fascinating, but the visuals are hypnotic. If you are stuck in front of your computer, it will definitely give you a woodworking fix. Thanks to Pat Tipton for sending me this link!

Next, you might like to check out the blog that Caleb James is writing. He was a student of mine and during our time together, I was inspired by his talent and attitude. He is definitely one to watch.
His blog is http://kapeldesigns.blogspot.com

I have loads happening around here, especially getting prepared to teach next week at Marc Adams School in Indiana, I hope Greg remembers the Scotch this time.


Wednesday, February 1, 2012

IMHO

I believe the the shavehorse is one of the greatest inventions ever. The rhythm and ease of working on one comes so naturally to folks that it seems to link right into our DNA. That being said, I've seen a lot of different designs and have tried to be diplomatic about my own preference (really, I've tried!).

I think that the dumbhead style shave horse that allows for the head assembly to be adjusted both up and down and forward and back, with an adjustable foot treadle is the most versatile and comfortable style around. Here is John Waters (an Aussie pal) sitting at my favorite style. You can find plans for it here.


There is another style of shavehorse that I run into a lot, and frankly, I'm not a huge fan. It's not that it doesn't work, it's just that I see more folks working awkwardly or getting frustrated while on it. I don't bring this up to be disparaging, but because I found that some subtle changes might improve it and if you have one, you might consider them.


While in Melbourne, where all of the shavehorses were like the one below, I noticed that the angle of the platform that the workpiece rests on seemed a bit steep. If you look at the wrists of Wayne in the photo, you see that they are out of alignment with his forearm, and his forearm is out of line with the spindle. This means that he must constantly adjust his wrists to keep the drawknife shaving consistently. Not a recipe for success, or comfort.


So I bullied my friend Bern into chopping up his newly minted shavehorse to try a hunch. I like a 10 degree slant to my platform. When Bern did this, the change was notable enough to justify chopping into the other 11. Look at Berns body position in the image below.


Not only is he a fine example of an Aussie craftsman, but he looks good, and comfortable doing it! You might be saying, yeah, but what if you are super tall? Well, lucky for us, they grow em huge over there and we had a 6'7" student who agreed that the shallower angle was a welcome change. Go figure.

Another change that you might consider if you are riding one of these, is to make an adjustable foot treadle. It wouldn't be too tough and I think that you'll notice that your energy is better spent when the treadle is properly adjusted. I suppose that the concept of the horse and the platform that ratchets up is supposed to make this unnecessary, but I'm just going from experience of watching folks use it.

And finally, I've notice that on lots of these, the platform extends too far forward and makes working on small pieces or near the head tough. So chop it off.

Here are a couple of ideas that I picked up from my friends Down Under that I will be putting to good use.


I've been meaning to do this to my continuous arm forms for some time, but seeing as they beat me to it, I give them full credit. If you are unfamiliar, the form usually has a tighter bend and a piece of angled steel that holds it in position away from the form. But since this is the position that we want, why not just make the form to fit!

And here are their wedges, with the clever cut out to make knocking them out easy (no more tapping the thin edge!).


Here is a seat carved from Kauri. It's pretty hard compared to our pine, or even poplar!


Not all of it was this figured, but it sure made for exciting carving. They assured me that it was a soft wood, but then again, they kept warning me about drop bears and hoop snakes as well!

Wednesday, December 14, 2011

A Hardy Lot

I am in Melbourne teaching some classes and have lots of good stuff to share. New woods, new tools, new techniques and new friends!


One of the main obstacles here, is the different variety of timbers that are readily available.
The woods here are absolutely unknown to me, such as gidgee, red gum, kaori, myrtle, houn pine and countless others.
Glen Rundell and Alistair Boell have worked very hard and exercised a great deal of ingenuity to make the available woods suit the windsor form. It makes me realize just how lucky I am to live where there is such an abundance of suitable chair wood.


Because the available woods don't split well, the spindle and arm stock is sawn first while green, being careful to follow the fibers. Once in billet form, it's on to the shavehorses, where the wood, a form of ash, behaved reasonably well.


Since I've been here, I've learned a lot that I look forward to sharing, and in the tradition of classroom innovation, some of the differences here have spurred on new thoughts that I'll take home to advance my own work.

One especially interesting technique that Glen and Alistair have developed, is this strap for bending the continuous arm bow. Even the most well behaved local timber won't bend without some form of strap, and these straps that they've come up with are ingenious, and work great!


Given the limitations of the wood, this class has proven itself to be a hardy lot, and quick with laugh to boot.

Wednesday, September 14, 2011

Back in the Saddle

As usual, summertime has been a tough time to sit down and keep up with all that's happening in the shop. But what's unusual is all the peripheral activity that has taken up my time. House selling and buying is one long stomach ache inducing activity! But enough of that, I'm taking refuge in building a settee.


I've never bothered to build a long steambox, so I simply bend the long arm one half at a time. I let the first side sit for about a week before bending the other. I am very pleased with the quality of this red oak.


Recently, I finished these two Birdcage armchairs. I'll take some detail shots next.
 

For a simple break after these two complex chairs, I built this walnut stool. I am hoping to start producing more of these.


They have just the right balance of fun to make, quick, and a satisfying conclusion.


It seems that Lily is having a tougher summer than usual, she broke a blood vessel in her ear and is stuck in the "space dog" mode. I've never seen her so bummed.


But Sue is thriving here in Massachusetts, we've been enjoying all the trails and scenic beauty of our new region, not to mention the raspberry patch!

Thursday, August 11, 2011

My Two Cents

Thanks for all the great suggestions on the Centerline Challenge. I read them all and even took some influence from some of them.
 I think that the simplest and possibly most elegant suggestion was to keep the piece in the form and set the form on the bench and simply scribe a line using the bench as a reference. The only reason that I didn't adopt this method is that it only marks one side, and sometimes I need to mark the other. To which, I thought the idea of leaving a gap in the center of the form panels to allow a pencil was a great idea!

I also loved the notion of using a shadow line. While it may not apply here, I have a feeling that it will be used in my future.

On the wishful thinking front, I'd love a laser that could just burn in a line. As you will see, a great many of the suggestions hit on my solution. So here is my take,


Here are a few stills of the jig in action. I loved the comment that my solution would be elegant, but not so pretty, I guess you folks know my affinity for the grotesque.


Thanks again for all the brain power, I'll be tapping it again soon!

Monday, August 8, 2011

The Center Line Challenge

Recently, I had a brain storm about finding the straight axis of a bent chair part. In my recent work, being able to register the axis of a bent piece has become increasingly important. So to ease my way, I thought of a method for marking the center of a bent piece, quickly and accurately.

As you can see below, when you look at the  piece so that the line is closest to you, the piece is split evenly and looks straight.


But as you see here, the piece has a curve.


By aligning this line with my sight line, I can use it as a reference to get the angle correct and very importantly, the rotation. Unlike straight parts, the rotation plays a huge role in positioning a bent part.

Of course a chair like the one below has oodles of complex reaming and positioning. I hope to go into this more later.


So here's the challenge. Before I tell you my idea, I want yours. How would you go about accurately marking the center axis of a bent piece? Remember, some pieces are bent in more than one direction like the one below (but only in one plane, for now!).


So think it over, stay up all night, drink 12 cups of coffee, climb a mountain and meditate...Whatever it takes, who knows, your idea might be a lot better than mine! I'll post the top three (IMHO) methods.

Friday, August 5, 2011

Curtis has been Busy!

Here are a few more installments in the video series that Curtis has been making. Enjoy
You can watch it here or click on the title to go to Youtube to see the hd version.

Riving and Shaping the Comb


Carving the Volutes


Final Shaping the Comb

Tuesday, June 21, 2011

Summer Rhythm

Every summer, I find myself more drawn to doing things away from the computer, so the blog suffers...but it's not for lack of interesting action, as a matter of fact, I've got a whole backlog of topics that I am trying to muster the self discipline to post!


Getting used to life in Massachusetts has been a rollercoaster, not just for me. The chickens had a large in barn coop, but I couldn't stand to see them indoors, so I built a new summer tractor for them. I have to move it every day or they completely obliterate the lawn.

In a past post, I spoke disparagingly of red oak, noting that I was probably experiencing a regional deficiency. Well, no such trouble here. I've found a great resource for logs (JB Sawmill in Hopkinton) and they have some lovely red oak. As you can see, it bent very nicely.


When I bent this, I thought to myself, "OK, I can live here".

Below are my first students in the new shop. Jerry and Steve. We had a fine time and the shop served us well. I'm surprised to say that I am as pleased with this shop as with the one that I built. It actually has one advantage, northern exposure. This means that I can turn out the lights and use a raking light easily, which makes surface flaws much easier to see.


Next year, they are bringing another family member into the mix.

Following up on my recent posts about felt, I keep finding new uses. Clamping the shaped backs of fan and combbacks has always presented a problem. The ear is thin and too weak for clamping, which leaves the next thickest part, which is the transition from the ear to the back. I used to have some carved clamp pads, but now I just use the thick felt.


You can see the impression made by the arris. I've found that popping the felt pads in the steamer for 10 minutes will swell them back to square and they are ready to use anew.

About the only thing missing from the shop, was my trusty companion, so I removed the old horse stall door and installed it as a half door on the main entrance to the shop.


Now Lil and Rocket can come and go from the house as they wish (Rocket of course stays in the house, on the bed)

Tuesday, May 17, 2011

Everything's a Nail


The old phrase "when you're holding a hammer, everything looks like a nail" ran through my head all day today in the shop. I was doing the finish assembly on a Birdcage armchair and at every turn, my shipment of felt from Duro-Felt kept coming into play. (No, I don't own stock in the company!)


I purchased the hard felt in 1 inch and 1/2 inch thickness to see what applications it might have beyond the clamping that I showed before. When working with near finished parts, especially round ones, I am constantly fighting little dents, flats spots and dings from the vise or shave horse. So I took the 1/2 inch stock and cut some off on the bandsaw (probably a sin) and used it in the shavehorse to buffer the parts. 
When I release the pressure on the horse, the felt opens as well and I didn't even notice it, except that I didn't have to go back and fix any dings!

Round pieces are a pain to bend, work and hold without creating flats, but in the vise, the felt worked great. The hold is just as firm.


And of course, the stuff is perfect for sanding pads. I could tell that the amount of time that it took to sand a faceted crest was cut down substantially and the pieces came out more even. From what I've read, it also helps the paper last longer.  The only question on my mind is where will it come in handy next.